Difference between revisions of "Android EN"
From CMU ITSC Network
| (One intermediate revision by the same user not shown) | |||
| Line 1: | Line 1: | ||
| − | <h2><b>Connecting to @JumboPlus5GHz on Android </b></h2> <br/><br/> | + | <h2><b>Connecting to @JumboPlus5GHz on Android </b></h2> <br/> |
| + | * [[Jumbo Android Guest EN | For Guest Account]] | ||
| + | <br/> | ||
1. Go to '''Settings''' >> '''Wi-Fi''' >> '''Turn on Wi-Fi''', then select '''@JumboPlus5GHz'''. | 1. Go to '''Settings''' >> '''Wi-Fi''' >> '''Turn on Wi-Fi''', then select '''@JumboPlus5GHz'''. | ||
* If you only see '''@JumboPlus''', it means your device supports only the '''2.4GHz''' frequency band. | * If you only see '''@JumboPlus''', it means your device supports only the '''2.4GHz''' frequency band. | ||
| Line 7: | Line 9: | ||
* Staff → Username: Firstname.Surname@cmu.ac.th <br/><br/> | * Staff → Username: Firstname.Surname@cmu.ac.th <br/><br/> | ||
[[File:android_jumbo2.png|556x556px|link=]] <br/><br/> | [[File:android_jumbo2.png|556x556px|link=]] <br/><br/> | ||
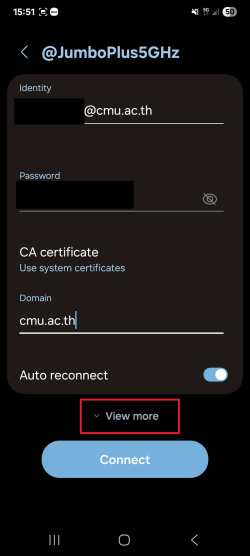
| − | 3. Tap on '''CA certificate''', then select '''Use system certificates'''. In the '''Domain''' field, enter: '''cmu.ac.th''' | + | 3. Tap on '''CA certificate''', then select '''Use system certificates'''. In the '''Domain''' field, enter: '''jumbo.cmu.ac.th''' |
<pre style="color: red"> If your device does not have the option to "Use system certificates", select Do not validate, unspecified, or none instead.</pre><br/> | <pre style="color: red"> If your device does not have the option to "Use system certificates", select Do not validate, unspecified, or none instead.</pre><br/> | ||
| − | [[File:android_jumbo3.png|556x556px|link=]] [[File:android_jumbo4.png|556x556px|link=]] [[File:android_jumbo5.png|556x556px|link=]] <br/><br/> | + | [[File:android_jumbo3.png|556x556px|link=]] [[File:android_jumbo4.png|556x556px|link=]] [[File:android_jumbo5-2.png|556x556px|link=]] <br/><br/> |
4. Tap '''View more''' (or Advanced settings). <br/><br/> | 4. Tap '''View more''' (or Advanced settings). <br/><br/> | ||
[[File:android_jumbo6.png|556x556px|link=]] <br/><br/> | [[File:android_jumbo6.png|556x556px|link=]] <br/><br/> | ||
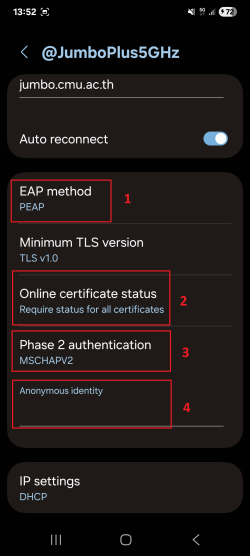
5. Make sure the following settings are correct: | 5. Make sure the following settings are correct: | ||
* EAP method: '''PEAP''' | * EAP method: '''PEAP''' | ||
| + | * Online certificate status: '''Require status for all certificates''' | ||
* Phase 2 authentication: '''MSCHAPV2''' | * Phase 2 authentication: '''MSCHAPV2''' | ||
* Anonymous identity: '''Leave this field blank'''. (If it auto-fills, delete the content.) <br/><br/> | * Anonymous identity: '''Leave this field blank'''. (If it auto-fills, delete the content.) <br/><br/> | ||
| − | [[File:android_jumbo7.png|556x556px|link=]] <br/><br/> | + | [[File:android_jumbo7-2.png|556x556px|link=]] <br/><br/> |
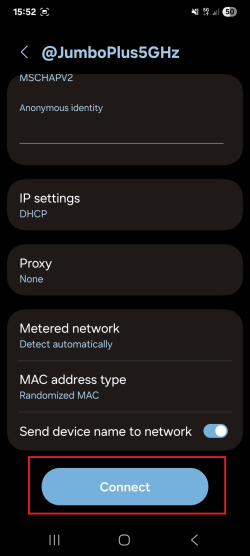
6. Scroll down and tap '''Connect'''. <br/><br/> | 6. Scroll down and tap '''Connect'''. <br/><br/> | ||
[[File:android_jumbo8.png|556x556px|link=]] <br/><br/> | [[File:android_jumbo8.png|556x556px|link=]] <br/><br/> | ||
7. Once connected to '''@JumboPlus5GHz''', your device will remember the network and automatically connect when in range. <br/><br/> | 7. Once connected to '''@JumboPlus5GHz''', your device will remember the network and automatically connect when in range. <br/><br/> | ||
[[File:android_jumbo9.png|556x556px|link=]] | [[File:android_jumbo9.png|556x556px|link=]] | ||
Latest revision as of 08:38, 8 January 2026
Connecting to @JumboPlus5GHz on Android
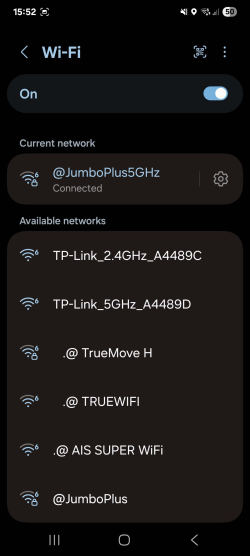
1. Go to Settings >> Wi-Fi >> Turn on Wi-Fi, then select @JumboPlus5GHz.
- If you only see @JumboPlus, it means your device supports only the 2.4GHz frequency band.
- If you see both network names, your device supports the 5GHz frequency band. It is recommended to connect to @JumboPlus5GHz.

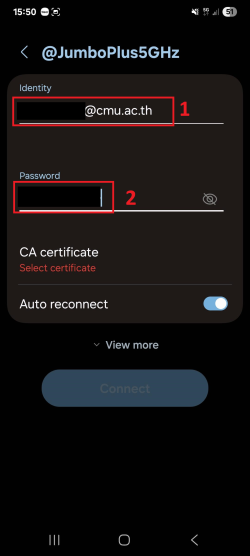
2. Enter your CMU Account in the Identity and Password fields
- Students → Username: Firstname_Surname@cmu.ac.th
- Staff → Username: Firstname.Surname@cmu.ac.th
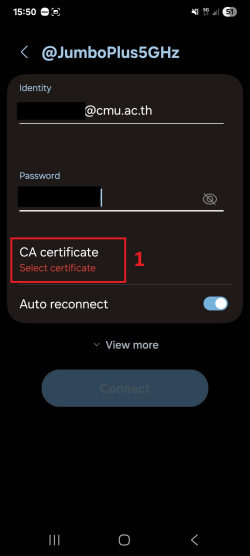
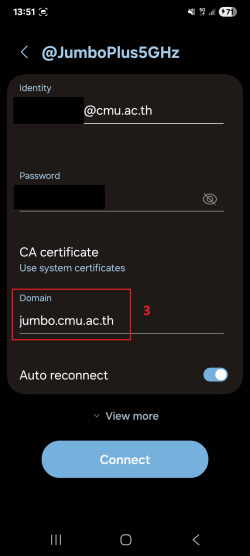
3. Tap on CA certificate, then select Use system certificates. In the Domain field, enter: jumbo.cmu.ac.th
If your device does not have the option to "Use system certificates", select Do not validate, unspecified, or none instead.

4. Tap View more (or Advanced settings).
5. Make sure the following settings are correct:
- EAP method: PEAP
- Online certificate status: Require status for all certificates
- Phase 2 authentication: MSCHAPV2
- Anonymous identity: Leave this field blank. (If it auto-fills, delete the content.)
6. Scroll down and tap Connect.
7. Once connected to @JumboPlus5GHz, your device will remember the network and automatically connect when in range.