Nginx
บทนำ
เนื่องจากสำนักได้ให้บริการ private cloud แก่ส่วนงานต่าง ๆ ในรูปแบบ Infrastructure as a service นั้น
โดยปกติ work load ที่ deploy นั้นสามารถ run application ต่าง ๆ ได้แล้วติดต่อกันได้ผ่านระบบเครือข่ายภายใน
ส่วน application ที่ต้องบริการทั่วไปโดยต้องรับการติดต่อจาก Internet ซึ่งส่วนใหญ่จะเป็น web application
เพื่อให้ผู้ใช้งานจาก Internet ใช้งานเว็บไซต์ที่อยู่บน cloud ของส่วนงานได้ ทางสำนักจะมี Public IP address ให้กับ cloud ของส่วนงาน 1 หมายเลขต่อ cloud
แล้วจะทำการแปลง Public IP เป็น Private IP ให้โดยการทำ port forwarding หรือ destination NAT
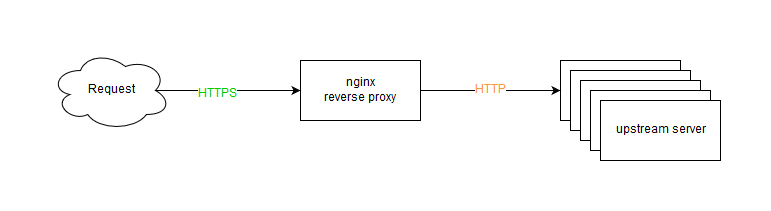
โดย work load ที่เป็นปลายทาง NAT จะต้องเป็น reverse proxy เพื่อที่จะทำให้สามารถให้บริการหลาย ๆ เว็บไซต์ได้
บทความนี้จะสาธิตการตั้งค่าใช้งาน nginx ซึ่งเป็น reverse proxy ที่ใช้งานกันอย่างแพร่หลายเพื่อที่ทางส่วนงานจะได้นำไปประบุกต์ใช้กับระบบของส่วนงานต่อไป
และในท้ายบทความจะแนะนำการใช้งาน ssl certificate สำหรับการเข้ารหัสเว็บไซต์แบบฟรี
Reverse Proxy
Lab Diagram
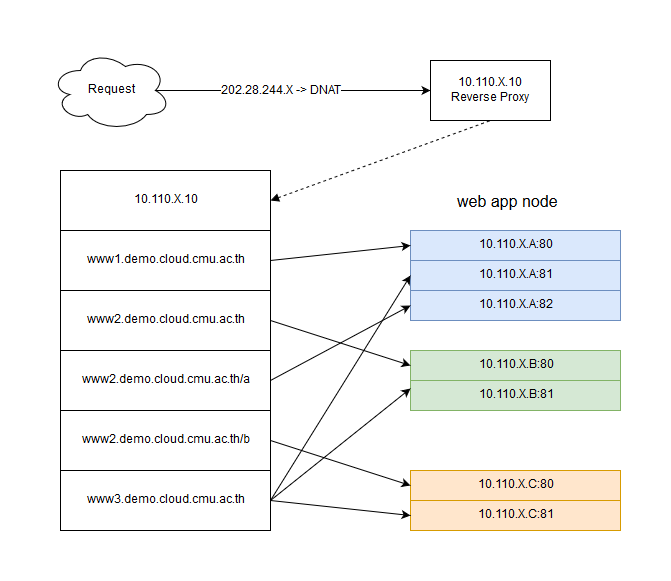
จากรูปภาพใน lab นี้จะใช้ nginx ทำ reverse proxy ในรูปแบบที่ใช้งานกันทั่ว ๆ ไป
จะใช้ server 4 เครื่อง เป็น nginx 1 เครื่อง และเป็น web application node 3 เครื่อง
1. nginx(สีขาว) ip X.X.X.10
2. web-node-a(สีฟ้า) ip X.X.X.11
3. web-node-b(สีเขียว) ip X.X.X.12
4. web-node-c(สีส้ม) ip X.X.X.13
โดยที่ www1.demo.cloud.cmu.ac.th, www2.demo.cloud.cmu.ac.th, www3.demo.cloud.cmu.ac.th จะลงทะเบียนโดเมนเป็น public ip ขานอกและ DNAT มาที่ ip private ของ nginx
ตั้งค่า IP Address Server
ตั้งค่า IP address เครื่อง nginx, web-node-a, web-node-b, web-node-c โดยให้ X เป็น .10, .11, .12, .13 ตามลำดับ Y คือ ip address ที่ได้รับ
sed -i 's/dhcp/static/g' /etc/network/interfaces
cat <<EOF >> /etc/network/interfaces
address Y.Y.Y.X
netmask 255.255.255.0
gateway Y.Y.Y.1
dns-nameservers 10.8.8.8 8.8.8.8
EOF
ifdown ens3 ; ifup ens3
ตั้งค่า hostname server
บทความนี้ใช้ ubuntu 16.04 ที่เครื่อง nginx รันคำสั่ง
echo "nginx" > /etc/hostname
echo "$(hostname -I) nginx" >> /etc/hosts
sysctl -w kernel.hostname=nginx
ที่เครื่อง web-node-a, web-node-b และ web-node-c รันคำสั่ง โดยที่ X=a,b หรือ c ตาม server ที่รันคำสั่ง
echo "web-node-X" > /etc/hostname
echo "$(hostname -I) web-node-X" >> /etc/hosts
sysctl -w kernel.hostname=web-node-X
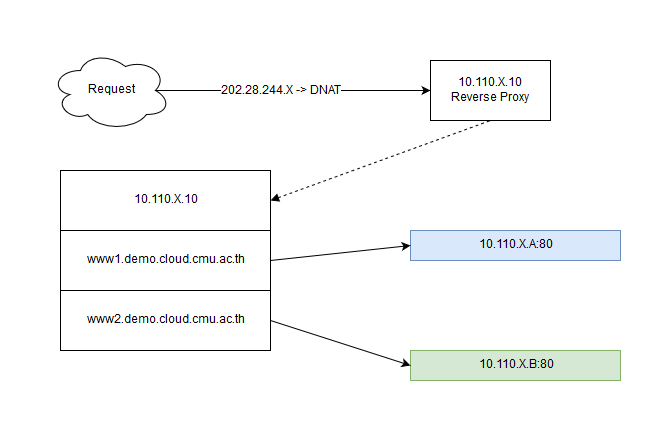
Reverse Proxy ทั่วไป
Diagram
ติดตั้งและตั้งค่า web application ตัวอย่าง
ที่เครื่อง web-node-a, web-node-b และ web-node-c รันคำสั่ง
tasksel
จากนั้นเลือก LAMP server แล้ว OK แล้วทำตามขั้นตอน

แก้ไขไฟล์หน้าเว็บตัวอย่าง
ที่เครื่อง web-node-a และ web-node-b รันคำสั่ง
mv /var/www/html/index.{html,html.ori}
echo "<?php echo '<pre>';print_r(\$_SERVER); echo '</pre>';?>" > /var/www/html/index.php
ติดตั้งและตั้งค่า nginx
ที่เครื่อง nginx รันคำสั่ง
apt install nginx
เพิ่ม file config สำหรับ web site www1.demo.cloud.cmu.ac.th และ www2.demo.cloud.cmu.ac.th
file /etc/nginx/sites-enabled/www1.conf
server {
        listen 80;
        server_name www1.X.cm.edu;
        location / {
                proxy_set_header Host $http_host;
                proxy_set_header X-Real-IP $remote_addr;
                proxy_set_header X-Forwarded-For $proxy_add_x_forwarded_for;
                proxy_pass http://X.X.X.11;
        }
}
file /etc/nginx/sites-enabled/www2.conf
server {
        listen 80;
        server_name www2.X.cm.edu;
        location / {
                proxy_set_header Host $http_host;
                proxy_set_header X-Real-IP $remote_addr;
                proxy_set_header X-Forwarded-For $proxy_add_x_forwarded_for;
                proxy_pass http://X.X.X.12;
        }
}
reload nginx เพื่อให้อ่านค่า file config ใหม่แล้วทดสอบเรียกใช้งาน web site
service nginx reload
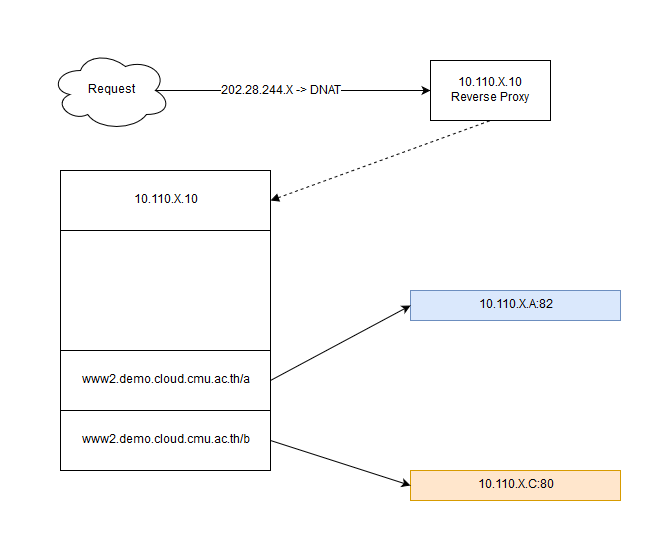
Reverse Proxy Alias
Diagram
สร้างเว็บไซต์ย่อย
ที่เครื่อง web-node-a สร้างเว็บไซต์ใหม่
mkdir -p /var/www/www2-a
echo "<?php echo '<pre>';print_r(\$_SERVER); echo '</pre>';?>" > /var/www/www2-a/index.php
สร้าง file config ของ apache2 สำหรับเว็บใหม่
file /etc/apache2/sites-enabled/www2-a.conf
cat <<EOF >>/etc/apache2/sites-enabled/www2-a.conf
Listen 82
<VirtualHost *:82>
        DocumentRoot /var/www/www2-a/
</VirtualHost>
EOF
reload apache2
service apache2 reload
ที่เครื่อง web-node-c สร้างเว็บไซต์ใหม่
mv /var/www/html/index.{html,html.ori}
echo "<?php echo '<pre>';print_r(\$_SERVER); echo '</pre>';?>" > /var/www/html/index.php
เพิ่ม alias บน nginx
ที่เครื่อง nginx แก้ไขไฟล์ /etc/nginx/sites-enabled/www2.conf
server {
        listen 80;
        server_name www2.X.cm.edu;
        location / {
                proxy_set_header Host $http_host;
                proxy_set_header X-Real-IP $remote_addr;
                proxy_set_header X-Forwarded-For $proxy_add_x_forwarded_for;
                proxy_pass http://X.X.X.12;
        }
        location /a {
                proxy_set_header Host $http_host;
                proxy_set_header X-Real-IP $remote_addr;
                proxy_set_header X-Forwarded-For $proxy_add_x_forwarded_for;
                proxy_pass http://X.X.X.11:82/;
        }
        location /b {
                proxy_set_header Host $http_host;
                proxy_set_header X-Real-IP $remote_addr;
                proxy_set_header X-Forwarded-For $proxy_add_x_forwarded_for;
                proxy_pass http://X.X.X.13/;
        }
}
reload nginx แล้วทดสอบเรียกเว็บไซต์
service nginx reload
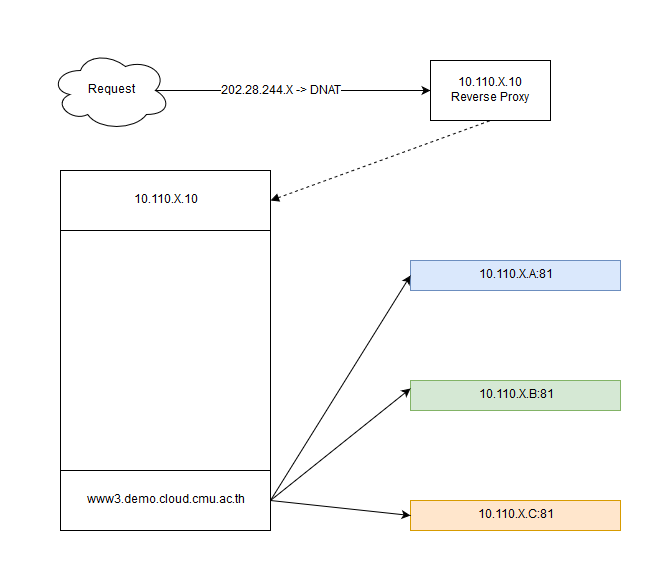
Reverse Proxy load balance
Diagram
สร้างเว็บไซต์ใหม่
ที่เครื่อง web-node-a, web-node-b และ web-node-c สร้างเว็บไซต์ใหม่
mkdir -p /var/www/www3
echo "<?php echo '<pre>';print_r(\$_SERVER); echo '</pre>';?>" > /var/www/www3/index.php
สร้าง file config apache2 สำหรับเว็บไซต์ใหม่ file /etc/apache2/sites-enabled/www3.conf
cat <<EOF >>/etc/apache2/sites-enabled/www3.conf
Listen 81
<VirtualHost *:81>
        DocumentRoot /var/www/www3/
</VirtualHost>
EOF
reload apache2
service apache2 reload
ตั้งค่า nginx แบบ load balance
เพิ่ม file config nginx /etc/nginx/sites-enabled/www3.conf
upstream www3 {
        server X.X.X.11:81;
        server X.X.X.12:81;
        server X.X.X.13:81;
}
server {
        listen 80;
        server_name www3.X.cm.edu;
        location / {
                proxy_set_header Host $http_host;
                proxy_set_header X-Real-IP $remote_addr;
                proxy_set_header X-Forwarded-For $proxy_add_x_forwarded_for;
                proxy_pass http://www3;
        }
}
reload nginx
service nginx reload
ทดสอบเรียกเว็บไซต์ www3.demo.cloud.cmu.ac.th แล้ว refresh จะเห็นว่าจะมีการเปลี่ยน node ไปเรื่อย ๆ
ประเภทของ load balance
- round-robin -- คือสลับวนไปเรื่อย ๆ ในแต่ละ request เป็นค่า default
- least-connected -- คือ request ถัดดไปจะถูกส่งไปยัง server ที่มี active connection น้อยที่สุด
upstream www3 {
        least_conn;
        server X.X.X.11:81;
        server X.X.X.12:81;
        server X.X.X.13:81;
}
- ip-hash -- ใช้ ip address ของ client เป็นตัวตัดสินใจว่าจะส่ง request ไปยัง server ไหน ต้องใช้วิธีนี้เพื่อที่จะทำ Session persistence
upstream www3 {
        ip_hash;
        server X.X.X.11:81;
        server X.X.X.12:81;
        server X.X.X.13:81;
}
Weighted load balancing
เป็นการส่ง request ไปยัง server แบบมีน้ำหนัก เช่นในตัวอย่าง server 10.110.0.61 จะถูกส่ง request มากกว่า server อื่น
upstream www3 {
        server X.X.X.11:81 weight=3;
        server X.X.X.12:81;
        server X.X.X.13:81;
}
Health checks
nginx จะใช้ request จริงในการตรวจสอบว่า upstream server ยังใช้งานได้อยู่หรือไม่โดยมีตัวแปรสองค่าที่เดี่ยวข้องคือ
- max_fails -- คือจำนวนครั้งที่ไม่สามารถติดต่อ server ได้แล้วจะถือว่า server นั้น down, server มี down จะไม่ถูกส่ง request ไปอีก ค่า default คือ 1
- fail_timeout -- คือระยะเวลาที่หลังจาก server down แล้วจะส่ง request ไปตรวจสอบว่ายังติดต่อได้หรือไม่ถ้าติดต่อได้จะถือว่า server up มาอีกครั้งและส่ง request ไปยัง server นั้นตามปกติ ค่า default คือ 10 วินาที
upstream www3 {
        server X.X.X.11:81 max_fails=3 fail_timeout=15s;
        server X.X.X.12:81;
        server X.X.X.13:81;
}
อ้างอิง
http://nginx.org/en/docs/
http://nginx.org/en/docs/http/load_balancing.html
SSL offload
ใช้ nginx ทำ https server เพื่อให้บริการ https ได้โดยใช้ Let's encrypt บริการ SSL certificate ฟรี
ติดตั้ง certbot
certbot เป็นเครื่องมือติดตั้ง certificate จาก let's encrypt และช่วยต่ออายุ certificate ให้อัตโนมัติ
ที่เครื่อง nginx รันคำสั่ง
apt-get update
apt-get install software-properties-common
add-apt-repository ppa:certbot/certbot
apt-get update
apt-get install python-certbot-nginx
ใช้ certbot ตั้งค่า nginx ให้เปิดใช้ https
ที่เครื่อง nginx รันคำสั่ง
certbot --nginx
ให้ระบุอีเมลแจ้งเตือน cert หมดอายุและยอมรับข้อตกลงการใช้งาน
root@nginx:~# certbot --nginx
Saving debug log to /var/log/letsencrypt/letsencrypt.log
Plugins selected: Authenticator nginx, Installer nginx
Enter email address (used for urgent renewal and security notices) (Enter 'c' to
cancel): supawit.w@cmu.ac.th
Starting new HTTPS connection (1): acme-v01.api.letsencrypt.org

-------------------------------------------------------------------------------
Please read the Terms of Service at
https://letsencrypt.org/documents/LE-SA-v1.2-November-15-2017.pdf. You must
agree in order to register with the ACME server at
https://acme-v01.api.letsencrypt.org/directory
-------------------------------------------------------------------------------
(A)gree/(C)ancel:
จากนั้น certbot จะอ่าน config จาก nginx และให้เลือกว่าจะเปิด https ที่เว็บไซต์ใด ในตัวอย่างจะเลือก www3.demo.cloud.cmu.ac.th
Starting new HTTPS connection (1): supporters.eff.org

Which names would you like to activate HTTPS for?
-------------------------------------------------------------------------------
1: www1.demo.cloud.cmu.ac.th
2: www2.demo.cloud.cmu.ac.th
3: www3.demo.cloud.cmu.ac.th
-------------------------------------------------------------------------------
Select the appropriate numbers separated by commas and/or spaces, or leave input
blank to select all options shown (Enter 'c' to cancel): 3
จากนั้น certbot จะให้เลือกว่าจะให้ตั้งค่าการ redirect http เป็น https ทั้งหมด แนะนำให้เลือก redirect ทั้งหมดโดยการตอบ 2
Obtaining a new certificate
Resetting dropped connection: acme-v01.api.letsencrypt.org
Performing the following challenges:
http-01 challenge for www3.demo.cloud.cmu.ac.th
Waiting for verification...
Cleaning up challenges
Deploying Certificate to VirtualHost /etc/nginx/sites-enabled/www3.conf

Please choose whether or not to redirect HTTP traffic to HTTPS, removing HTTP access.
-------------------------------------------------------------------------------
1: No redirect - Make no further changes to the webserver configuration.
2: Redirect - Make all requests redirect to secure HTTPS access. Choose this for
new sites, or if you're confident your site works on HTTPS. You can undo this
change by editing your web server's configuration.
-------------------------------------------------------------------------------
Select the appropriate number [1-2] then [enter] (press 'c' to cancel): 2
certbot จะทำการสรุปผลการติดตั้ง certificate และ reload nginx ให้อัตโนมัติ
Redirecting all traffic on port 80 to ssl in /etc/nginx/sites-enabled/www3.conf

-------------------------------------------------------------------------------
Congratulations! You have successfully enabled https://www3.demo.cloud.cmu.ac.th

You should test your configuration at:
https://www.ssllabs.com/ssltest/analyze.html?d=www3.demo.cloud.cmu.ac.th
-------------------------------------------------------------------------------

IMPORTANT NOTES:
 - Congratulations! Your certificate and chain have been saved at:
   /etc/letsencrypt/live/www3.demo.cloud.cmu.ac.th/fullchain.pem
   Your key file has been saved at:
   /etc/letsencrypt/live/www3.demo.cloud.cmu.ac.th/privkey.pem
   Your cert will expire on 2018-09-11. To obtain a new or tweaked
   version of this certificate in the future, simply run certbot again
   with the "certonly" option. To non-interactively renew *all* of
   your certificates, run "certbot renew"
 - Your account credentials have been saved in your Certbot
   configuration directory at /etc/letsencrypt. You should make a
   secure backup of this folder now. This configuration directory will
   also contain certificates and private keys obtained by Certbot so
   making regular backups of this folder is ideal.
 - If you like Certbot, please consider supporting our work by:

   Donating to ISRG / Let's Encrypt:   https://letsencrypt.org/donate
   Donating to EFF:                    https://eff.org/donate-le

root@nginx:~#
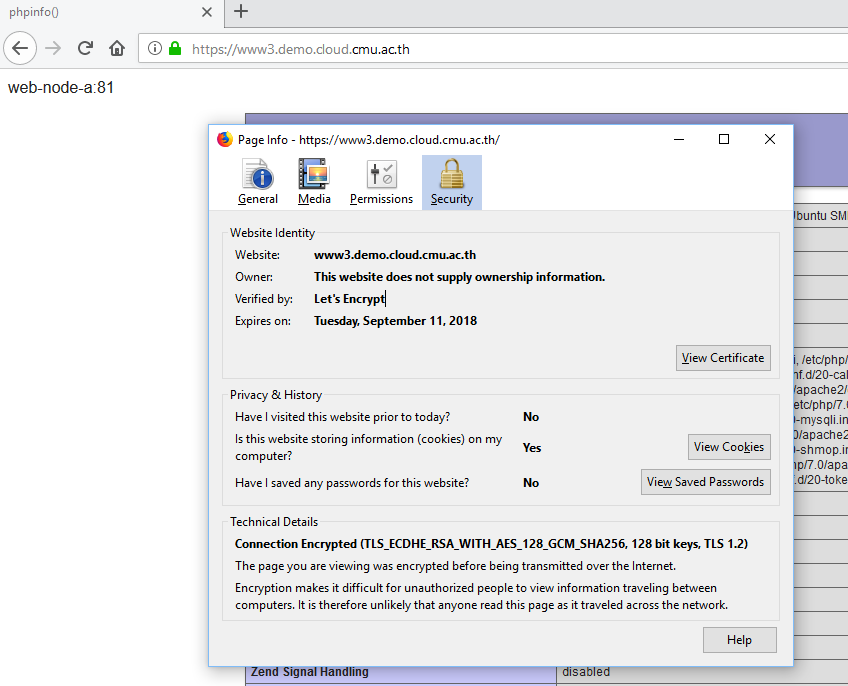
ทดสอบเรียกเว็บไซต์ www3.demo.cloud.cmu.ac.th จะเห็นว่าเป็น https และ browser รองรับ
ดูว่า certbot ทำอะไร
มีการเพิ่ม crontab เพื่อให้ต่ออายุ certificate อัตโนมัติ
root@nginx:~# cat /etc/cron.d/certbot
# /etc/cron.d/certbot: crontab entries for the certbot package
#
# Upstream recommends attempting renewal twice a day
#
# Eventually, this will be an opportunity to validate certificates
# haven't been revoked, etc.  Renewal will only occur if expiration
# is within 30 days.
SHELL=/bin/sh
PATH=/usr/local/sbin:/usr/local/bin:/sbin:/bin:/usr/sbin:/usr/bin

0 */12 * * * root test -x /usr/bin/certbot -a \! -d /run/systemd/system && perl -e 'sleep int(rand(3600))' && certbot -q renew
root@nginx:~#
เข้าไปแก้ไข nginx config file ให้อัตโนมัติ ลองเข้าไปดู file /etc/nginx/sites-enabled/www3.conf
upstream www3 {
        server X.X.X.11:81;
        server X.X.X.12:81;
        server X.X.X.13:81;
}
server {
        server_name www3.demo.cloud.cmu.ac.th;
        location / {
                proxy_set_header Host $http_host;
                proxy_set_header X-Real-IP $remote_addr;
                proxy_set_header X-Forwarded-For $proxy_add_x_forwarded_for;
                proxy_pass http://www3;
        }

    listen 443 ssl; # managed by Certbot
    ssl_certificate /etc/letsencrypt/live/www3.demo.cloud.cmu.ac.th/fullchain.pem; # managed by Certbot
    ssl_certificate_key /etc/letsencrypt/live/www3.demo.cloud.cmu.ac.th/privkey.pem; # managed by Certbot
    include /etc/letsencrypt/options-ssl-nginx.conf; # managed by Certbot
    ssl_dhparam /etc/letsencrypt/ssl-dhparams.pem; # managed by Certbot

}

server {
    if ($host = www3.demo.cloud.cmu.ac.th) {
        return 301 https://$host$request_uri;
    } # managed by Certbot


        listen 80;
        server_name www3.demo.cloud.cmu.ac.th;
    return 404; # managed by Certbot


}
อ้างอิง
https://letsencrypt.org/
https://certbot.eff.org/lets-encrypt/ubuntuxenial-nginx
บทส่งท้าย
บทความนี้แสดงถึงการตั้งค่า reverse proxy เบื้องต้น ในการใช้งานจริงอาจจะต้องมีการ fine tune ค่าต่าง ๆ เพิ่มเติมกรณีที่ web application ต้องการรองรับ request จำนวนมาก หรือมีความต้องการเฉพาะอาจจะต้องใช้เทคนิคอื่น ๆ เพิ่มเติมเช่น static file caching ซึ่งต้องศึกษาเพิ่มเติมต่อยอดจากบทความนี้ต่อไป หวังว่าบทความนี้จะช่วยปูพื้นฐานให้เข้าใจ concept ของ reverse proxy และการทำ SSL offload
สอบถามเพิ่มเติม
ผู้เขียน : ศุภวิทย์ วรรณภิละ วิศวกร ฝ่ายระบบเครือข่าย สำนักบริการเทคโนโลยีสารสนเทศ มหาวิทยาลัยเชียงใหม่
email : supawit.w@cmu.ac.th
โทรศัพท์ : 0-5394-3853