Difference between revisions of "Let's Encrypt"
| (4 intermediate revisions by the same user not shown) | |||
| Line 136: | Line 136: | ||
</IfModule> | </IfModule> | ||
</source> | </source> | ||
| + | |||
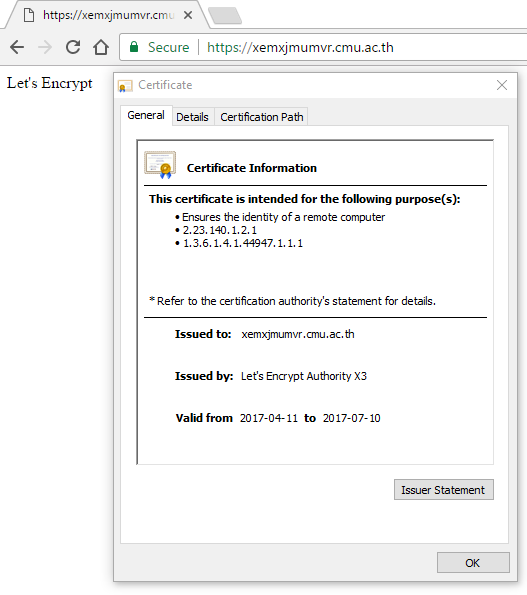
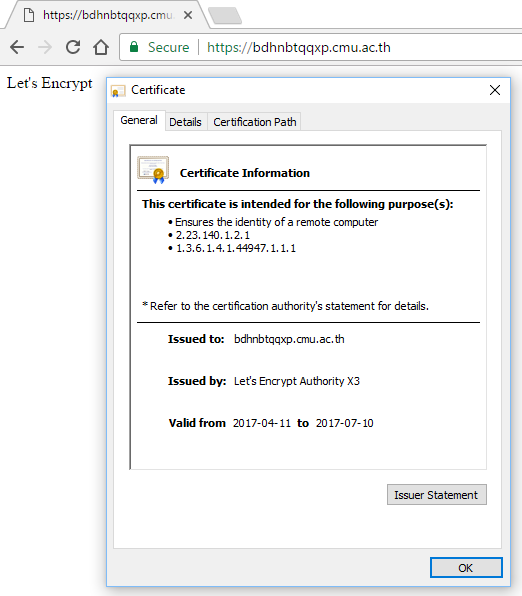
| + | * เว็บไซต์จะมี https โดยใช้ใบรับรองของ Let's Encrypt ซึ่งได้รับความเชื่อถือจากทุก browser<br> | ||
| + | ::: [[File:Certbot 01.PNG|link=]] | ||
| + | |||
| + | * การตั้งค่าให้ renew certificate โดยอัตโนมัติ<br> | ||
| + | ใช้ crontab รันคำสั่ง certbot อัตโนมัติตามเวลาที่ระบุ เช่น ทุกวันจันทร์เวลา 2:30<br> | ||
| + | certbot จะทำการตรวจสอบว่าใบรับรองหมดอายุหรือไม่ถ้าใหล้หมดจะทำการต่ออายุ certificate ให้โดยอัตโนมัติ | ||
| + | <source> | ||
| + | 30 2 * * 1 /usr/local/sbin/certbot-auto renew >> /var/log/le-renew.log | ||
| + | </source> | ||
| + | |||
| + | * redirect http ไป https<br> | ||
| + | ให้แก้ไฟล์ config ของ site ที่เป็น http โดยใช้ mod_rewrite<br> | ||
| + | /etc/apache2/site-enabled/xEmXjMUmVr.cmu.ac.th.conf<br> | ||
| + | <source> | ||
| + | <VirtualHost *:80> | ||
| + | ServerAdmin supawit.w@cmu.ac.th | ||
| + | ServerName xEmXjMUmVr.cmu.ac.th | ||
| + | |||
| + | ErrorLog ${APACHE_LOG_DIR}/xEmXjMUmVr-error.log | ||
| + | |||
| + | # Possible values include: debug, info, notice, warn, error, crit, | ||
| + | # alert, emerg. | ||
| + | LogLevel warn | ||
| + | |||
| + | CustomLog ${APACHE_LOG_DIR}/xEmXjMUmVr-access.log combined | ||
| + | |||
| + | RewriteEngine On | ||
| + | RewriteCond %{HTTPS} off | ||
| + | RewriteRule (.*) https://%{HTTP_HOST}%{REQUEST_URI} | ||
| + | </VirtualHost> | ||
| + | </source> | ||
| + | === Let's Encrypt บน IIS, Windows Server === | ||
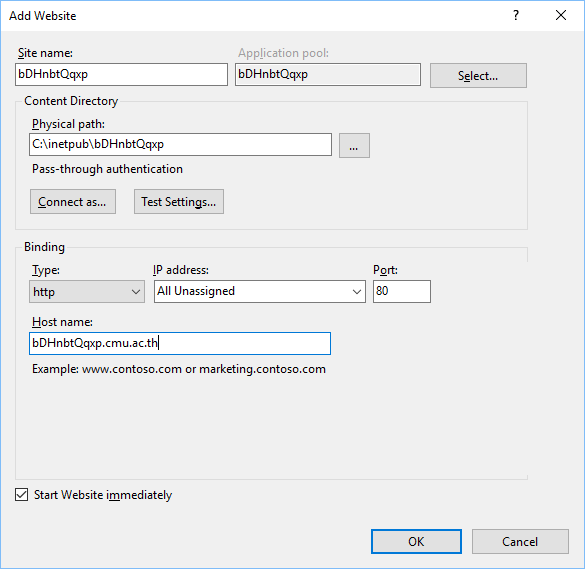
| + | * มีเว็บไซต์ที่เปิดให้บริการและสามารถใช้งานได้จากอินเทอร์เน็ตได้เรียบร้อยแล้วเพื่อที่ทาง Let's Encrypt จะใช้ยืนยันความเป็นเจ้าของเว็บไซต์ได้<br> | ||
| + | ::: [[File:Iis 01.PNG|link=]] | ||
| + | * Download เครื่องมือ [https://github.com/Lone-Coder/letsencrypt-win-simple letsencrypt-win-simple] จาก [https://github.com/Lone-Coder/letsencrypt-win-simple/releases https://github.com/Lone-Coder/letsencrypt-win-simple/releases] จากนั้นแยกไฟล์ เช่น C:\ | ||
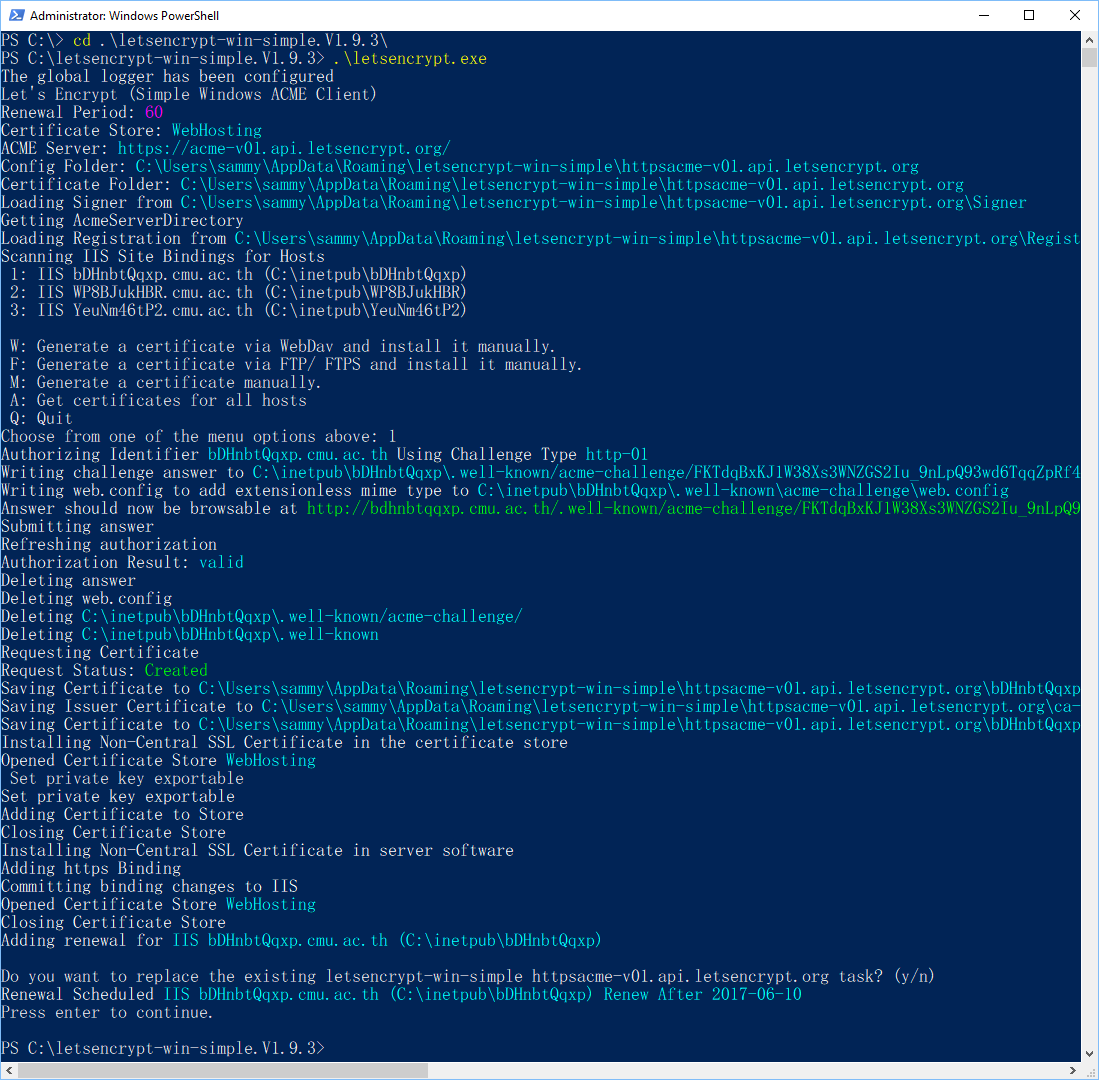
| + | * เปิด power shell ด้วยสิทธิ์ administrator แล้วไปยัง folder ของ letsencrypt-win-simple แล้วรันคำสั่ง letsencrypt.exe<br> | ||
| + | เลือก site ที่ต้องการเปิดใช้งาน Let's Encrypt ตาม interactive shell ในส่วนของ task scheduler ให้ตอบ n | ||
| + | ::: [[File:Iis 02.PNG|link=]] | ||
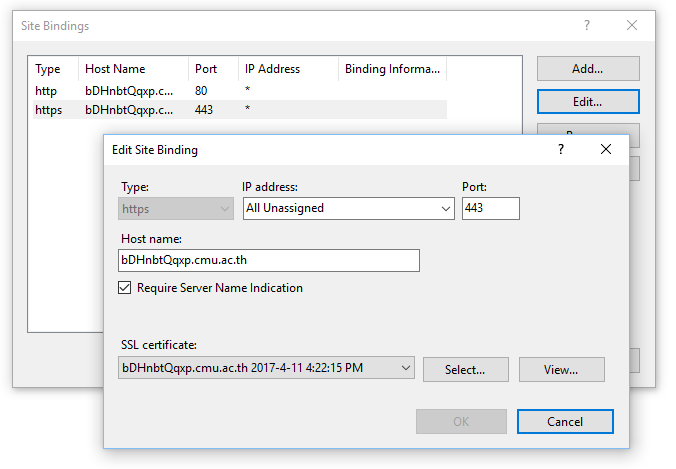
| + | * letsencrypt-win-simple จะทำการ installl certificate และตั้งค่า IIS ให้เปิดใช้งาน https ให้กับ site ที่เลือกโดยอัตโนมัติ | ||
| + | ::: [[File:Iis 03.PNG|link=]]<br> | ||
| + | <br> | ||
| + | ::: [[File:Iis 04.PNG|link=]] | ||
| + | * การตั้งค่าให้ renew certificate โดยอัตโนมัติ ทำโดย task scheduler ของ Windows Server ซึ่ง letsencrypt-win-simple จะสร้างให้อัตโนมัติ<br> | ||
| + | แต่ต้องมีการปรับเปลี่ยนให้ task รันขณะ user ไม่ได้ log on และรันด้วย user ที่มีสิทธิ์ administrator โดยการเข้าไปปรับค่า task scheduler ที่สร้างไว้<br> | ||
| + | :::[[File:Iis 05.PNG|link=]] | ||
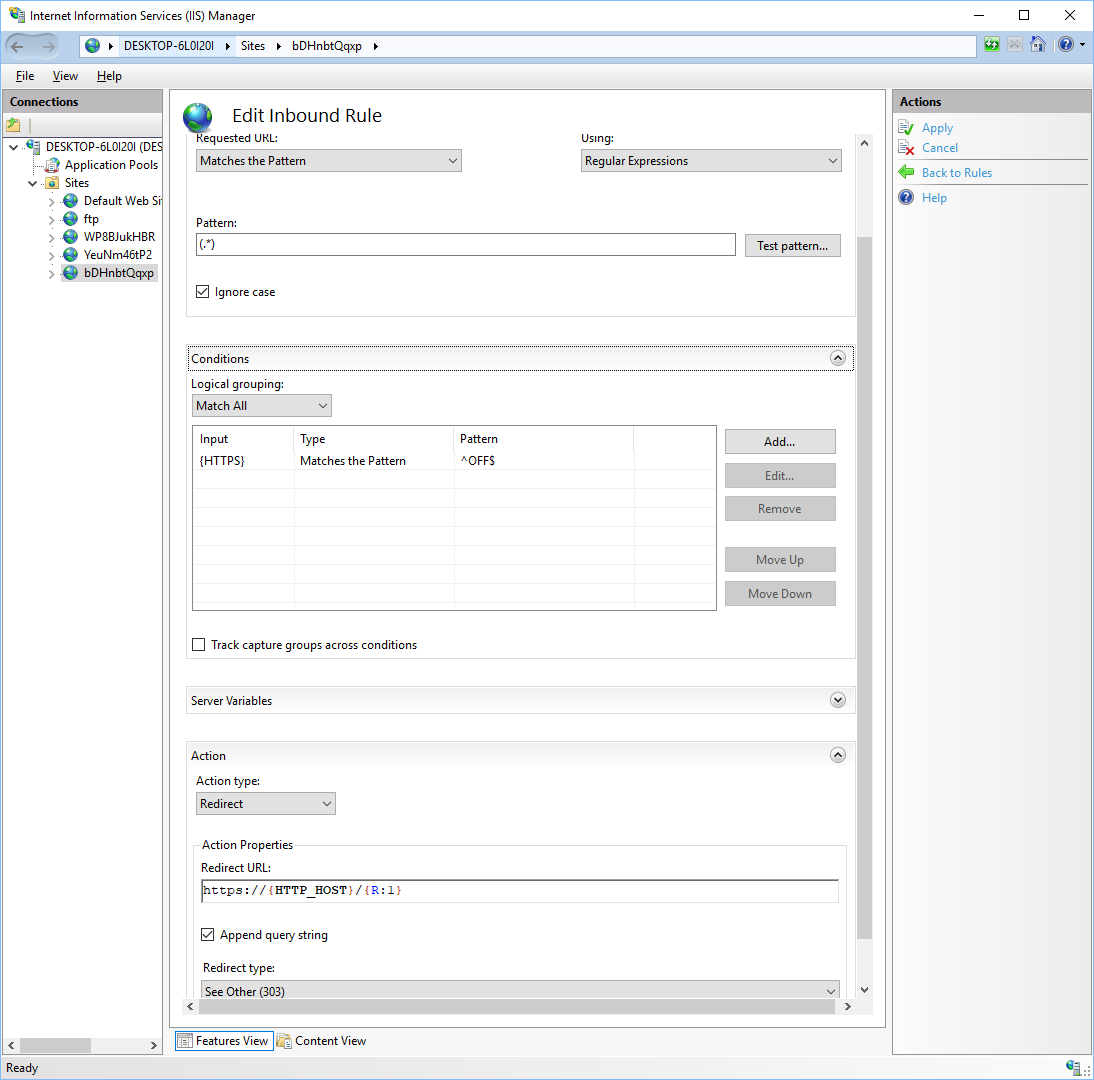
| + | * redirect http ไป https<br> | ||
| + | ต้องติดตั้ง module rewrite ให้ iis ผ่าน web platform installer<br> | ||
| + | ไปที่ site ที่เลือกแล้วไปที่ URL Rewrite <br> | ||
| + | ที่มุมขวาบนเลือก Add Rule(s)..<br> | ||
| + | เลือก blank rule แล้ว OK<br> | ||
| + | ตั้งค่าตามภาพแล้วกด Apply, Back to Rules<br> | ||
| + | หรือทำตามขั้นตอนใน [https://www.youtube.com/watch?v=U7USHit5mhY https://www.youtube.com/watch?v=U7USHit5mhY]<br> | ||
| + | :::[[File:Iis 06.PNG|link=]] | ||
| + | |||
| + | === สอบถามรายละเอียดเพิ่มเติม === | ||
| + | * email : supawit.w@cmu.ac.th โทรศัพท์ : 0-5394-3853 | ||
Latest revision as of 09:53, 11 April 2017
การทำ https บน web server โดยใช้บริการฟรี SSL Certificate จาก Let's Encrypt
หลักการและเหตุผล
การให้บริการ web ให้ปลอดภัยต้องมีการเข้ารหัสข้อมูลโดยเฉพาะ web ที่มีการ log in ด้วย username, password ของ CMU IT Account หรือบัญชีใด ๆ ซึ่งเทคนิคที่ใช้กันคือ https หรือ http over SSL
ซึ่งการจะทำได้นั้นจะต้องมี SSL certificate ที่ออกจากผู้รับรองที่น่าเชื่อถือซึ่งมีค่าใช้จ่าย
Let's Encrypt เป็นผู้ออกไปรับรอง SSL certificate ที่ใช้งานได้โดยไม่เสียค่าใช้จ่าย แต่ใบรับรองจะมีอายุเพียง 90 วัน ทำให้ต้องใช้เครื่องมือในการต่ออายุใบรับรองแบบอัตโนมัติ
บทความนี้จะนำวิธีการใช้งาน SSL certificate ของ Let's Encrypt บน web server Apache บน Ubuntu Linux และ IIS บน Windows Server
Let's Encrypt บน apache, Ubuntu
- เครื่องมือที่ใช้สำหรับการขอใช้งาน Let's Encrypt certificate คือ certbot สามารถเข้าไปดูวิธีการติดตั้ง certbot ได้ที่คู่มือการใช้งานบนเว็บไซต์ certbot กรณี Ubuntu สามารถติดตั้งได้โดยง่าย
$ sudo add-apt-repository ppa:certbot/certbot
$ sudo apt-get update
$ sudo apt-get install python-certbot-apache- ในส่วนของ apache ให้ทำการ config virtual host ในลักษณะที่เป็นไฟล์แยกไว้ใน /etc/apache2/site-enabled/domain.conf เช่น
/etc/apache2/site-enabled/xEmXjMUmVr.cmu.ac.th.conf
<VirtualHost *:80>
        ServerAdmin supawit.w@cmu.ac.th
        ServerName xEmXjMUmVr.cmu.ac.th

        ErrorLog ${APACHE_LOG_DIR}/xEmXjMUmVr-error.log

        # Possible values include: debug, info, notice, warn, error, crit,
        # alert, emerg.
        LogLevel warn

        CustomLog ${APACHE_LOG_DIR}/xEmXjMUmVr-access.log combined

        DocumentRoot /home/supawit/xEmXjMUmVr/html
        <Directory />
                Options FollowSymLinks
                AllowOverride None
        </Directory>
        <Directory /home/supawit/xEmXjMUmVr/html>
                Options FollowSymLinks MultiViews
                AllowOverride None
                Order allow,deny
                allow from all
        </Directory>
        <IfModule mpm_itk_module>
                AssignUserId supawit supawit
        </IfModule>
</VirtualHost>
ซึ่งเว็บไซต์จะต้องเปิดให้บริการและสามารถใช้งานได้จากอินเทอร์เน็ตได้เรียบร้อยแล้วเพื่อที่ทาง Let's Encrypt จะใช้ยืนยันความเป็นเจ้าของเว็บไซต์ได้
- ใช้ certbot ในการขอ certificate โดยเลือก site ตาม interactive shell
root@license:~# certbot-auto --apache
Saving debug log to /var/log/letsencrypt/letsencrypt.log

Which names would you like to activate HTTPS for?
-------------------------------------------------------------------------------
1: antivirus.cmu.ac.th
2: license.cmu.ac.th
3: xemxjmumvr.cmu.ac.th
-------------------------------------------------------------------------------
Select the appropriate numbers separated by commas and/or spaces, or leave input
blank to select all options shown (Enter 'c' to cancel):3
Obtaining a new certificate
Performing the following challenges:
tls-sni-01 challenge for xemxjmumvr.cmu.ac.th
Waiting for verification...
Cleaning up challenges
Generating key (2048 bits): /etc/letsencrypt/keys/0002_key-certbot.pem
Creating CSR: /etc/letsencrypt/csr/0002_csr-certbot.pem
Created an SSL vhost at /etc/apache2/sites-available/xEmXjMUmVr.cmu.ac.th-le-ssl.conf
Deploying Certificate for xemxjmumvr.cmu.ac.th to VirtualHost /etc/apache2/sites-available/xEmXjMUmVr.cmu.ac.th-le-ssl.conf
Enabling available site: /etc/apache2/sites-available/xEmXjMUmVr.cmu.ac.th-le-ssl.conf

Please choose whether HTTPS access is required or optional.
-------------------------------------------------------------------------------
1: Easy - Allow both HTTP and HTTPS access to these sites
2: Secure - Make all requests redirect to secure HTTPS access
-------------------------------------------------------------------------------
Select the appropriate number [1-2] then [enter] (press 'c' to cancel): 1

-------------------------------------------------------------------------------
Congratulations! You have successfully enabled https://xemxjmumvr.cmu.ac.th

You should test your configuration at:
https://www.ssllabs.com/ssltest/analyze.html?d=xemxjmumvr.cmu.ac.th
-------------------------------------------------------------------------------

IMPORTANT NOTES:
 - Congratulations! Your certificate and chain have been saved at
   /etc/letsencrypt/live/xemxjmumvr.cmu.ac.th/fullchain.pem. Your cert
   will expire on 2017-07-10. To obtain a new or tweaked version of
   this certificate in the future, simply run certbot-auto again with
   the "certonly" option. To non-interactively renew *all* of your
   certificates, run "certbot-auto renew"
 - If you like Certbot, please consider supporting our work by:

   Donating to ISRG / Let's Encrypt:   https://letsencrypt.org/donate
   Donating to EFF:                    https://eff.org/donate-le

root@license:~#- certbot จะทำการสร้าง site ที่เป็น https ให้โดยอัตโนมัติและ reload service apache ให้
/etc/apache2/sites-enabled/xEmXjMUmVr.cmu.ac.th-le-ssl.conf
<IfModule mod_ssl.c>
<VirtualHost *:443>
        ServerAdmin supawit.w@cmu.ac.th
        ServerName xEmXjMUmVr.cmu.ac.th

        ErrorLog ${APACHE_LOG_DIR}/xEmXjMUmVr-error.log

        # Possible values include: debug, info, notice, warn, error, crit,
        # alert, emerg.
        LogLevel warn

        CustomLog ${APACHE_LOG_DIR}/xEmXjMUmVr-access.log combined

        DocumentRoot /home/supawit/xEmXjMUmVr/html
        <Directory />
                Options FollowSymLinks
                AllowOverride None
        </Directory>
        <Directory /home/supawit/xEmXjMUmVr/html>
                Options FollowSymLinks MultiViews
                AllowOverride None
                Order allow,deny
                allow from all
        </Directory>
        <IfModule mpm_itk_module>
                AssignUserId supawit supawit
        </IfModule>
SSLCertificateFile /etc/letsencrypt/live/xemxjmumvr.cmu.ac.th/cert.pem
SSLCertificateKeyFile /etc/letsencrypt/live/xemxjmumvr.cmu.ac.th/privkey.pem
Include /etc/letsencrypt/options-ssl-apache.conf
SSLCertificateChainFile /etc/letsencrypt/live/xemxjmumvr.cmu.ac.th/chain.pem
</VirtualHost>
</IfModule>- เว็บไซต์จะมี https โดยใช้ใบรับรองของ Let's Encrypt ซึ่งได้รับความเชื่อถือจากทุก browser
- การตั้งค่าให้ renew certificate โดยอัตโนมัติ
ใช้ crontab รันคำสั่ง certbot อัตโนมัติตามเวลาที่ระบุ เช่น ทุกวันจันทร์เวลา 2:30
certbot จะทำการตรวจสอบว่าใบรับรองหมดอายุหรือไม่ถ้าใหล้หมดจะทำการต่ออายุ certificate ให้โดยอัตโนมัติ
30 2 * * 1 /usr/local/sbin/certbot-auto renew >> /var/log/le-renew.log- redirect http ไป https
ให้แก้ไฟล์ config ของ site ที่เป็น http โดยใช้ mod_rewrite
/etc/apache2/site-enabled/xEmXjMUmVr.cmu.ac.th.conf
<VirtualHost *:80>
        ServerAdmin supawit.w@cmu.ac.th
        ServerName xEmXjMUmVr.cmu.ac.th

        ErrorLog ${APACHE_LOG_DIR}/xEmXjMUmVr-error.log

        # Possible values include: debug, info, notice, warn, error, crit,
        # alert, emerg.
        LogLevel warn

        CustomLog ${APACHE_LOG_DIR}/xEmXjMUmVr-access.log combined

        RewriteEngine On
        RewriteCond %{HTTPS} off
        RewriteRule (.*) https://%{HTTP_HOST}%{REQUEST_URI}
</VirtualHost>
Let's Encrypt บน IIS, Windows Server
- มีเว็บไซต์ที่เปิดให้บริการและสามารถใช้งานได้จากอินเทอร์เน็ตได้เรียบร้อยแล้วเพื่อที่ทาง Let's Encrypt จะใช้ยืนยันความเป็นเจ้าของเว็บไซต์ได้
- Download เครื่องมือ letsencrypt-win-simple จาก https://github.com/Lone-Coder/letsencrypt-win-simple/releases จากนั้นแยกไฟล์ เช่น C:\
- เปิด power shell ด้วยสิทธิ์ administrator แล้วไปยัง folder ของ letsencrypt-win-simple แล้วรันคำสั่ง letsencrypt.exe
เลือก site ที่ต้องการเปิดใช้งาน Let's Encrypt ตาม interactive shell ในส่วนของ task scheduler ให้ตอบ n
- letsencrypt-win-simple จะทำการ installl certificate และตั้งค่า IIS ให้เปิดใช้งาน https ให้กับ site ที่เลือกโดยอัตโนมัติ
- การตั้งค่าให้ renew certificate โดยอัตโนมัติ ทำโดย task scheduler ของ Windows Server ซึ่ง letsencrypt-win-simple จะสร้างให้อัตโนมัติ
แต่ต้องมีการปรับเปลี่ยนให้ task รันขณะ user ไม่ได้ log on และรันด้วย user ที่มีสิทธิ์ administrator โดยการเข้าไปปรับค่า task scheduler ที่สร้างไว้

- redirect http ไป https
ต้องติดตั้ง module rewrite ให้ iis ผ่าน web platform installer
ไปที่ site ที่เลือกแล้วไปที่ URL Rewrite
ที่มุมขวาบนเลือก Add Rule(s)..
เลือก blank rule แล้ว OK
ตั้งค่าตามภาพแล้วกด Apply, Back to Rules
หรือทำตามขั้นตอนใน https://www.youtube.com/watch?v=U7USHit5mhY
สอบถามรายละเอียดเพิ่มเติม
- email : supawit.w@cmu.ac.th โทรศัพท์ : 0-5394-3853