Difference between revisions of "CMU OpenVPN EN"
| Line 105: | Line 105: | ||
# You can Turn off when you want to disconnecting and click OK <br/><br/> [[File:IOS OVPN 10.jpg | link=]] [[File:IOS OVPN 11.jpg | link=]]<br/><br/> | # You can Turn off when you want to disconnecting and click OK <br/><br/> [[File:IOS OVPN 10.jpg | link=]] [[File:IOS OVPN 11.jpg | link=]]<br/><br/> | ||
| − | == | + | == Using on the macOS == |
| − | === | + | === Installation === |
| − | # Download | + | # Download the Tunneblick program from [https://tunnelblick.net tunnelblick] and click Open at file.dmg <br/><br/> [[File:VPNOSX 1.png | link=]] <br/><br/> |
| − | # | + | # After that, you have to double click at icon Tunnelblick <br/><br/> [[File:VPNOSX 2.png | link=]] <br/><br/> |
| − | # | + | # If it shows same the image please choose Open <br/><br/> [[File:VPNOSX 3.png | link=]] <br/><br/> |
| − | # | + | # Add your computer password, in case of new program installation then click OK <br/><br/> [[File:VPNOSX 4.png | link=]] <br/><br/> |
| − | # | + | # In the Welcome to Tunnelblick window please choose I have configuration files <br/><br/> [[File:VPNOSX.png | link=]] <br/><br/> |
| − | === | + | === Connection === |
| − | # | + | # Download file for connecting from [https://network.cmu.ac.th/cmu.ovpn https://network.cmu.ac.th/cmu.ovpn] <br/><br/> |
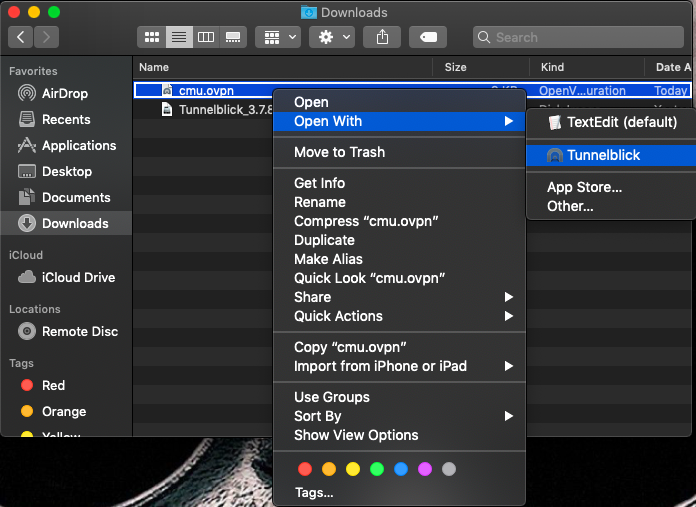
| − | # | + | # Right click a file that you are download then choose Open with Tunnelblick <br/><br/> [[File:VPNOSX 5.png | link=]] <br/><br/> |
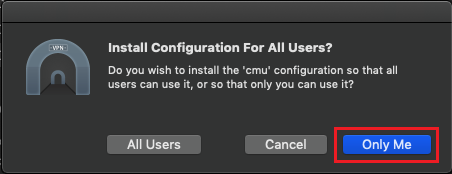
| − | # | + | # In the Install Configuration for All User window and enter Only Me <br/><br/> [[File:VPNOSX 6.png | link=]] <br/><br/> |
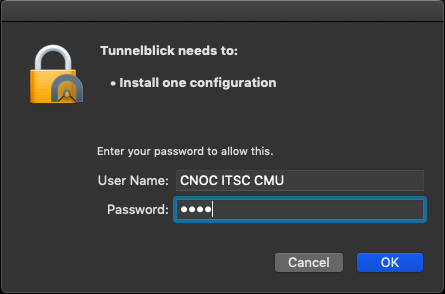
| − | # | + | # Add your computer password, in case of change the computer config after that click OK <br/><br/> [[File:VPNOSX 7.png | link=]] <br/><br/> |
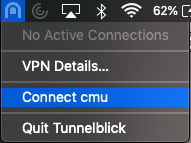
| − | # | + | # Click icon Tunneblick on task bar and choose Connect CMU <br/><br/> [[File:VPNOSX 8.png | link=]] <br/><br/> |
| − | # | + | # Specify your CMU Account that receive from the university after that click OK <br/><br/> [[File:VPNOSX 9.png | link=]] <br/><br/> |
| − | # | + | # If it shows same the image please choose Do not warn about this again and OK <br/><br/> [[File:VPNOSX 10.png | link=]] <br/><br/> |
| − | # | + | # When the connection is success will show the window as following <br/><br/> [[File:VPNOSX 11.png | link=]] <br/><br/> |
| − | # | + | # You can choose Disconnect CMU for disconnectiong <br/><br/> [[File:VPNOSX 12.png | link=]] <br/><br/> |
== วิธีแก้ปัญหาเมื่อพบ Errors == | == วิธีแก้ปัญหาเมื่อพบ Errors == | ||
Revision as of 08:59, 30 June 2020
Introduction
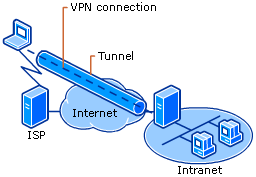
VPN or (Virtual Private Network) is use tunneling techniques to run on the internet, no matter where you are as you can still use the University network. After you connect the VPN all data will run to the University network before going out to the internet.
By reason of the VPN connection makes it as though use the university network, therefore allowing access to various resources which is restricted to use only at University such as the research resources, various of library article, or online studying teaching system you can be obtained from anywhere, which the VPN connection must be verified by an CMU IT account before connecting every time.
Please Note
In case of you already use University internal network such as Faculty internal network, CMU wireless network, or Jumbo Net what’s you no need to access connecting openvpn for use the internet because it is the same line and it going to increase the burden of openvpn servers, thus blocking the openvpn connection from the University network
Terms
- To use this research network is only for studying or searching or in the correctly way
- To use this research network will be saved using according to infringe law as Thailand’s 2007 Cybercrime
- In case of, if admin found that the usage affects to the system or the usage of other users, admin can terminate or decide to the user immediately without notice
- According to infringe law as Thailand’s 2007 Cybercrime, the account holder that infringe law must be law prosecuted regardless who uses the account, therefore the user must use their personal accounts. Do not distribute to others because of the account holder will solely responsible for the consequences
- To use this research network will used only for University allowing website for not to use the University resources in the wrong way
- To access CMU OpenVPN with the CMU account means you already accepted this terms
Using on the Windows operating system
Installation
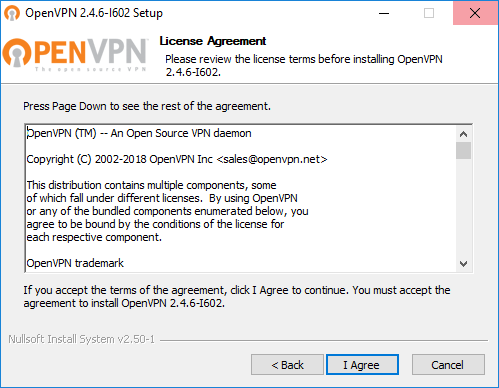
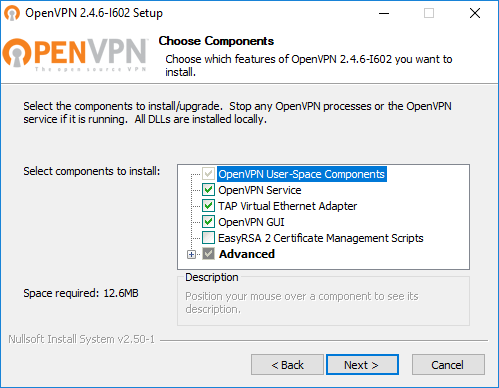
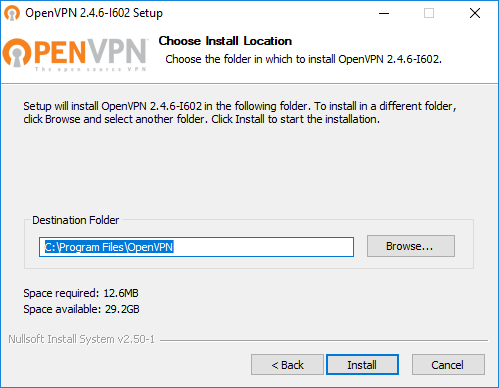
1. You must download the installation from https://openvpn.net/community-downloads/ then enter Windows installer
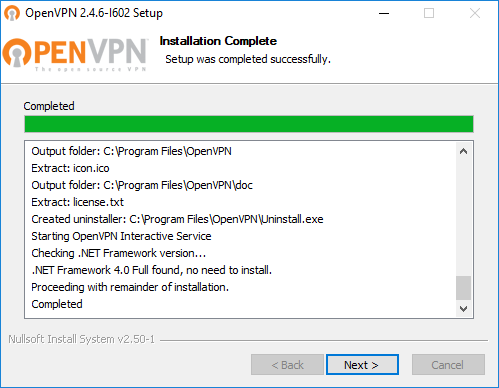
2. To install, start downloaded installer by click the Next and Install following procedures
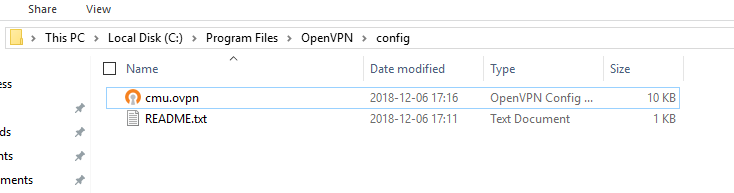
3. Next, download file for connecting from https://network.cmu.ac.th/cmu.ovpn
4.Then, copy file cmu.ovpn that you download into folder C:\Program Files\OpenVPN\config
Connection
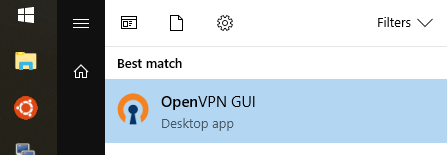
1. Open the OpenVPN GUI program
2. Right click on system tray and then click on icon ![]() enter your CMU Account and click OK'
enter your CMU Account and click OK'
![]()
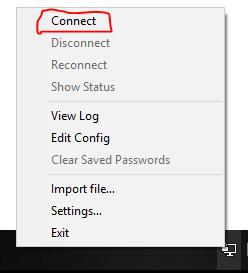
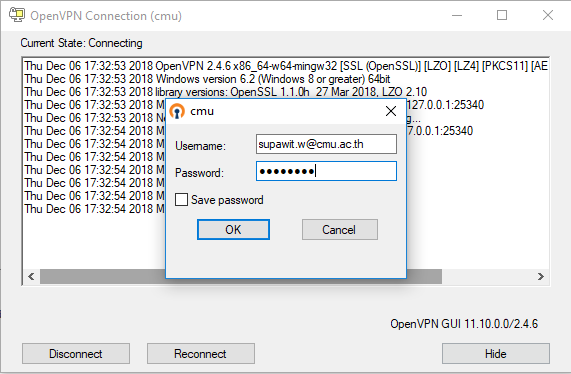
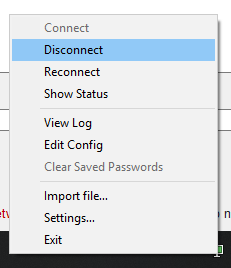
3. When the connecting is success, the icon will be a green ![]() , the right clicks on icon, you can disconnect anytime
, the right clicks on icon, you can disconnect anytime
Using on the Ubantu Linux operating system
Installation
1. Open the Terminal then add the command
sudo apt install openvpn -y
Please specified your correctly password and the system will install openvpn
2. Download file for connecting by add the command in terminal
cd ~
wget https://network.cmu.ac.th/cmu.ovpn
Connection
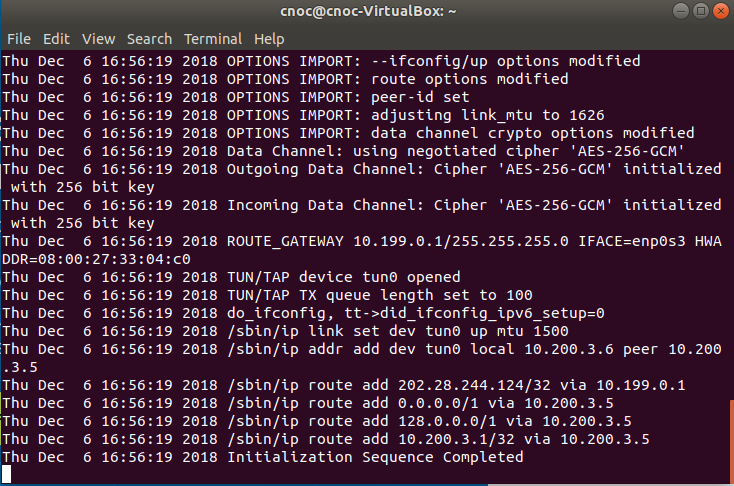
1. Open the terminal then add the command
cd ~
sudo openvpn --config cmu.ovpn
Please specified the instrument password by @cmu.ac.th and the password respectively will find the terminal window as in the image Always open the terminal all time in using OpenVPN and you can close terminal anytime you want to disconnected
Using on the Android
Installation
1. Download the OpenVPN Connect application from Playstore

2. 2. Download file for connecting from https://network.cmu.ac.th/cmu.ovpn
Connection
1. Getting to the application and choose OVPN Profile

2. Then going to the folder cmu.ovpn file
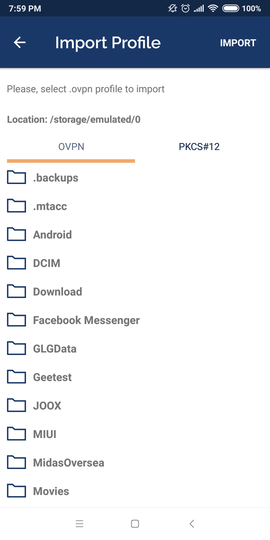
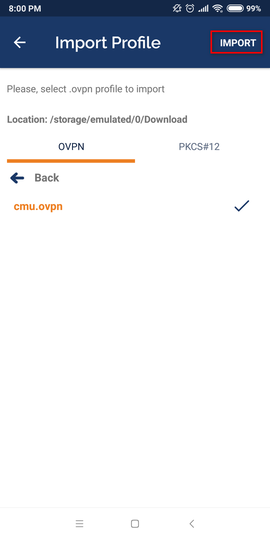
3. Enter cmu.ovpn file then click IMPORT
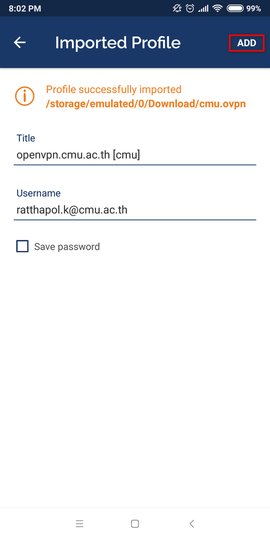
4. Add your CMU Account at username
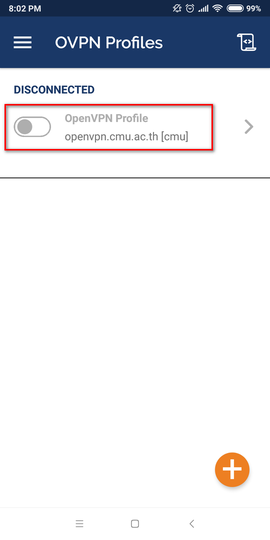
5. To connect please click as following
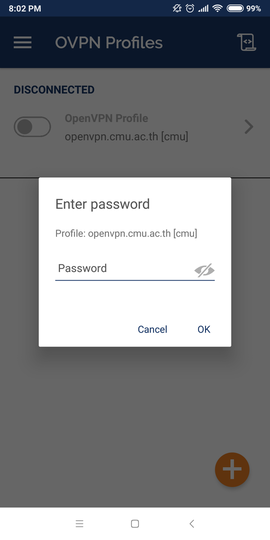
6. Fill your CMU Account Password
7. Click OK
8. When the connection is success will show the window as following
9. You can check your information which slide down
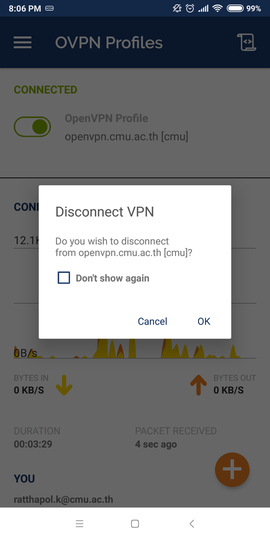
10. If you want to disconnecting you can enter as following
11. Click OK for disconnect
Using on the IOS
For installation and connection
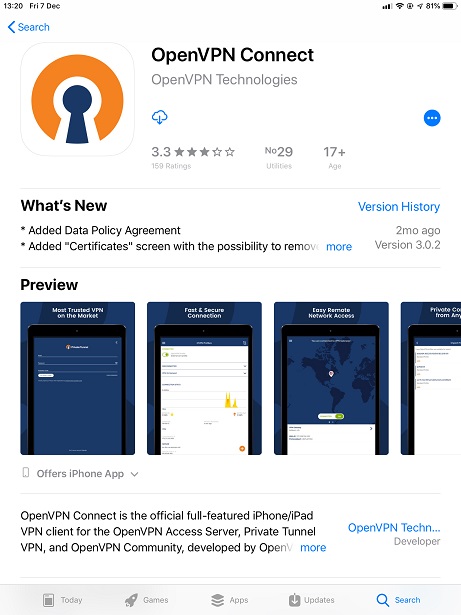
- Getting to App store to install the OpenVPN Connect application
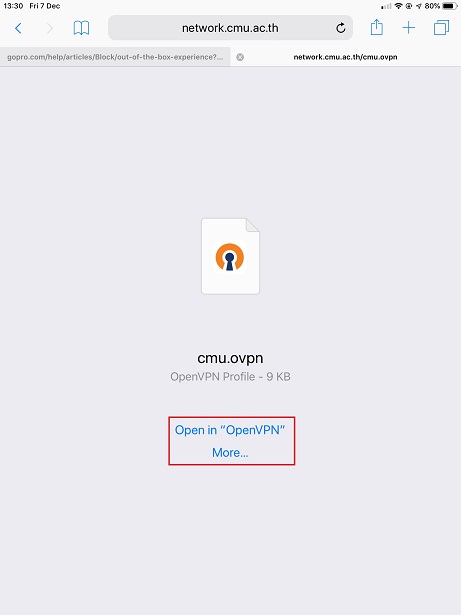
- Download file for connecting from https://network.cmu.ac.th/cmu.ovpn
- After that, choose Open in "OpenVPN"
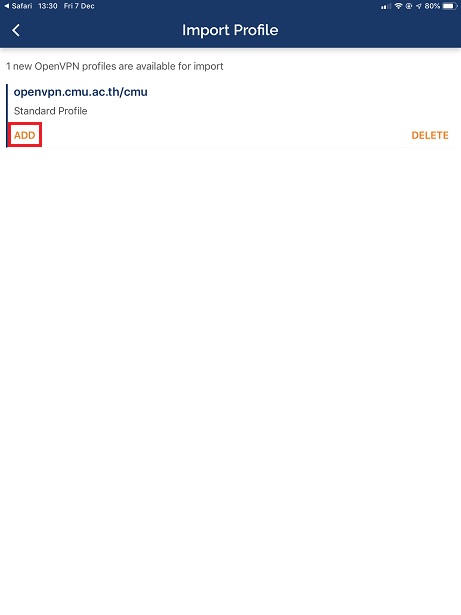
- On the Import Profile window please click ADD
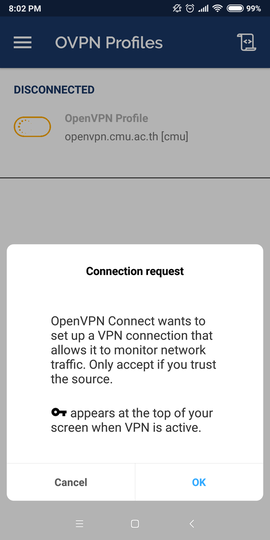
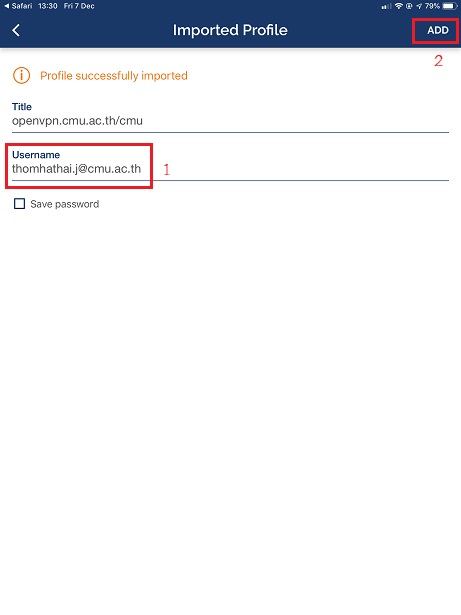
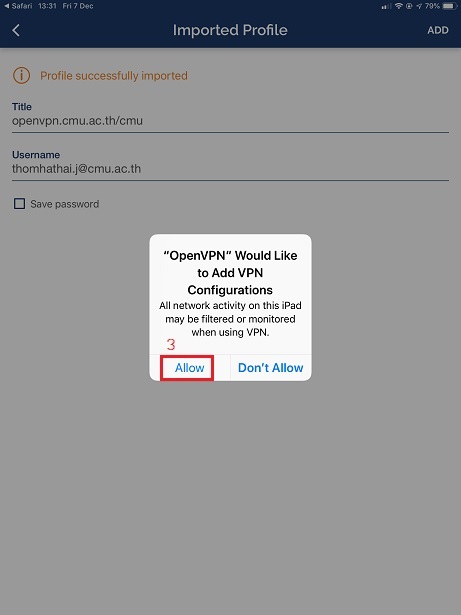
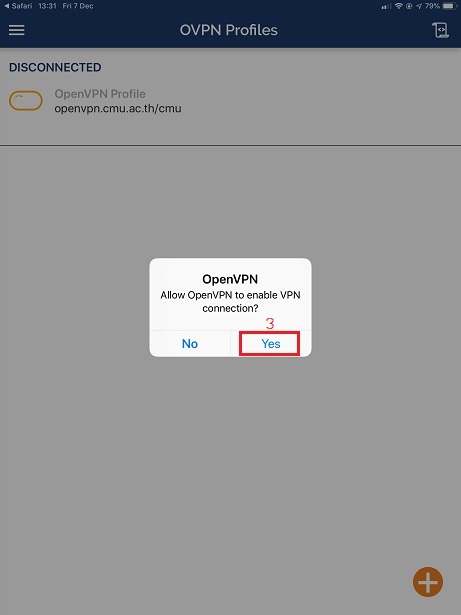
- On the Imported Profile window please specified your CMU Account on username then click ADD and accept Allow
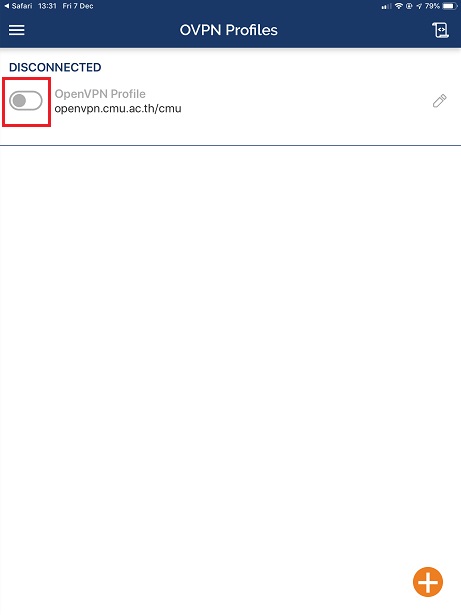
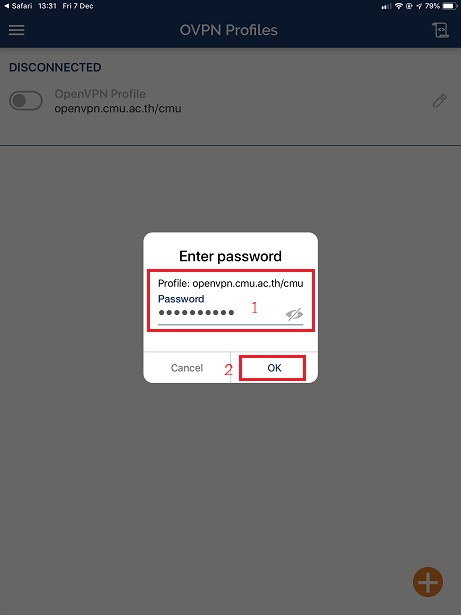
- Please Turn on at the OVPN Profiles window for using after that, fill your CMU Account password and click OK
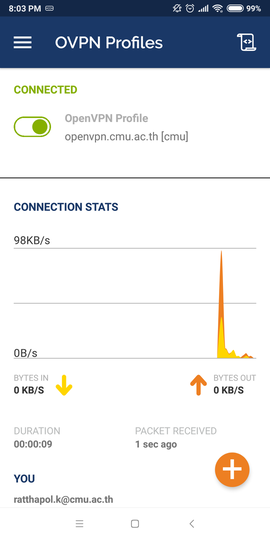
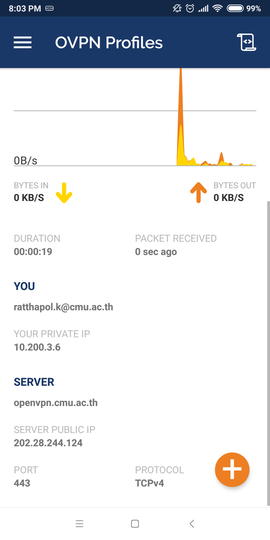
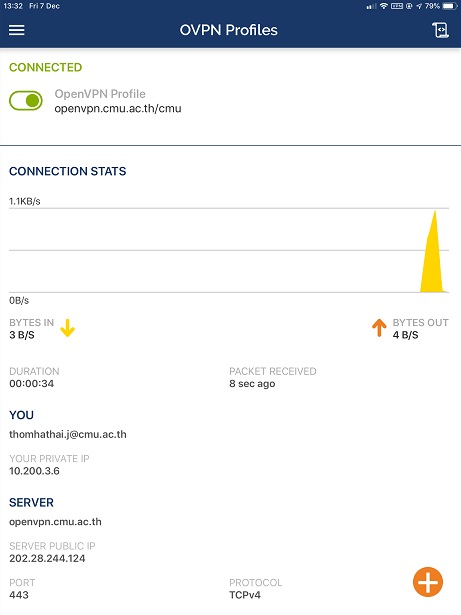
- When the connection is success will show the window as following
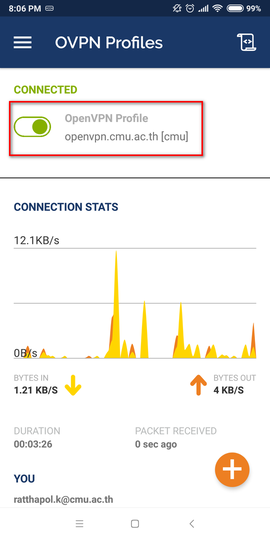
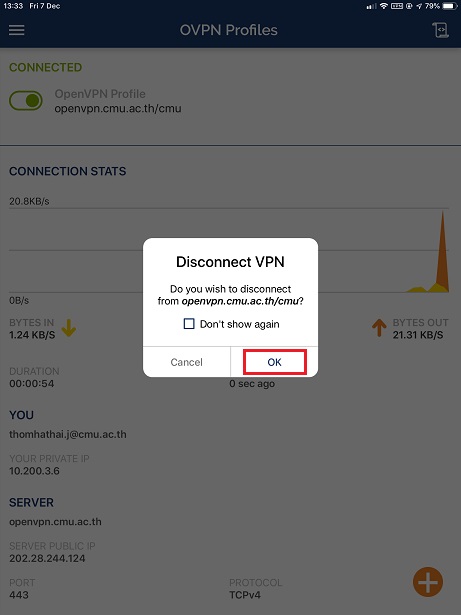
- You can Turn off when you want to disconnecting and click OK

Using on the macOS
Installation
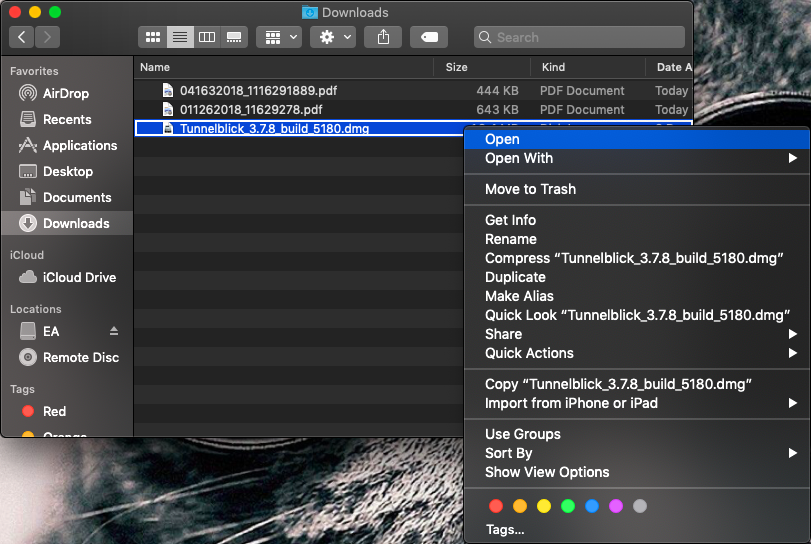
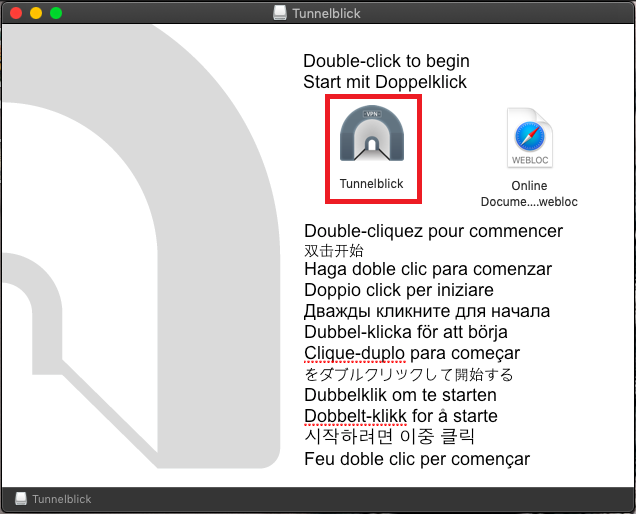
- Download the Tunneblick program from tunnelblick and click Open at file.dmg
- After that, you have to double click at icon Tunnelblick
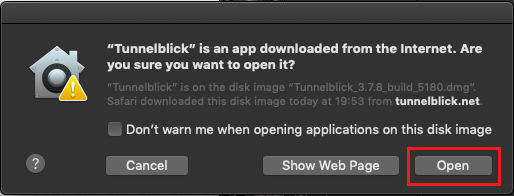
- If it shows same the image please choose Open
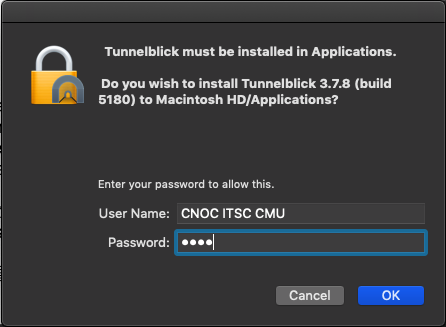
- Add your computer password, in case of new program installation then click OK
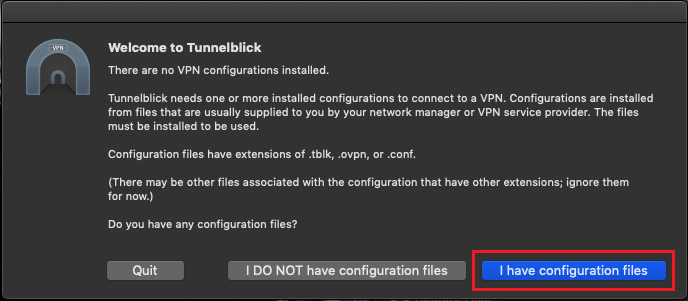
- In the Welcome to Tunnelblick window please choose I have configuration files
Connection
- Download file for connecting from https://network.cmu.ac.th/cmu.ovpn
- Right click a file that you are download then choose Open with Tunnelblick
- In the Install Configuration for All User window and enter Only Me
- Add your computer password, in case of change the computer config after that click OK
- Click icon Tunneblick on task bar and choose Connect CMU
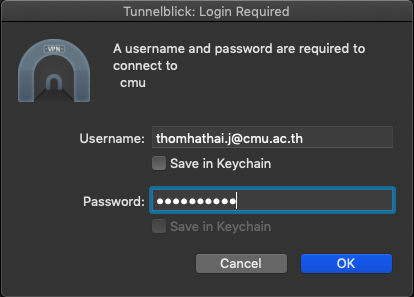
- Specify your CMU Account that receive from the university after that click OK
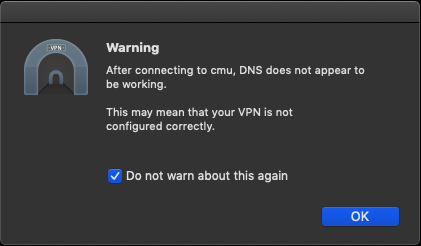
- If it shows same the image please choose Do not warn about this again and OK
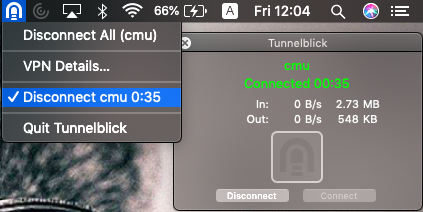
- When the connection is success will show the window as following

- You can choose Disconnect CMU for disconnectiong
วิธีแก้ปัญหาเมื่อพบ Errors
OpenVPN Error : There are no TAP-Windows adapters on this system.
- เมื่อพบ error ดังรูป
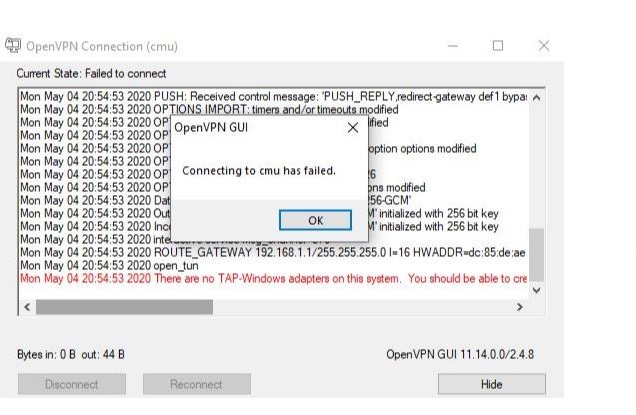
- ให้ไปที่ path C:\Program Files \ TAP-Windowns \ bin\ addtap.bat จากนั้นคลิกขวาที่ addtap.bat เลือก Run as administrator แล้วลองเชื่อมต่อ OpenVPN อีกครั้ง

OpenVPN Error : All TAP-Windows adapters on this system are currently in use
Solution 1 : Re-enable the adapter
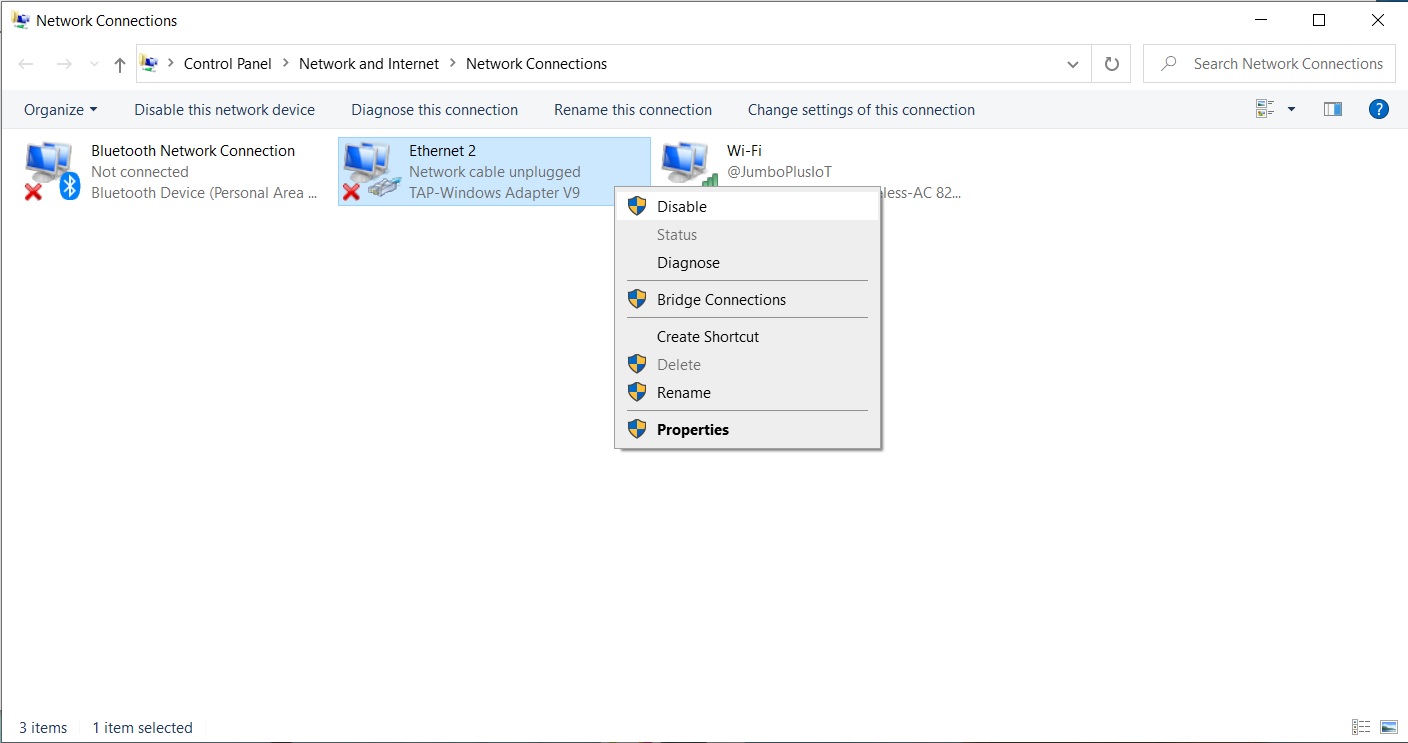
- ไปที่ Control Panel เลือก Network and Internet เลือก Network and Sharing Center เลือก Change adapter settings. หา icon ที่มีคำว่า TAP-Windows Adapter แสดงอยู่ จากนั้นคลิกขวาที่ icon เลือก Disable และคลิกขวาที่ icon เดิมอีกครั้งเลือก Enable
Solution 2 : reinstall the TAP driver
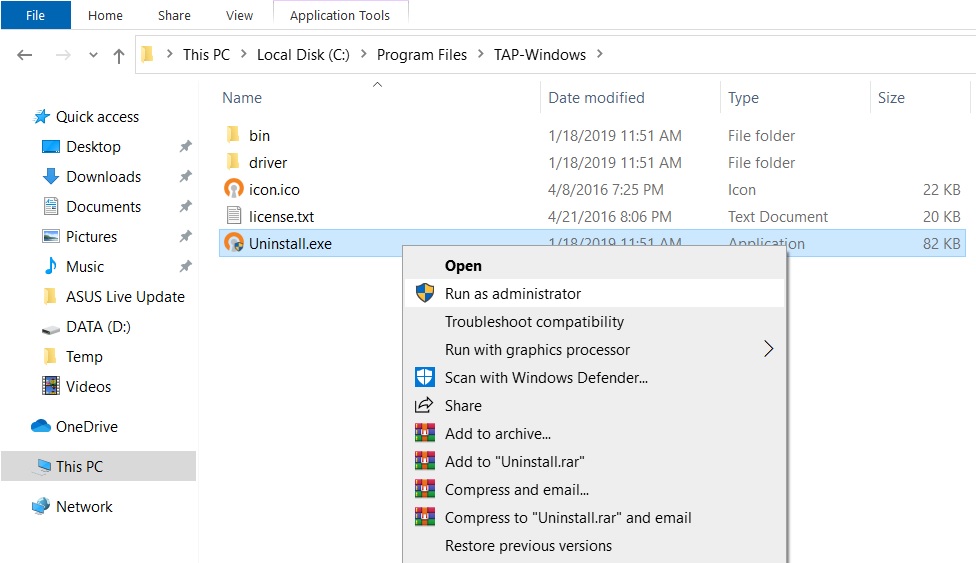
- ไปที่ path C:\ Program Files \ TAP-Windows คลิกขวาที่ Unintall เลือก Run as administrator
- ทำการ Restart Windows
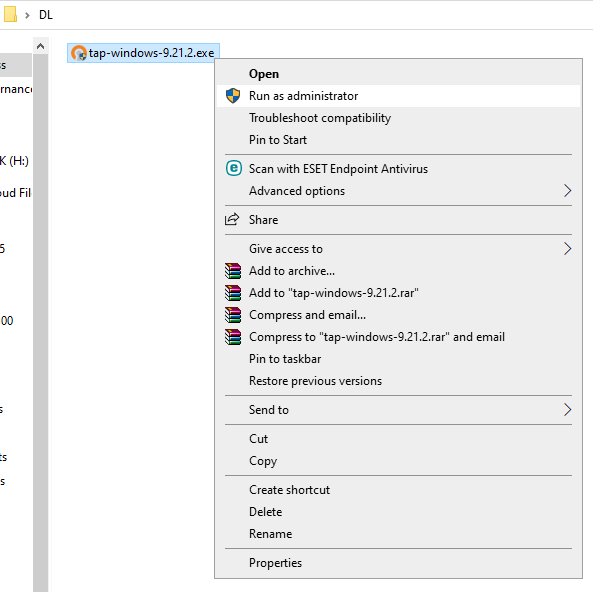
- จากนั้นดาวน์โหลด the Tab driver จาก OpenVPN repository และทำการติดตั้ง โดยคลิกขวา เลือก Run as adminnistrator
link ที่เกี่ยวข้อง
ติดต่อสอบถามเพิ่มเติม
Onestop Service สำนักบริการเทคโนโลยีสารสนเทศ มหาวิทยาลัยเชียงใหม่
โทรศัพท์ : 0-5394-3827
อีเมล : onestop@cmu.ac.th