Docker
From CMU ITSC Network
What is Docker
- Software Container เป็นการสร้างสภาพแวดล้อมสำหรับ software โดยแยกออกออกมาเพื่อไม่ให้กวนกับ software อื่น ๆ บนระบบปฏิบัติการเดียวกัน สามารถนำ Container ไปทำงานบนเครื่องไหนก็ได้จะได้ผลเหมือนกัน
- Docker เป็น engine ในการจัดการ Software Container ที่ใช้งานได้ง่าย ไม่ซับซ้อน เป็นที่แพร่หลาย
- Container VS VM
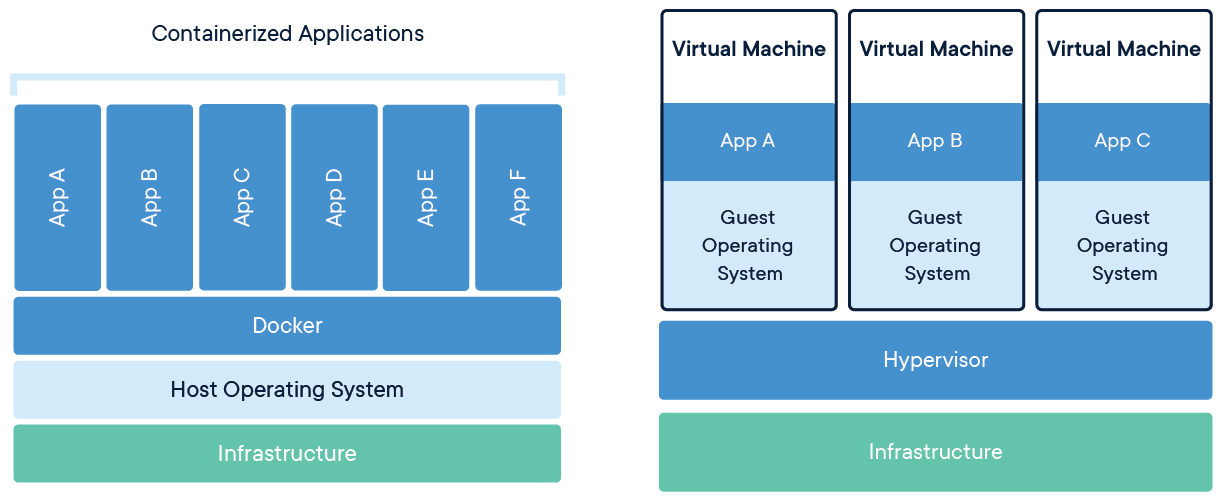
*image from https://www.docker.com
Pain point
- ต้องติดตั้ง ตั้งค่า server ที่จะรัน Application
- ไม่สามารถติดตั้งหรืออัพเกรด Library บางอย่างบน OS ได้เนื่องจากกระทบกับ Application อื่น
- เครื่อง Dev กับ Production ไม่เหมือนกัน
Docker Architecture
Docker Engine
- Docker Client คือพวก CLI ของ Docker ที่ใช้ในการจัดการ
- Docker Daemon คือ service ของ Docker ที่รันบน Server เราจะเรียก Server นี้ว่า Docker Machine
Docker Hub
- เป็น Repository หรือเรียกว่า Registry ทำหน้าที่ให้บริการ Docker Image มี Image ของผู้พัฒนาโปรแกรมต่าง ๆ ให้ใช้งาน มีการจัดเก็บ version ของ image อย่างเป็นระบบ มีเอกสารคู่มือการใช้งาน Image
โดยให้บริการที่ https://hub.docker.com ใช้งานได้ฟรี
- สามารถสร้าง Private Registry บน Server เองได้
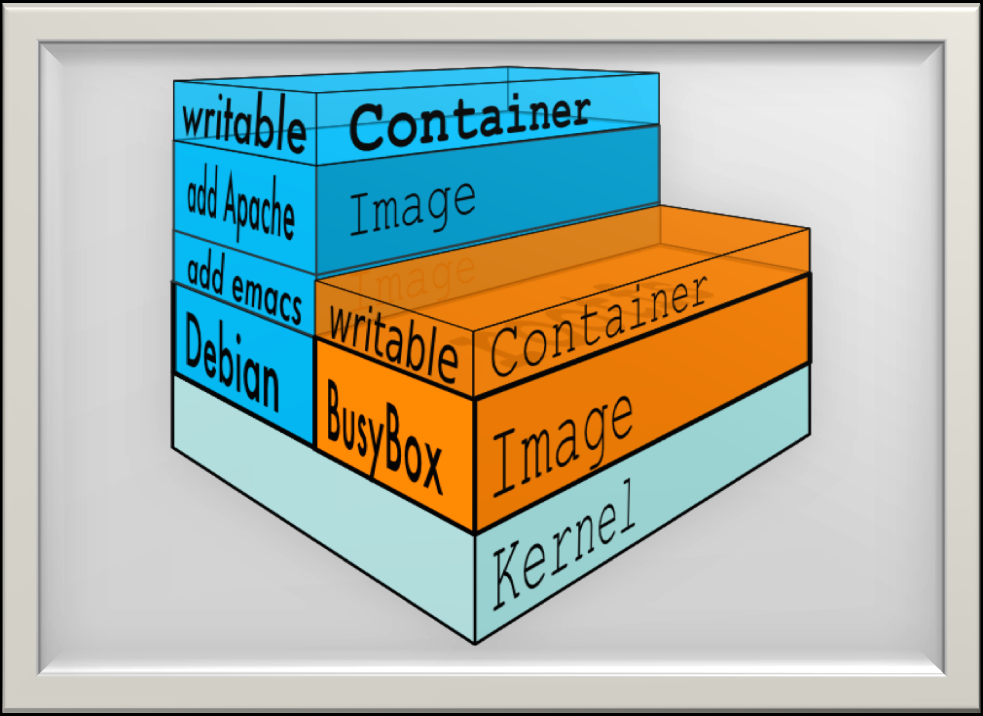
Docker Image
- เป็น Template ที่สร้างขึ้นโดยนักพัฒนาเป็นชุดของ Software/Library สามารถดึง(pull)มาจาก Registry เพื่อใช้งานหรือสร้างขึ้นมาเองได้
- เป็นไฟล์แบบอ่านอย่างเดียว
Docker Container
- คือ Image ที่ถูกรันขึ้นมาใช้งาน โดยจะมีสภาพแวดล้อมตาม Image ต้นแบบ
- ไฟล์หรืออะไรที่ถูกสร้างขึ้นมาใน Container จะหายไปเมื่อมีการลบ Container
- สามารถการเปลี่ยนแปลงใน Container กลับไปเป็น Image ได้เรียกว่า commit
Docker Machine
- Docker Desktop for Windows https://docs.docker.com/docker-for-windows/install/
- Docker for Ubuntu https://docs.docker.com/install/linux/docker-ce/ubuntu/
Workshop 1 : pull image
เปิด powshell ขึ้นมา แล้วพิมพ์คำสั่งในการ pull image
docker pull mysql:latest
docker pull ubuntu:latest
docker pull alpine
แสดง image ที่อยู่บนเครื่อง
docker images
REPOSITORY                 TAG                    IMAGE ID            CREATED             SIZE
mysql                      latest                 91dadee7afee        2 days ago          477MB
ubuntu                     latest                 47b19964fb50        4 weeks ago         88.1M
alpine                     latest                 caf27325b298        5 weeks ago         5.53MB
Workshop 2 : General Commands
| Command | Description |
| docker build | Build an image from a Dockerfile |
| docker commit | Create a new image from a container’s changes |
| docker container | Manage containers |
| docker cp | Copy files/folders between a container and the local filesystem |
| docker exec | Run a command in a running container |
| docker image | Manage images |
| docker images | List images |
| docker inspect | Return low-level information on Docker objects |
| docker logs | Fetch the logs of a container |
| docker network | Manage networks |
| docker ps | List containers |
| docker pull | Pull an image or a repository from a registry |
| docker push | Push an image or a repository to a registry |
| docker restart | Restart one or more containers |
| docker rm | Remove one or more containers |
| docker rmi | Remove one or more images |
| docker run | Run a command in a new container |
| docker stats | Display a live stream of container(s) resource usage statistics |
| docker stop | Stop one or more running containers |
| docker tag | Create a tag TARGET_IMAGE that refers to SOURCE_IMAGE |
| docker top | Display the running processes of a container |
| docker volume | Manage volumes |
https://docs.docker.com/engine/reference/commandline/docker/
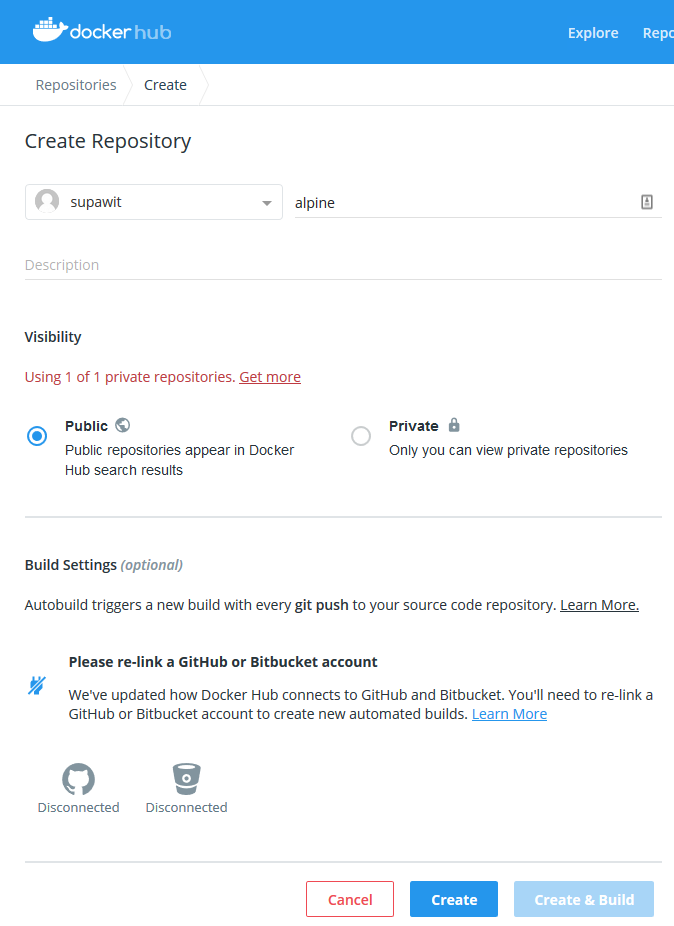
Workshop 3 : push image
- สมัครบัญชี https://hub.docker.com
- เข้าสู่ระบบแล้วสร้าง repository
- tag image เป็นชื่อบัญชีที่สร้าง
docker tag alpine:latest [accountname]/alpine:latest
- แสดงรายการ image
docker images
alpine                     latest                 caf27325b298        5 weeks ago         5.53MB
supawit/alpine             latest                 caf27325b298        5 weeks ago         5.53MB
- login เข้า hub.docker.com ด้วยบัญชีที่สร้าง
docker login -u [accountname]
- push image ที่ tag ไว้ขึ้น repository บน registry
docker push [accountname]/alpine:latest
Workshop 4 : Run Container
Interactive
- run container แบบ interactive terminal โดยให้ชื่อ container เป็น nginx และ map port 8080 ที่ docker machine เข้าไปเป็น port 80 ใน container
docker run -it --rm --name nginx -p 8080:80 nginx
- ทดสอบเปิด browser http://localhost:8080
- ตรวจสอบ container
docker ps -a
- Ctrl+C เพื่อจบการทำงาน
Detach
- run container แบบ detach
docker run -it -d --name nginx -p 8080:80 nginx
- ทดสอบเปิด browser http://localhost:8080
- ตรวจสอบ container
docker ps -a
- ทดสอบเข้า shell ใน container ด้วยการส่งคำสั่งไปทำงานบน container ที่ทำงานอยู่
docker exec -it nginx bash
- การหยุด/เริ่ม container
docker stop nginx
docker start nginx
- ลบ container
docker rm nginx
Docker Network
- เบื้องต้อน docker จะมี network มาให้ 3 รูปแบบ
PS D:\> docker network ls
NETWORK ID          NAME                DRIVER              SCOPE
749dc07193c8        bridge              bridge              local
1e55901ecd55        host                host                local
98f00c775b7d        none                null                local
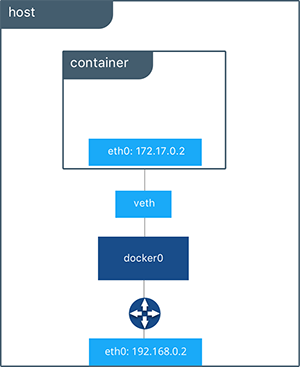
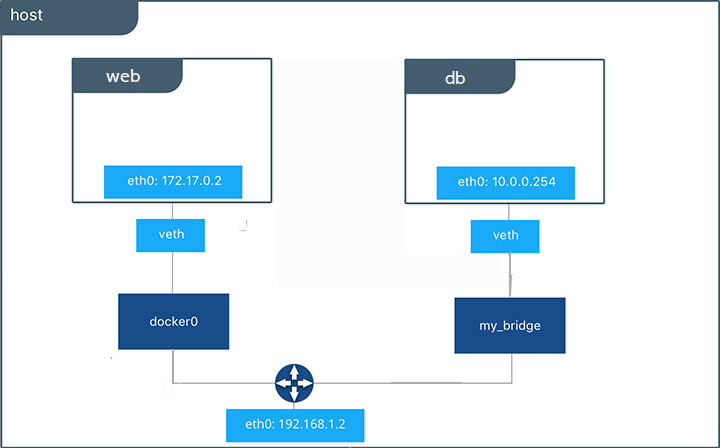
- bridge เป็น default network ที่ container เชื่อมสู่ภายนอกผ่าน virtual switch docker0 ผ่าน routing ของ virtual network ที่สร้างขึ้นด้วย docker engine
- host เป็น network ที่ container ใช้ network interface ของ docker machine host
- none เป็น network loopback ของ container ไม่มีการเชื่อมต่อสู่ภายนอก
- โดยปกติกรณีสั่ง run container ถ้าไม่ได้ระบุ option เกี่ยวกับ network, container จะต่อเข้ากับ network bridge และกำหนด ip address ให้โดยอัตโนมัติ
PS D:\> docker run -d --name web nginx
4b0f396b24625fdae8066723efe76bb53b2e60031780e1b5bb168ace1161b5fa
PS D:\> docker inspect bridge
[
    {
        "Name": "bridge",
        "Id": "749dc07193c80a8efd89629be5ab4abf8252fdb04d837ebec95176bdde50c293",
        "Created": "2019-03-12T03:41:54.6066118Z",
        "Scope": "local",
        "Driver": "bridge",
        "EnableIPv6": false,
        "IPAM": {
            "Driver": "default",
            "Options": null,
            "Config": [
                {
                    "Subnet": "172.17.0.0/16",
                    "Gateway": "172.17.0.1"
                }
            ]
        },
        "Internal": false,
        "Attachable": false,
        "Ingress": false,
        "ConfigFrom": {
            "Network": ""
        },
        "ConfigOnly": false,
        "Containers": {
            "4b0f396b24625fdae8066723efe76bb53b2e60031780e1b5bb168ace1161b5fa": {
                "Name": "nginx",
                "EndpointID": "d884ba8b25e4f665a6f232d9971c4255b9c53b54e2c222c94926a44970c80ba2",
                "MacAddress": "02:42:ac:11:00:02",
                "IPv4Address": "172.17.0.2/16",
                "IPv6Address": ""
            }
        },
        "Options": {
            "com.docker.network.bridge.default_bridge": "true",
            "com.docker.network.bridge.enable_icc": "true",
            "com.docker.network.bridge.enable_ip_masquerade": "true",
            "com.docker.network.bridge.host_binding_ipv4": "0.0.0.0",
            "com.docker.network.bridge.name": "docker0",
            "com.docker.network.driver.mtu": "1500"
        },
        "Labels": {}
    }
]
- option เกี่ยวกับ network ตอน run container
--dns=x.x.x.x(default จะใช้ --name,--net-alias)
--net="<bridge/none/host/custom>"
--net-alias="xxxx"
--add-host="xxxx"
--mac-address="xxxx"
--ip="x.x.x.x"
-p, --publish <host-port>:<container-port>
-P, --publish-all Auto map port
- สามารถสร้าง virtual network เพิ่มเติมได้ เพื่อจัดระเบียบและแบ่งส่วน network ของ container ออกจากกัน แนะนำให้ production ควรทำแบบนีั
docker network create my_bridge
docker network ls
NETWORK ID          NAME                DRIVER              SCOPE
749dc07193c8        bridge              bridge              local
1e55901ecd55        host                host                local
4d49d6a516f3        my_bridge           bridge              local
98f00c775b7d        none                null                local
option เพิ่มเติมในการส้ราง network
--subnet= xx เช่น 10.10.0.0/24
--ip-range = xx ระบุ ip ที่จะแจกให้ container
--gateway = xx ระบุ ip ของ gateway
--opt = custom options เช่น --opt="com.docker.network.mtu"="9000"
- run container โดยใช้ network ที่สร้างขึ้น
docker run -d --net=my_bridge --name db mongo
- สามารถให้ container เชื่อมต่อกับหลาย ๆ network ได้เช่นเชื่อม container web เขากับ network my_bridge
docker network connect my_bridge web
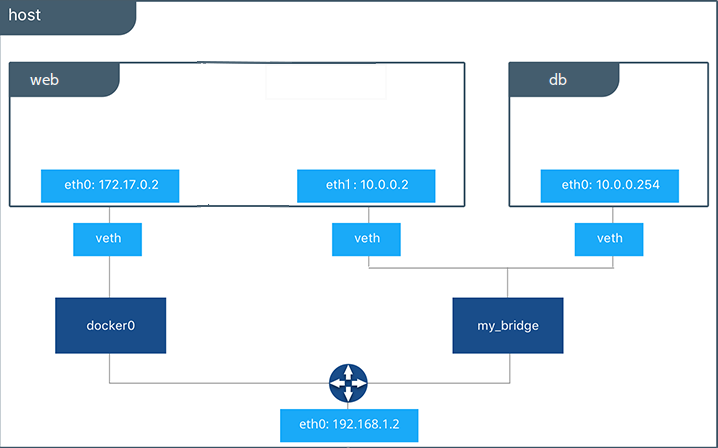
- ตัด container จาก network
docker network disconnect my_bridge web
Workshop 5 : Internal Network
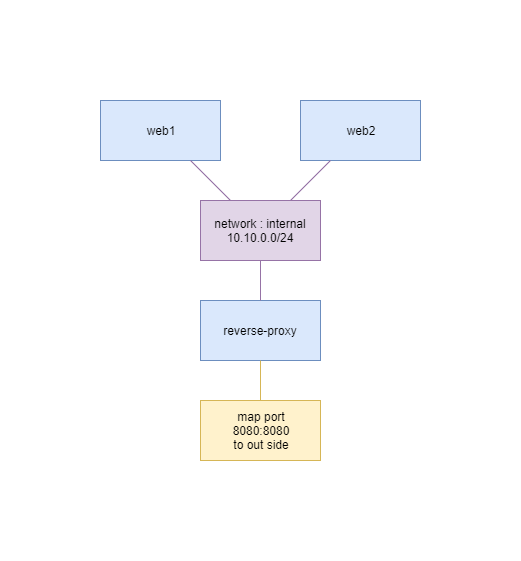
- สร้าง network ขึ้นมาให้ container เชื่อมต่อ
docker network create --subnet=10.10.0.0/24 --gateway=10.10.0.1 internal
- run container ที่ web1, web2, reverse-proxy
docker run -d --net internal --net-alias web1 --name web1 supawit/nginx:web1
docker run -d --net internal --net-alias web2 --name web2 supawit/nginx:web2
docker run -d --net internal --net-alias reverse-proxy -p 8080:8080 --name reverse-proxy supawit/nginx:reverse-proxy
- ตรวจสอบ container
docker ps
CONTAINER ID        IMAGE                         COMMAND                  CREATED             STATUS              PORTS                            NAMES
17597e0e0c2a        supawit/nginx:reverse-proxy   "nginx -g 'daemon of…"   3 minutes ago       Up 3 minutes        80/tcp, 0.0.0.0:8080->8080/tcp   reverse-proxy
3aa9aa4e1ac8        supawit/nginx:web2            "nginx -g 'daemon of…"   3 minutes ago       Up 3 minutes        80/tcp                           web2
4aa35567534f        supawit/nginx:web1            "nginx -g 'daemon of…"   5 minutes ago       Up 5 minutes        80/tcp                           web1
- ดูรายละเอียด network
docker inspect internal
[
    {
        "Name": "internal",
        "Id": "d29a2364bf2a1b412bea30935d5b9e31ee6bfd611aad21e56fa6142dd6e952bb",
        "Created": "2019-03-12T07:59:15.6694828Z",
        "Scope": "local",
        "Driver": "bridge",
        "EnableIPv6": false,
        "IPAM": {
            "Driver": "default",
            "Options": {},
            "Config": [
                {
                    "Subnet": "10.10.0.0/24",
                    "Gateway": "10.10.0.1"
                }
            ]
        },
        "Internal": false,
        "Attachable": false,
        "Ingress": false,
        "ConfigFrom": {
            "Network": ""
        },
        "ConfigOnly": false,
        "Containers": {
            "17597e0e0c2afa2ee3706769ddb06d740e91dbfd0d5ae919ae281e5c4056044c": {
                "Name": "reverse-proxy",
                "EndpointID": "4fdfb543c1583036364b7bfce9bc6fd1788b7457ccf535bfde8c8d0bca0229e7",
                "MacAddress": "02:42:0a:0a:00:04",
                "IPv4Address": "10.10.0.4/24",
                "IPv6Address": ""
            },
            "3aa9aa4e1ac8cf49781b8cf488416d6cf0f385c4af0f041b364f83f39f0cba4b": {
                "Name": "web2",
                "EndpointID": "c48238943308d64e66eb964fad3dfb0d4be778ce401444764e643adfee09138c",
                "MacAddress": "02:42:0a:0a:00:03",
                "IPv4Address": "10.10.0.3/24",
                "IPv6Address": ""
            },
            "4aa35567534f8497f60b3161c7e285a7d9fd355cf0cec225070013a117bae6ff": {
                "Name": "web1",
                "EndpointID": "6679a0bec7a8a25787250c075333da083fc76a4da6035060431af888197061ff",
                "MacAddress": "02:42:0a:0a:00:02",
                "IPv4Address": "10.10.0.2/24",
                "IPv6Address": ""
            }
        },
        "Options": {},
        "Labels": {}
    }
]
- สามารถดู log ของ container ประกอบได้ด้วยคำสั่ง
docker logs -f web1
- ดูการตั้งค่า reverse proxy
docker exec reverse-proxy cat /etc/nginx/conf.d/reverse.conf
upstream web {
        server web1:80;
        server web2:80;
}

server {
        listen 8080;
        location / {
                proxy_pass http://web;
                proxy_set_header Host $http_host;
                proxy_set_header X-Real-IP $remote_addr;
                proxy_set_header X-Forwarded-For $proxy_add_x_forwarded_for;
        }
}
- workshop clean up
docker stop web1 web2 reverse-proxy
docker rm web1 web2 reverse-proxy
docker network rm internal
docker image rm supawit/nginx:web1 supawit/nginx:web2 supawit/nginx:reverse-proxy