Difference between revisions of "Android"
From CMU ITSC Network
Thomhathai (talk | contribs) (Created page with "<h2><b>การเชื่อมต่อ @JumboPlus และ @JumboPlus 5 GHz สำหรับ Andriod 7 </b></h2> <br/><br/> # ไปที่ Settings >> Wi-Fi >> Turn...") |
Thomhathai (talk | contribs) |
||
| Line 7: | Line 7: | ||
#* Phase 2 authentication : MSCHAPV2 | #* Phase 2 authentication : MSCHAPV2 | ||
#* CA certificate : Do not validate / unspecified <br/><br/> [[File:JumboAndroid 3.jpg |link=]] <br/><br/> | #* CA certificate : Do not validate / unspecified <br/><br/> [[File:JumboAndroid 3.jpg |link=]] <br/><br/> | ||
| + | # กรอก CMU Account ที่ช่อง Identity และ Password จากนั้นกด "Connect" | ||
| + | #* นักศึกษา Username : Firstname_Surname@cmu.ac.th | ||
| + | #* บุคลากร Username :Firstname.Surname@cmu.ac.th | ||
Revision as of 09:39, 12 December 2018
การเชื่อมต่อ @JumboPlus และ @JumboPlus 5 GHz สำหรับ Andriod 7
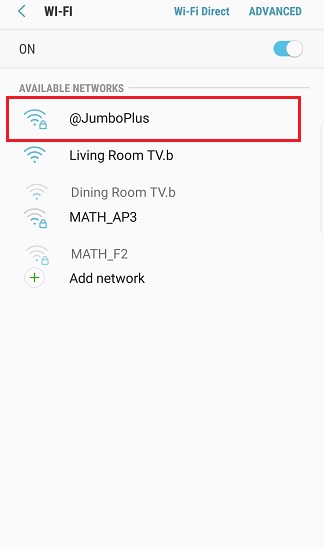
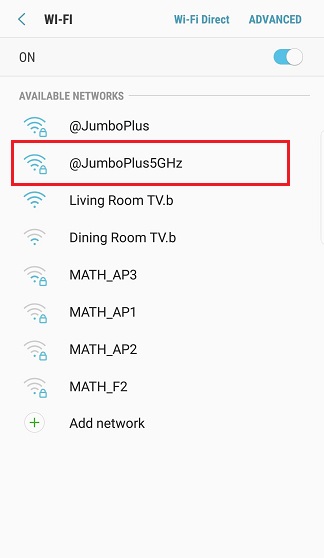
- ไปที่ Settings >> Wi-Fi >> Turn on Wi-Fi จากนั้นเลือก @JumboPlus หรือ @JumboPlus5GHz
- กรณีเห็น @JumboPlus ชื่อเดียว แสดงว่าอุปกรณ์ของท่านรองรับคลื่นความถี่ 2.4GHz เท่านั้น
- กรณีเห็นทั้งสองชื่อ แสดงว่าอุปกรณ์ของท่านรองรับคลื่นความถี่ 5GHz แนะนำให้เลือกเชื่อมต่อที่ @JumboPlus5GHz


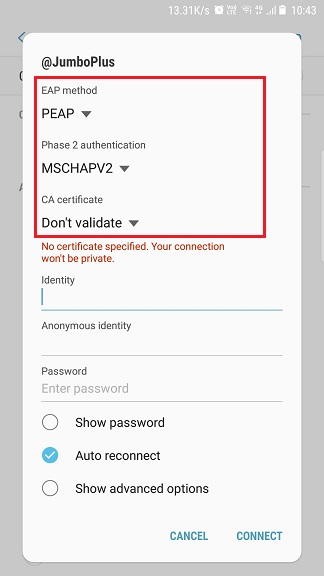
- เลือกค่าโปรไฟล์ดังนี้
- EAP method : PEAP
- Phase 2 authentication : MSCHAPV2
- CA certificate : Do not validate / unspecified

- กรอก CMU Account ที่ช่อง Identity และ Password จากนั้นกด "Connect"
- นักศึกษา Username : Firstname_Surname@cmu.ac.th
- บุคลากร Username :Firstname.Surname@cmu.ac.th