Difference between revisions of "Windows 10 and Windows 11 EN"
From CMU ITSC Network
Thomhathai (talk | contribs) (Created page with "<h2><b> Windows10 & Windows 11 connect @JumboPlus5GHz</b></h2> <br/><br/> # Press the '''globe''' icon on the Taskbar (bottom right) and click '''>''' on the Wi-Fi icon, then...") |
Thomhathai (talk | contribs) |
||
| Line 4: | Line 4: | ||
#* '''If you see both names, it means your device supports the 5GHz frequency; it is recommended to connect to @JumboPlus5GHz.'''<br/><br/> [[File:windows11_jumbo1.png | link=]] [[File:windows11_jumbo2.png | link=]] <br/><br/> | #* '''If you see both names, it means your device supports the 5GHz frequency; it is recommended to connect to @JumboPlus5GHz.'''<br/><br/> [[File:windows11_jumbo1.png | link=]] [[File:windows11_jumbo2.png | link=]] <br/><br/> | ||
# Enter your '''Username''' and '''Password''' for the '''CMU Account''' provided by the university, then click '''OK'''<br/> | # Enter your '''Username''' and '''Password''' for the '''CMU Account''' provided by the university, then click '''OK'''<br/> | ||
| − | * CMU | + | * CMU Students: Firstname_Surname@cmu.ac.th |
| − | * CMU | + | * CMU Students with ID 69 onwards: StudentID@cmu.ac.th |
| + | * CMU Staffs: Firstname.Surname@cmu.ac.th <br/><br/> [[File:windows11_jumbo3.png|link=]] <br/><br/> | ||
3. Click '''Connect''' <br/><br/> [[File:windows11_jumbo4.png|link=]] <br/><br/> | 3. Click '''Connect''' <br/><br/> [[File:windows11_jumbo4.png|link=]] <br/><br/> | ||
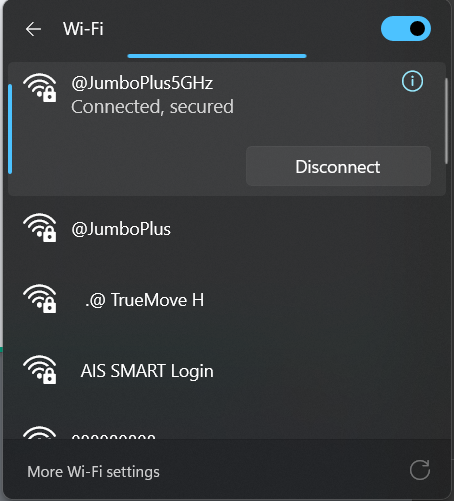
4. After successfully connecting to '''@JumboPlus5GHz''' or '''@JumboPlus''', the device will remember the connection. Next time you are in an area with a signal, the device will connect automatically. <br/><br/> [[File:windows11_jumbo5.png|link=]] | 4. After successfully connecting to '''@JumboPlus5GHz''' or '''@JumboPlus''', the device will remember the connection. Next time you are in an area with a signal, the device will connect automatically. <br/><br/> [[File:windows11_jumbo5.png|link=]] | ||
Latest revision as of 08:51, 7 July 2026
Windows10 & Windows 11 connect @JumboPlus5GHz
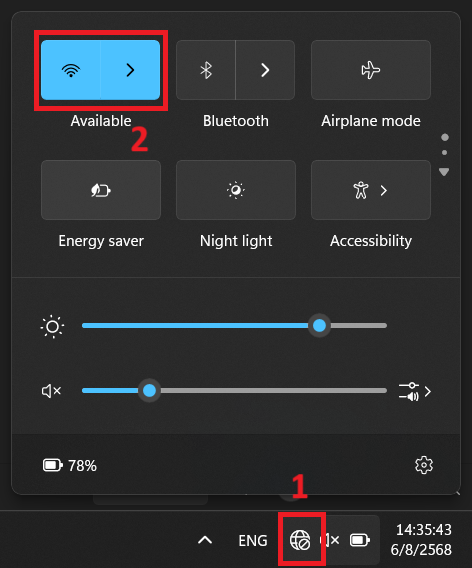
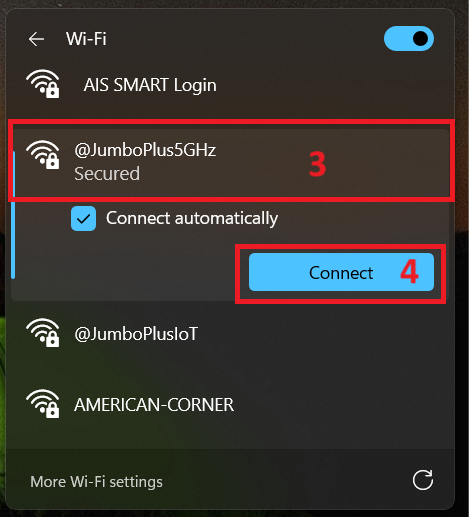
- Press the globe icon on the Taskbar (bottom right) and click > on the Wi-Fi icon, then select @JumboPlus5GHz and click Connect
- If you only see the name @JumboPlus, it means your device only supports the 2.4GHz frequency.
- If you see both names, it means your device supports the 5GHz frequency; it is recommended to connect to @JumboPlus5GHz.
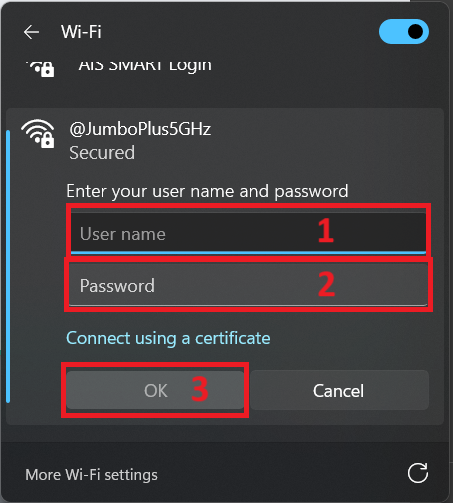
- Enter your Username and Password for the CMU Account provided by the university, then click OK
- CMU Students: Firstname_Surname@cmu.ac.th
- CMU Students with ID 69 onwards: StudentID@cmu.ac.th
- CMU Staffs: Firstname.Surname@cmu.ac.th
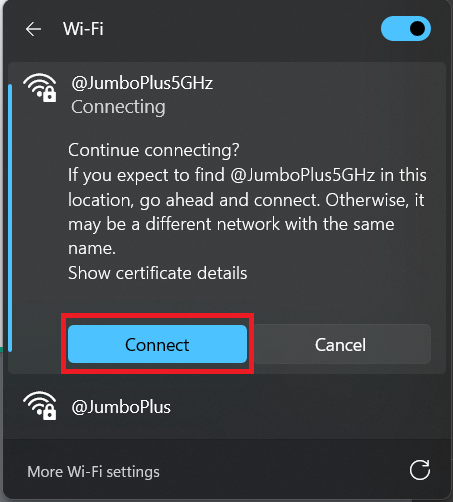
3. Click Connect
4. After successfully connecting to @JumboPlus5GHz or @JumboPlus, the device will remember the connection. Next time you are in an area with a signal, the device will connect automatically.