Difference between revisions of "CMU GlobalProtect for Guest Account English Guide"
From CMU ITSC Network
(Created page with "== Using GlobalProtect on Windows == === Check Your System Type === # Right-click on '''This PC''' or '''My Computer''' and select '''Properties'''. <br/> File:SystemType1....") |
|||
| Line 22: | Line 22: | ||
=== Installation === | === Installation === | ||
| − | # Go to | + | # Go to https://guest-vpn.cmu.ac.th/ and log in with your '''CMU Guest Account''' to download the installation file <br/>[[File:Gb mac 01.png|link=|alt=|border]]<br/><br/> |
| − | # Double-click | + | # Double-click '''GlobalProtect.pkg''' to start the installation <br/>[[File:Gb mac 02.png|link=|alt=|border]]<br/><br/> |
| − | # Click | + | # Click '''Continue''' in the '''Introduction''' and '''Destination Select''' sections <br/>[[File:Gb mac 03.png|link=|alt=|border|615x615px]][[File:Gb mac 04.png|link=|alt=|border|615x615px]]<br/><br/> |
| − | # In the | + | # In the '''Installation Type''' section, click '''Install''' <br/> [[File:Gb mac 05.png|link=|alt=|border|615x615px]] <br/><br/> |
| − | # Enter your device password and click | + | # Enter your device password and click '''Install Software'''. Wait until installation is complete, then click '''Close''' <br/>[[File:Gb mac 06.png|link=|alt=|border|615x615px]] [[File:Gb mac 07.png|link=|alt=|border|615x615px]] <br/><br/> |
=== Connecting with Guest Account === | === Connecting with Guest Account === | ||
| − | # In the | + | # In the '''Welcome!''' window, click '''Get Started''', enter '''guest-vpn.cmu.ac.th''', then click '''Connect''' <br/>[[File:Gpguestmac01.png|300px|link=]]<br/><br/> |
| − | # Log in with your | + | # Log in with your '''Username''' and '''Password''', then click '''Connect''' <br/>[[File:Gpguestmac02.png|300px|link=]]<br/><br/> |
| − | # In the | + | # In the '''System Extension Blocked''' window, click '''Open Security Preferences''' <br/>[[File:Gb mac 10.png|link=]]<br/><br/> |
| − | # In the | + | # In the '''General''' tab, click the lock icon at the bottom, enter your password, and click '''Unlock''' <br/>[[File:Gb mac 11.png|link=|alt=|border|665x665px]] [[File:Gb mac 12.png|link=|alt=|border|665x665px]] <br/><br/> |
| − | # | + | # Click '''Allow''' twice as shown, then click the lock icon again to lock it <br/>[[File:Gb mac 13.png|link=|alt=|border|665x665px]] [[File:Gb mac 14.png|link=|alt=|border|665x665px]]<br/><br/> |
| − | # To disconnect, click the | + | # To disconnect, click the '''GlobalProtect icon''' on the menu bar, click the top-right button, then select '''Disconnect'''<br/>[[File:Gpguestmac03.png|300px|link=]]<br/><br/> |
== Using GlobalProtect on iOS == | == Using GlobalProtect on iOS == | ||
=== Installation === | === Installation === | ||
| − | # Open the | + | # Open the '''App Store''', search for '''GlobalProtect''', and install the app <br/>[[File:Gpios06.png|541x541px|link=|alt=]]<br/><br/> |
=== Connecting with Guest Account === | === Connecting with Guest Account === | ||
| − | # Open the | + | # Open the '''GlobalProtect''' app, tap '''Allow''' to enable notifications, then tap '''Continue''' <br/>[[File:Gpios01.png|541x541px|link=|alt=]]<br/><br/> |
| − | # Enter | + | # Enter '''guest-vpn.cmu.ac.th''', then tap '''Connect''' <br/>[[File:Gpguestios01.png|541x541px|link=|alt=|border]]<br/><br/> |
| − | # Tap | + | # Tap '''Allow''' <br/>[[File:Gpguestios02.png|541x541px|link=|alt=|border]]<br/><br/> |
| − | # Log in with your | + | # Log in with your '''Username''' and '''Password''', then tap '''Sign in''' <br/>[[File:Gpguestios03.png|541x541px|link=|alt=|border]] <br/><br/> |
| − | # To disconnect, tap the top-left button, select | + | # To disconnect, tap the top-left button, select '''Sign out''', then tap '''Continue''' <br/>[[File:Gpguestios04.png|541x541px|link=|alt=|border]] [[File:Gpguestios05.png|541x541px|link=|alt=|border]] [[File:Gpguestios06.png|541x541px|link=|alt=|border]] <br/><br/> |
== Using GlobalProtect on Android == | == Using GlobalProtect on Android == | ||
=== Installation === | === Installation === | ||
| − | # Open the | + | # Open the '''Play Store''', search for '''GlobalProtect''', and install the app <br/>[[File:Gp and 01.jpg|556x556px|link=|alt=|border]]<br/><br/> |
=== Connecting with Guest Account === | === Connecting with Guest Account === | ||
| − | # Open the | + | # Open the '''GlobalProtect''' app, then tap '''OK''' <br/>[[File:Gpguestand01.png|556x556px|link=|alt=|border]]<br/><br/> |
| − | # Tap | + | # Tap '''Allow''' to enable notifications <br/>[[File:Gpguestand02.png|556x556px|link=|alt=|border]]<br/><br/> |
| − | # Enter | + | # Enter '''guest-vpn.cmu.ac.th''', then tap '''Connect''' <br/>[[File:Gpguestand03.png|556x556px|link=|alt=|border]]<br/><br/> |
| − | # Log in with your | + | # Log in with your '''Username''' and '''Password''', then tap '''Sign in''' <br/>[[File:Gpguestand04.png|556x556px|link=|alt=|border]]<br/><br/> |
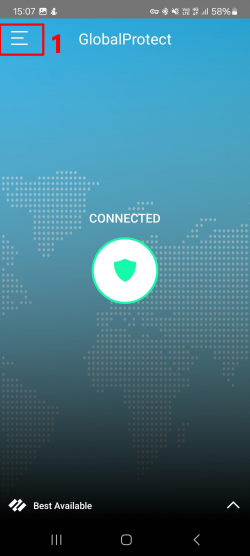
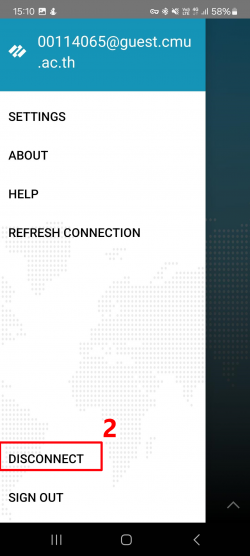
| − | # To disconnect, tap the top-left button, then select | + | # To disconnect, tap the top-left button, then select '''Disconnect''' <br/>[[File:Gpguestand05.png|556x556px|link=|alt=|border]] [[File:Gpguestand06.png|556x556px|link=|alt=|border]]<br/><br/> |
Latest revision as of 04:02, 21 June 2025
Using GlobalProtect on Windows
Check Your System Type
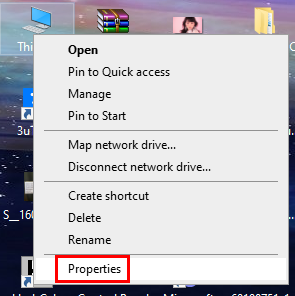
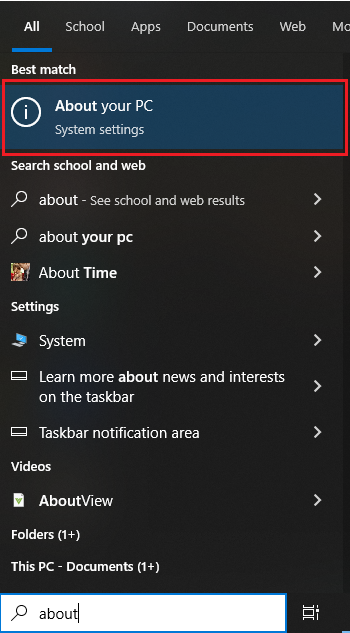
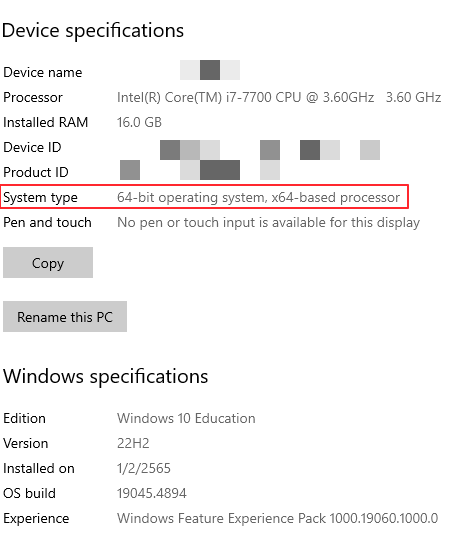
- Right-click on This PC or My Computer and select Properties.
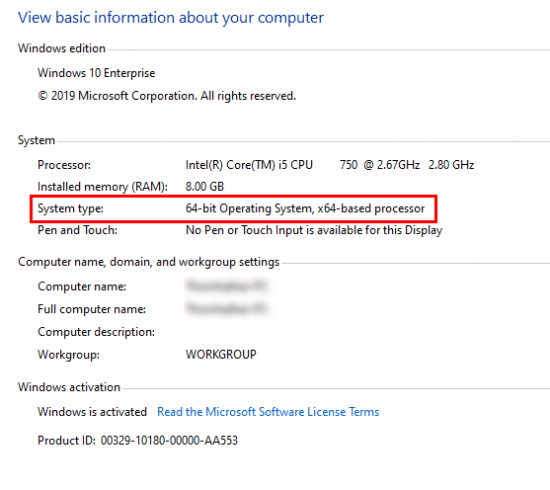
- Look under System Type to see if your system is 32-bit or 64-bit to download the correct file.
If This PC or My Computer is not on the Desktop, use the search bar on the Taskbar and search for About your PC.
Installation
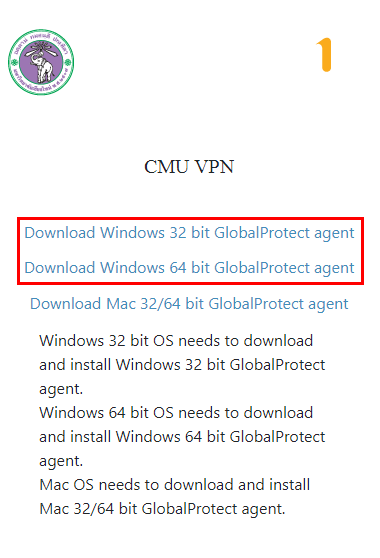
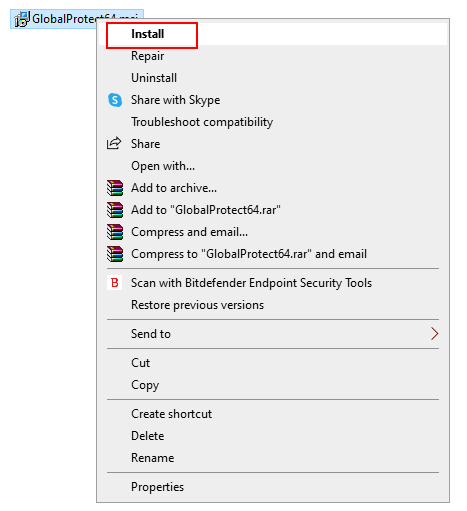
- Go to https://guest-vpn.cmu.ac.th/ and log in with your CMU Guest Account to download the installation file. Then right-click on GlobalProtect.msi (or double-click) and select Install
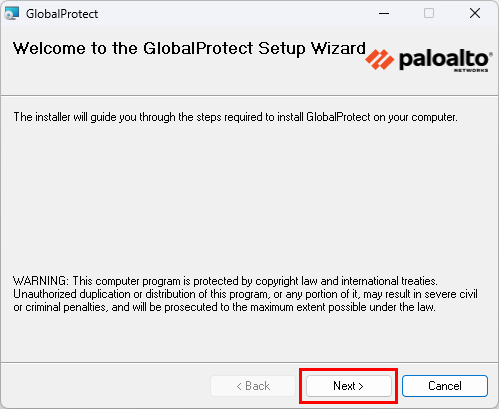
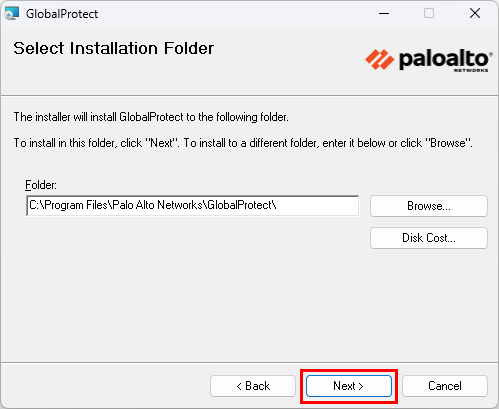
- In the Welcome to GlobalProtect Setup Wizard and Select Installation Folder windows, click Next
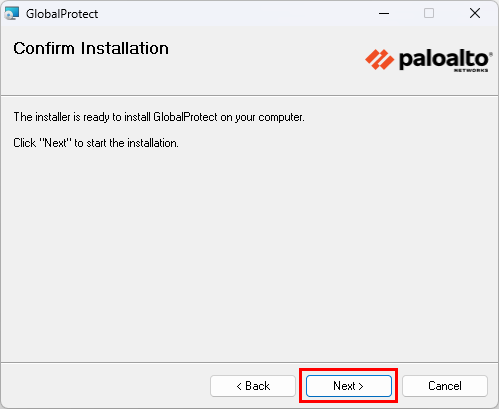
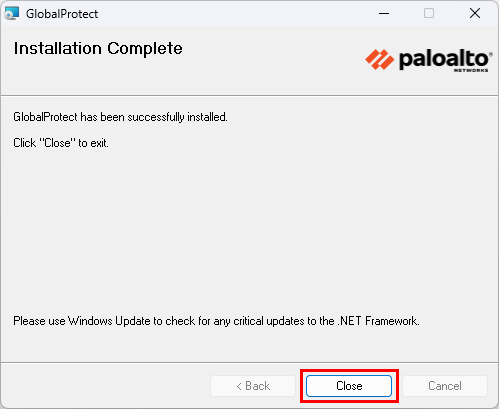
- In the Confirm Installation window, click Next and wait until Installation Complete appears, then click Close
Connecting with Guest Account
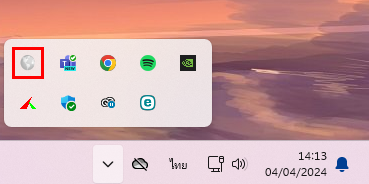
- Click the System tray and select the GlobalProtect icon
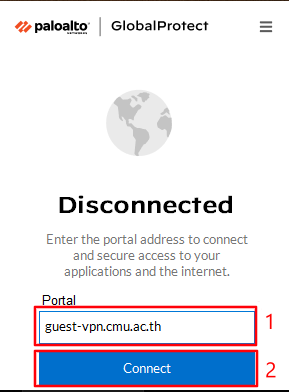
- . In the Welcome! window, click Get Started, enter guest-vpn.cmu.ac.th, then click Connect
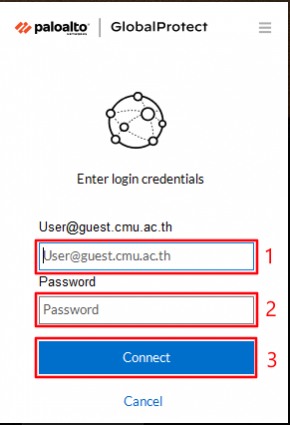
- Log in with your Username and Password, then click Connect
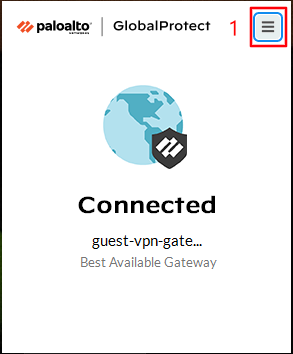
- To disconnect, click the System tray, select the GlobalProtect icon, click the top-right button, then select Disconnect
Using GlobalProtect on macOS
Installation
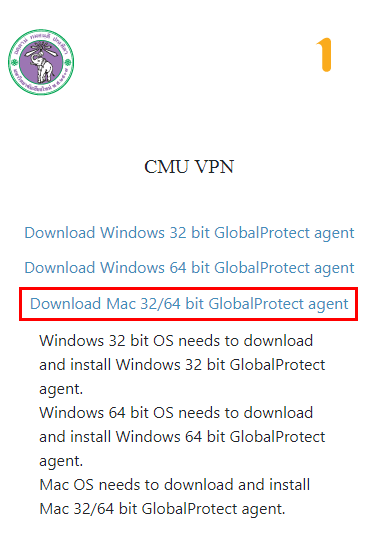
- Go to https://guest-vpn.cmu.ac.th/ and log in with your CMU Guest Account to download the installation file
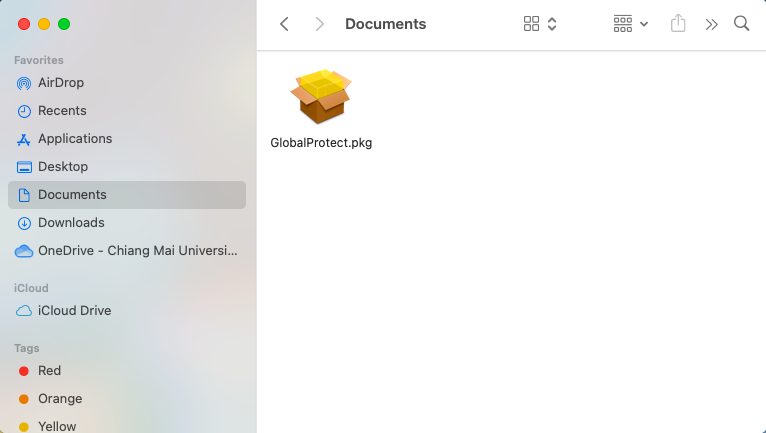
- Double-click GlobalProtect.pkg to start the installation
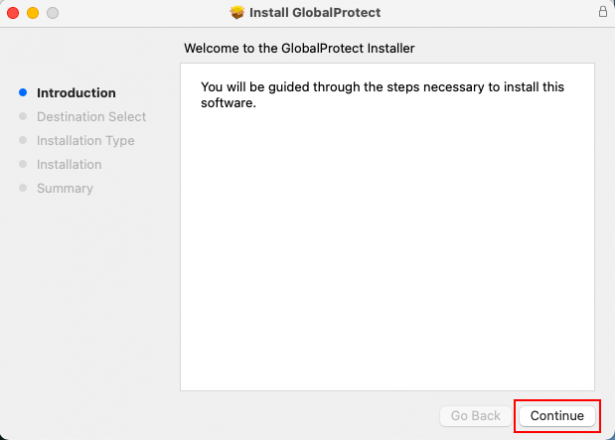
- Click Continue in the Introduction and Destination Select sections
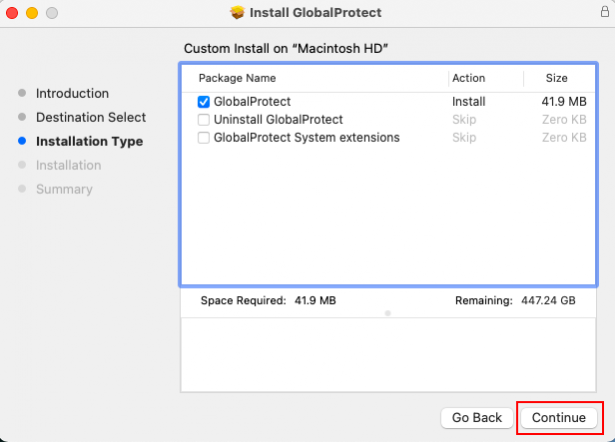
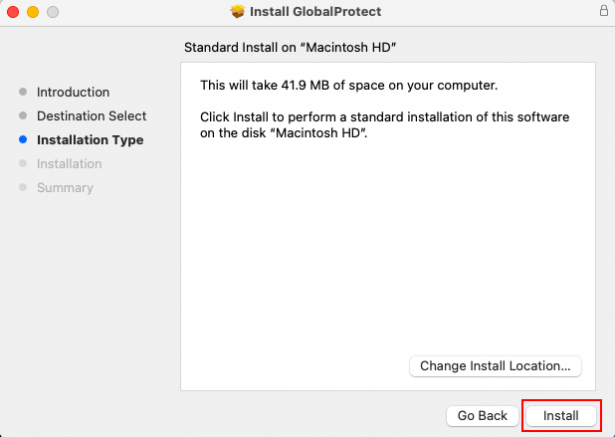
- In the Installation Type section, click Install
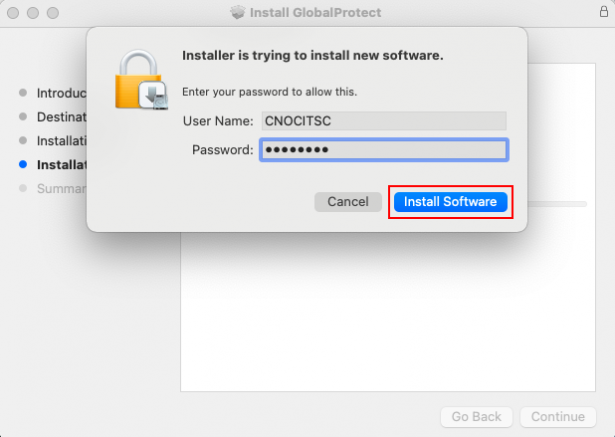
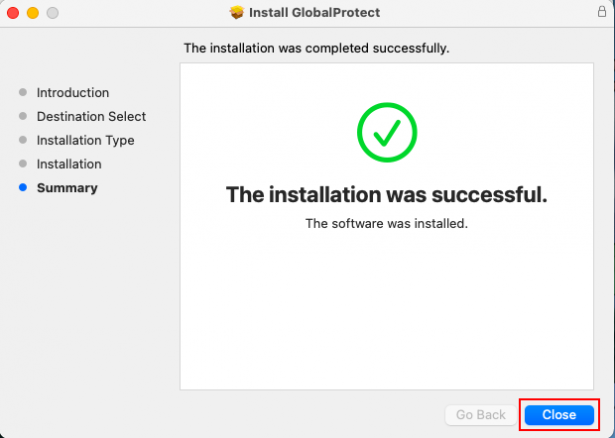
- Enter your device password and click Install Software. Wait until installation is complete, then click Close
Connecting with Guest Account
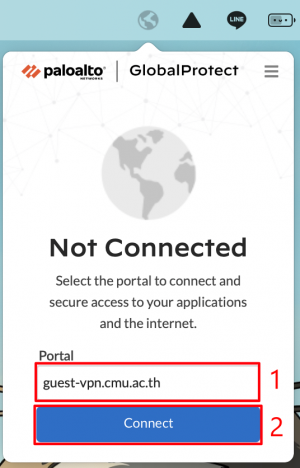
- In the Welcome! window, click Get Started, enter guest-vpn.cmu.ac.th, then click Connect
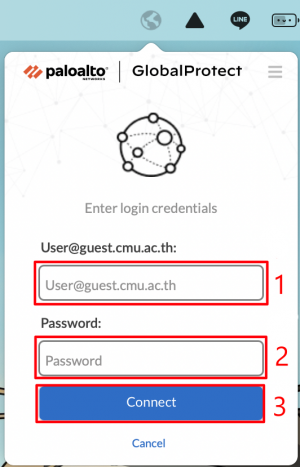
- Log in with your Username and Password, then click Connect
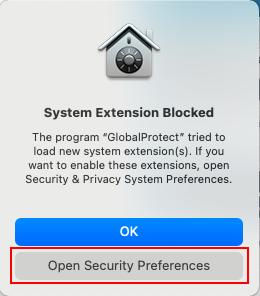
- In the System Extension Blocked window, click Open Security Preferences
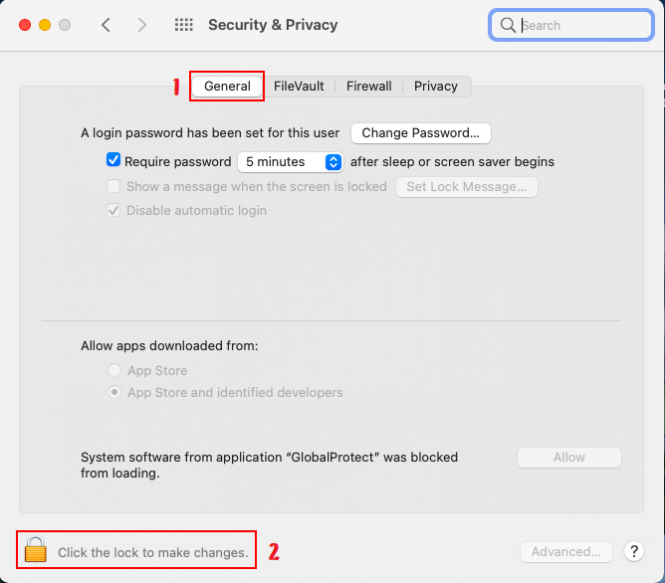
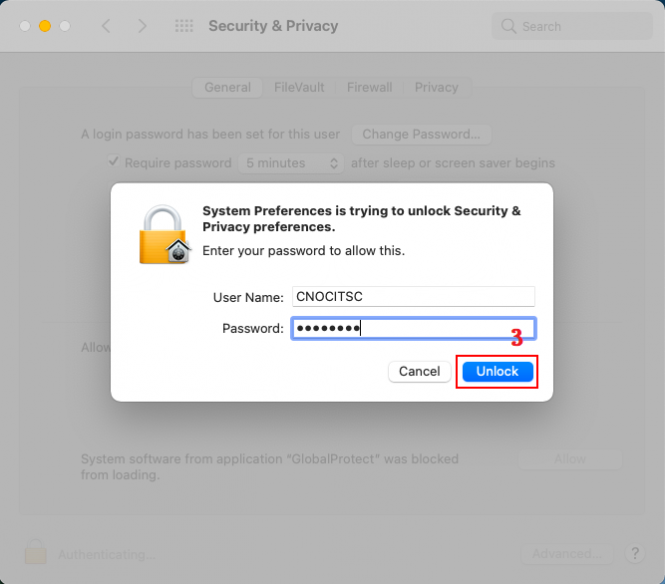
- In the General tab, click the lock icon at the bottom, enter your password, and click Unlock
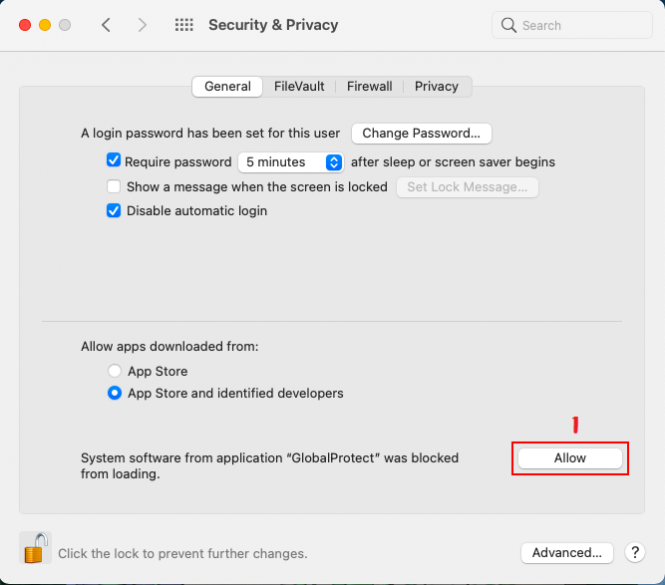
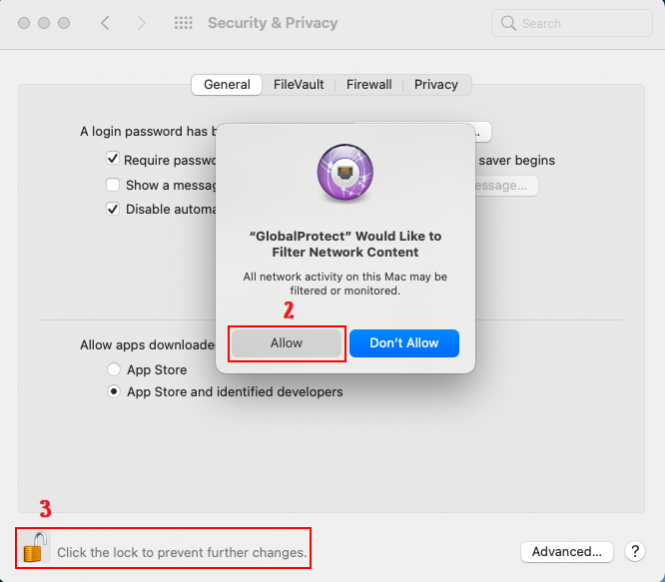
- Click Allow twice as shown, then click the lock icon again to lock it
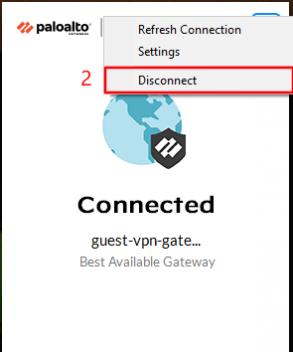
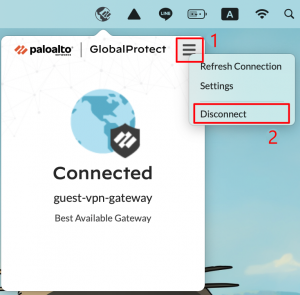
- To disconnect, click the GlobalProtect icon on the menu bar, click the top-right button, then select Disconnect
Using GlobalProtect on iOS
Installation
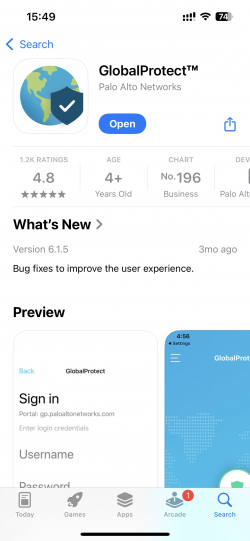
- Open the App Store, search for GlobalProtect, and install the app
Connecting with Guest Account
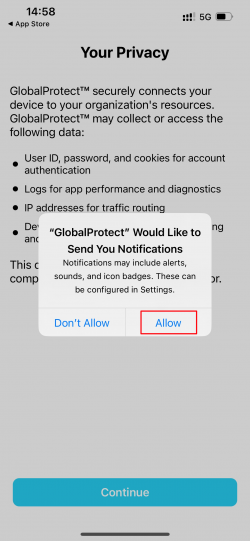
- Open the GlobalProtect app, tap Allow to enable notifications, then tap Continue
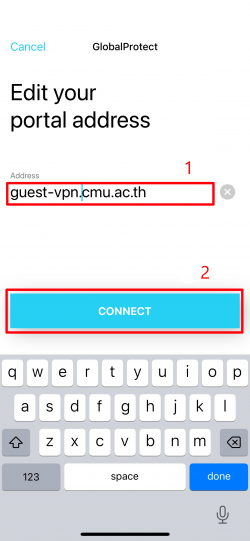
- Enter guest-vpn.cmu.ac.th, then tap Connect
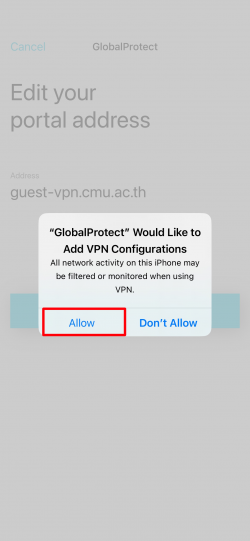
- Tap Allow
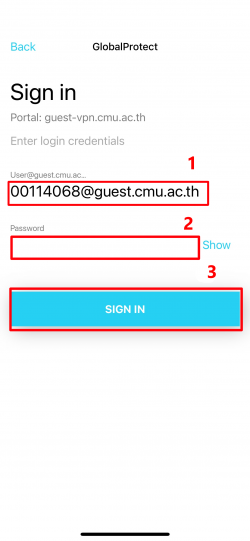
- Log in with your Username and Password, then tap Sign in
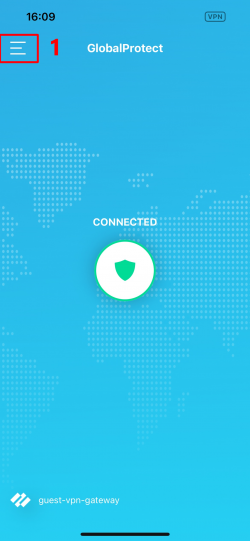
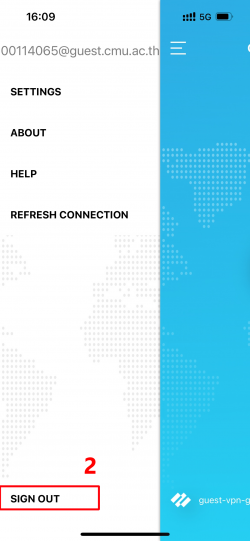
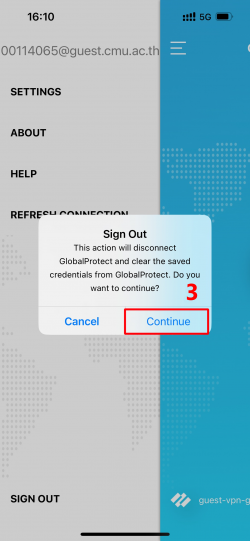
- To disconnect, tap the top-left button, select Sign out, then tap Continue
Using GlobalProtect on Android
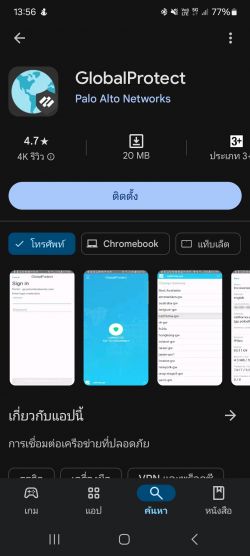
Installation
- Open the Play Store, search for GlobalProtect, and install the app
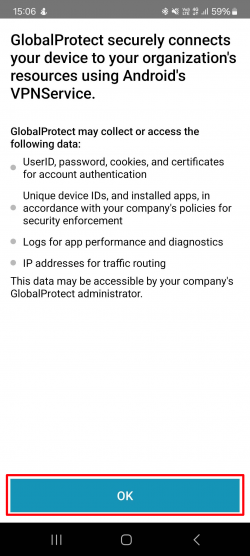
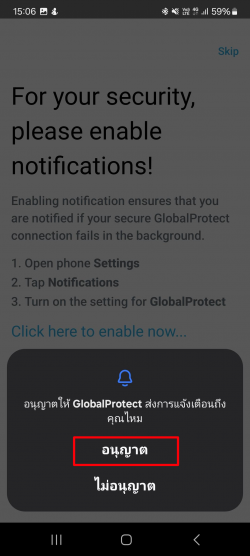
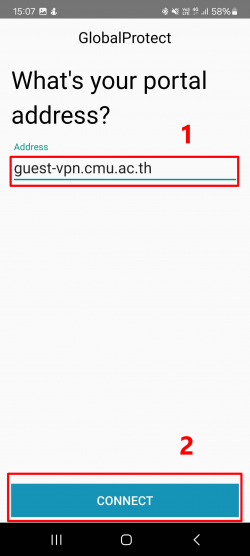
Connecting with Guest Account
- Open the GlobalProtect app, then tap OK
- Tap Allow to enable notifications
- Enter guest-vpn.cmu.ac.th, then tap Connect
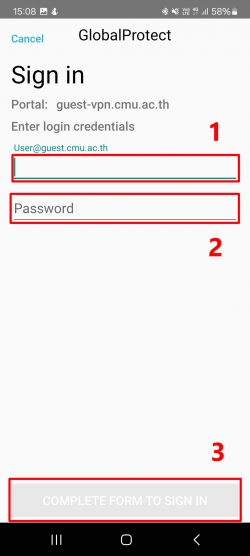
- Log in with your Username and Password, then tap Sign in
- To disconnect, tap the top-left button, then select Disconnect