Difference between revisions of "Antivirus (Endpoint Protection)"
Thomhathai (talk | contribs) |
Thomhathai (talk | contribs) |
||
| (19 intermediate revisions by the same user not shown) | |||
| Line 36: | Line 36: | ||
# ไปที่ https://antivirus.cmu.ac.th/ แล้ว Log in ด้วย CMU Account อ่านและทำความเข้าใจข้อตกลงการใช้งาน กดยอมรับข้อตกลง จากนั้น download file สำหรับ MacOS <br/><br/> [[File:EST MAC20.png|border|link=]] <br/><br/> | # ไปที่ https://antivirus.cmu.ac.th/ แล้ว Log in ด้วย CMU Account อ่านและทำความเข้าใจข้อตกลงการใช้งาน กดยอมรับข้อตกลง จากนั้น download file สำหรับ MacOS <br/><br/> [[File:EST MAC20.png|border|link=]] <br/><br/> | ||
# ไปที่ Downloads จากนั้น Double Click ที่ '''file epi_mac_live_installer.pkg''' และกด '''Allow''' <br/><br/> [[File:EST MAC01.png|550px|border|link=]] [[File:EST MAC02.png|550px|border|link=]] <br/><br/> | # ไปที่ Downloads จากนั้น Double Click ที่ '''file epi_mac_live_installer.pkg''' และกด '''Allow''' <br/><br/> [[File:EST MAC01.png|550px|border|link=]] [[File:EST MAC02.png|550px|border|link=]] <br/><br/> | ||
| − | # | + | # ในหัวข้อ Introduction กด '''Continue''' <br/><br/> [[File:EST MAC03.png|550px|border|link=]] <br/><br/> |
| − | + | # ในหัวข้อ Downloader กด '''Continue''' อีก 2 ครั้ง <br/><br/> [[File:EST MAC04.png|550px|border|link=]] [[File:EST MAC05.png|550px|border|link=]]<br/><br/> | |
| − | # | + | # ในหัวข้อ Installation Type กด '''Install''' <br/><br/> [[File:EST MAC06.png|550px|border|link=]] <br/><br/> |
| − | + | # ในหัวข้อ Installation ใส่รหัสผ่าน หรือลายนิ้วมื้อของเครื่อง และกด '''Allow''' <br/><br/> [[File:EST MAC07.png|550px|border|link=]] [[File:EST MAC08.png|550px|border|link=]]<br/><br/> | |
| − | # | + | # กด '''Allow''' ในหัวข้อ Summary รอจนกระทั่งติดตั้งโปรแกรมเสร็จ กด '''Close''' <br/><br/> [[File:EST MAC09.png|550px|border|link=]] [[File:EST MAC10.png|550px|border|link=]] <br/><br/> |
| − | + | # กด Move to Trash เพื่อลบไฟล์ติดตั้งที่ Download มา <br/><br/> [[File:EST MAC11.png|550px|border|link=]] <br/><br/> | |
| − | # | + | # หากพบแจ้งเตือน '''Your computer is not fully protected''' ดังรูป เลือก '''Open System Preferences''' <br/><br/> [[File:EST MAC16.png|550px|border|link=]] <br/><br/> |
| − | + | # หน้าต่างการตั้งค่าจะปรากฏขึ้นมา ให้ไปที่เมนู '''Privacy & Security'''จากนั้นไปที่ '''Full Disk Access''' และเปิดใช้งาน '''ESET Endpoint Security''' และ '''ESET Management Agent'''<br/><br/> [[File:EST MAC15png.png|700px|border|link=]] <br/><br/> | |
| − | + | # จากนั้นกลับไปที่ แจ้งเตือน Your computer is not fully protected และกด '''Start Again''' <br/><br/> [[File:EST MAC21.png|550px|border|link=]] <br/><br/> | |
| − | # | + | # ทำการ Restart เครื่อง 1 ครั้ง แล้วเปิดโปรแกรม ESET Endpoint Antivirus ตรวจสอบสถานะความพร้อมใช้งานของโปรแกรมที่ เมนู Protection Status ด้านซ้ายมือ <br/><br/> [[File:ESET-22.png|550px|border|link=]] <br/><br/> |
| − | |||
| − | |||
| − | |||
| − | |||
| − | |||
| − | |||
| − | |||
| − | |||
| − | |||
| − | |||
| − | # | ||
| − | # | ||
| − | |||
| − | # | ||
| − | |||
| − | # | ||
| − | # ทำการ Restart เครื่อง 1 ครั้ง แล้วเปิดโปรแกรม ESET Endpoint Antivirus | ||
| − | |||
| − | |||
=== เปิดใช้คำสั่งสแกน Thumb drive หรือ External Hard disk อัตโนมัติ === | === เปิดใช้คำสั่งสแกน Thumb drive หรือ External Hard disk อัตโนมัติ === | ||
# เปิดโปรแกรม ESET Endpoint Antivirus ไปที่ '''Set up''' คลิกเครื่องหมาย '''>''' ในหัวข้อ '''Computer''' <br/><br/> [[File:Mac Setting11.png|border|link=]] <br/><br/> | # เปิดโปรแกรม ESET Endpoint Antivirus ไปที่ '''Set up''' คลิกเครื่องหมาย '''>''' ในหัวข้อ '''Computer''' <br/><br/> [[File:Mac Setting11.png|border|link=]] <br/><br/> | ||
Latest revision as of 07:40, 14 August 2024
ข้อมูลเบื้องต้นของ ESET Endpoint Security
ESET Endpoint Security เทคโนโลยีความปลอดภัยหลายชั้น เพราะความปลอดภัยเพียงชั้นเดียวอาจไม่เพียงพอ จากภัยคุกคามในปัจจุบันที่มีวิวัฒนาการอย่างต่อเนื่อง ESET จึงรวบรวมผู้เชี่ยวชาญ เทคโนโลยี มาทำงานร่วมกับ ESET LiveSense เพื่อความปลอดภัยที่มากกว่าแอนตี้ไวรัส ผนวกรวมกับ Machine Learning ที่ ESET สร้างขึ้นมาเพื่อรับมือกับภัยคุกคามโดยเฉพาะ และ ESET เป็นหนึ่งในผู้ใช้เทคโนโลยีคลาวด์รายแรกๆ ใน ESET LiveGrid® ที่คอยอัปเดตฐานข้อมูลให้กับผู้ใช้ทั่วโลก ทุ่มเทวิจัยมัลแวร์และคิดค้นเทคโนโลยีใหม่ๆมานานกว่า 3 ทศวรรษและต่อจากนี้
ESET Endpoint Security พัฒนาเทคโนโลยี ESET LiveSense รวมระบบ Machine Learning ระบบ Cloud Reputation System และผู้เชี่ยวชาญเพื่อสร้างโซลูชันการรักษาความปลอดภัยแบบสมบูรณ์ มีการป้องกันสูงสุดกับการใช้ทรัพยากรของระบบน้อยที่สุด เทคโนโลยีปัญญาประดิษฐ์ขั้นสูงนี้สามารถกำจัดการแฝงตัวจากไวรัส สปายแวร์ ม้าโทรจัน เวิร์ม แอดแวร์ รูทคิท และการโจมตีทางอินเทอร์เน็ตอื่นๆ ในเชิงรุกโดยไม่ขัดขวางประสิทธิภาพการทำงานของระบบหรือรบกวนคอมพิวเตอร์
คำแนะนำก่อนและหลังการติดตั้งโปรแกรม
- ทำการ Uninstall โปรแกรม Antivirus ตัวเก่าที่มีก่อนติดตั้งตัวใหม่
- ในขณะทำการติดตั้งโปรแกรม ควรเชื่อมต่อกับระบบเครือข่ายภายในมหาวิทยาลัยเท่านั้น (CMU-NET หรือ Jumbo Net)
- หลังจากติดตั้งโปรแกรม ทำการ update โปรแกรมอย่างสม่ำเสมอ และเรียกใช้การสแกนคอมพิวเตอร์แบบเต็มรูปแบบอย่างน้อยหนึ่งครั้งต่อเดือน เนื่องจากมัลแวร์มีความหลากหลายและฐานข้อมูลไวรัสจะอัพเดทตัวเองทุกวัน
- อย่าเข้าชมเว็บไซต์ที่น่าสงสัยที่มีโฆษณาป็อปอัพและแบบแฟลชจำนวนมาก
- ระมัดระวังเมื่อติดตั้งโปรแกรมฟรีแวร์ ชุดเข้ารหัส/ถอดรหัส เป็นต้น โปรดใช้โปรแกรมที่ปลอดภัยและเข้าสู่เว็บไซต์ทางอินเทอร์เน็ตที่ปลอดภัยเท่านั้น
- ระมัดระวังเมื่อเปิดสิ่งที่แนบมาของอีเมล โดยเฉพาะอย่างยิ่งข้อความที่ส่งให้ผู้รับจำนวนมากและข้อความจากผู้ส่งที่ไม่รู้จัก
การติดตั้ง ESET Endpoint Antivirus สำหรับระบบปฏิบัติการ Windows
- ไปที่ https://antivirus.cmu.ac.th/ แล้ว Log in ด้วย CMU Account อ่านและทำความใจข้อตกลงการใช้งาน กดยอมรับข้อตกลง จากนั้นเลือก download file ติดตั้งของระบบปฏิบัติการ Windows
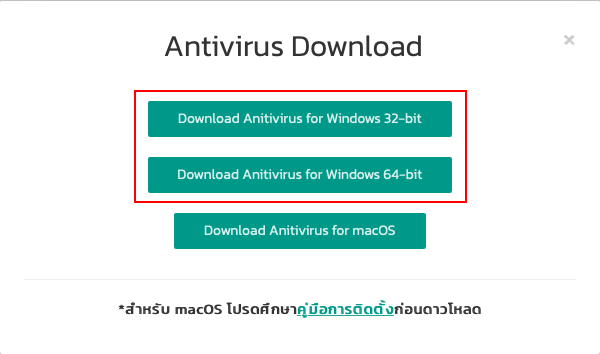
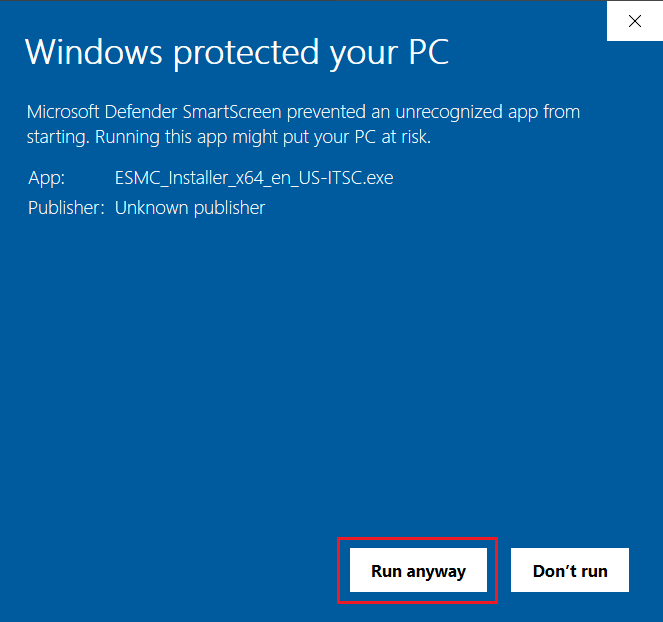
- คลิกขวาที่ file ที่ download เรียบร้อยแล้ว เลือก Run as administrator

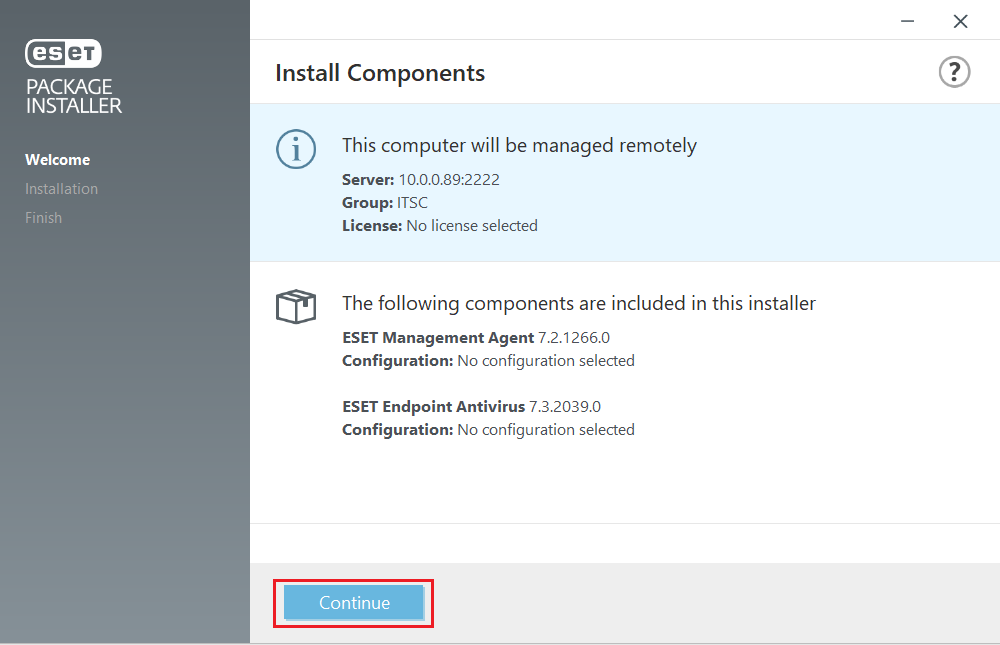
- จากนั้นคลิก Continue
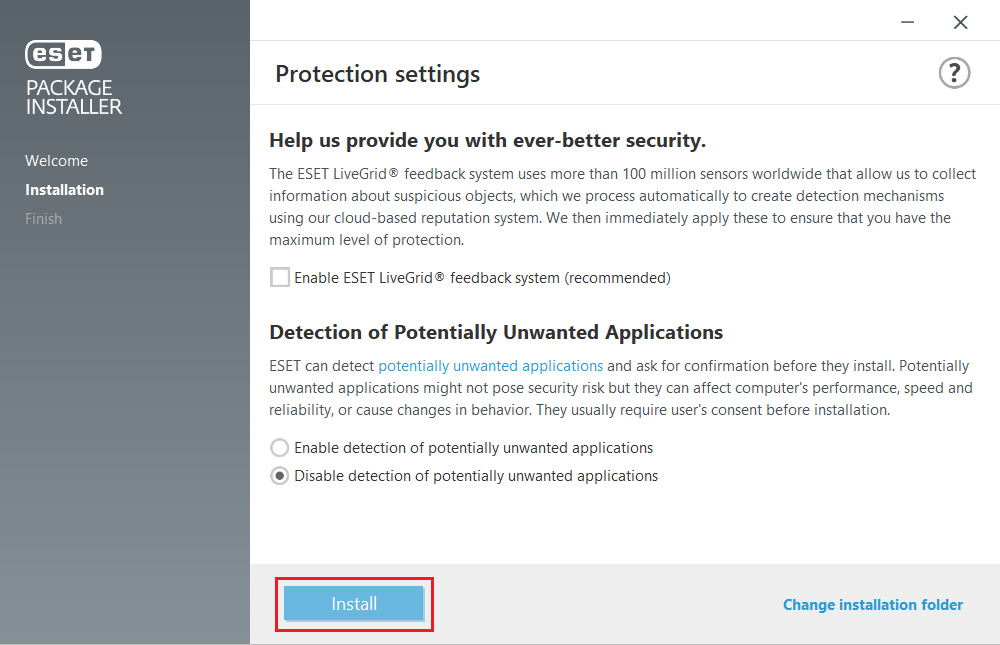
- คลิก Allow all and continue
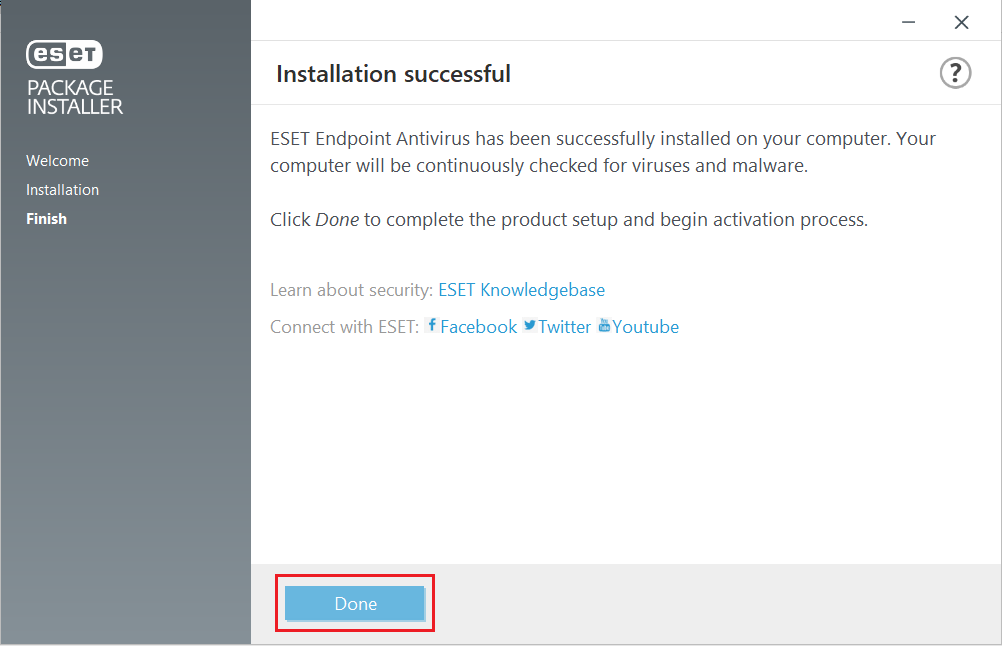
- รอข้อความขึ้นว่า Installation successful คลิก Done
- เปิดโปรแกรม ESET Endpoint Antivirus ใน Tab Mornitoring หากพบข้อความ Security alert รอประมาณ 15 นาทีให้โปรแกรมติดต่อกับ Server เพื่อ Activate license
- ทำการ Restart เครื่อง 1 ครั้ง เพื่อให้ระบบทำงานสมบูรณ์
เปิดใช้คำสั่งสแกน Thumb drive หรือ External Hard disk อัตโนมัติ
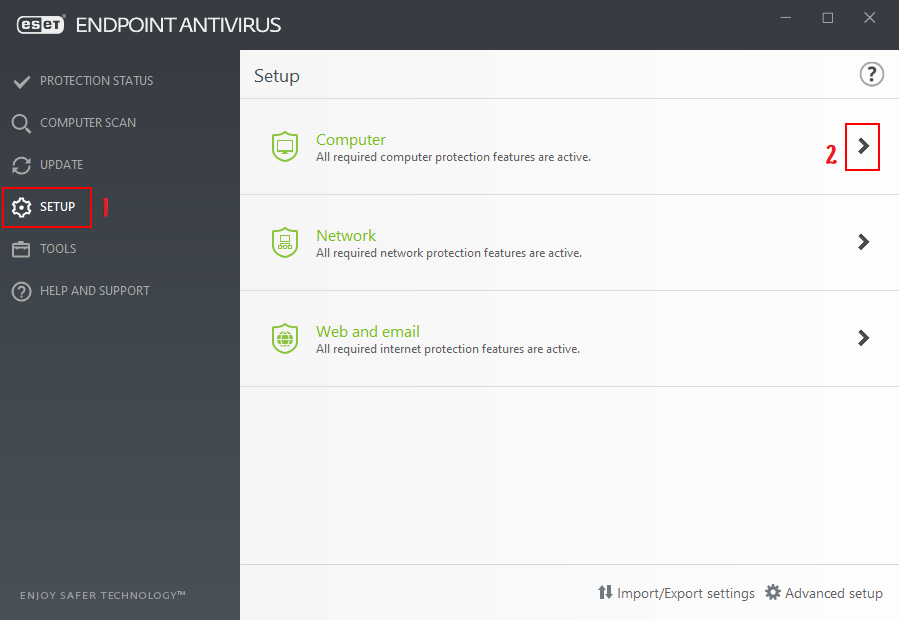
- เปิดโปรแกรม ESET Endpoint Antivirus ไปที่ Tab Set up ในหัวข้อ Computer คลิกสัญลักษณ์ > ท้ายข้อความ
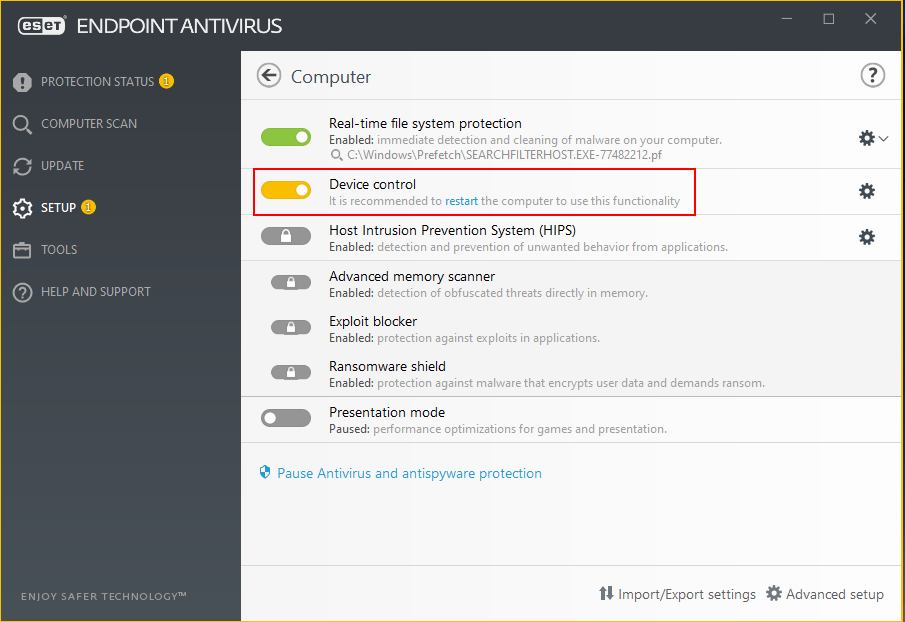
- เปิดใช้งานเมนู Device Control
- ทำการ Restart เครื่อง 1 ครั้ง เพื่อให้ระบบทำงานสมบูรณ์
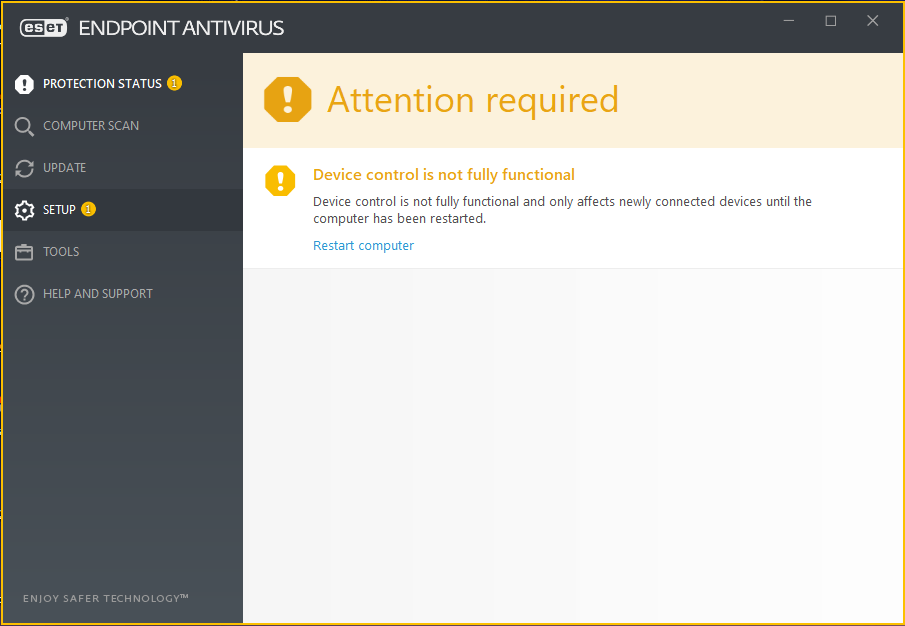
วิธียกเว้นการ Scan หรือ action file ใน Folder ที่กำหนด
- เปิดโปรแกรม ESET Endpoint Antivirus ไปที่ Tab Set up ในหัวข้อ Computer คลิกสัญลักษณ์ > ท้ายข้อความ

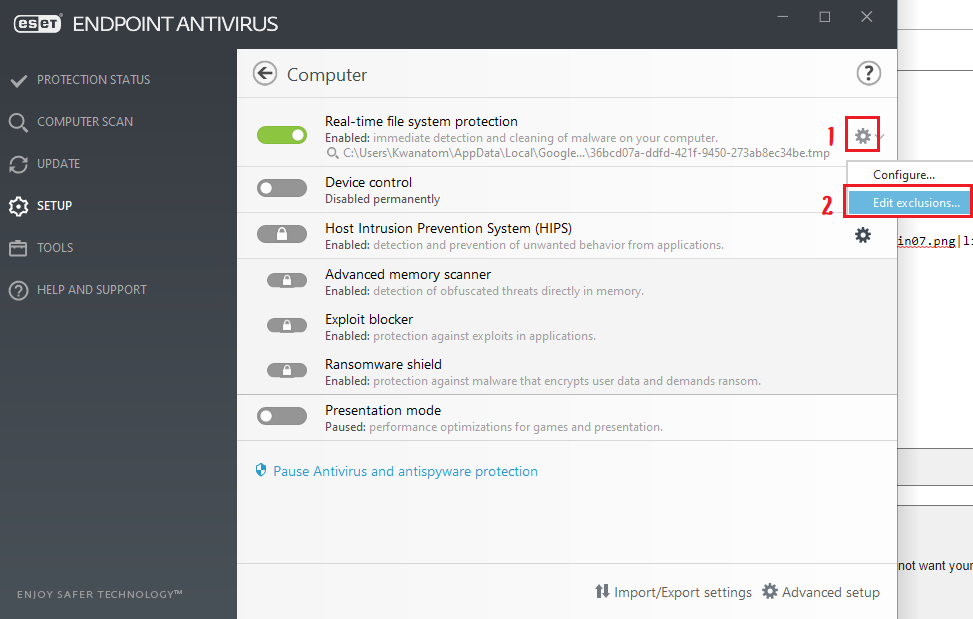
- ที่เมนู Real-time file system protection ให้คลิกที่รูปเฟืองด้านท้าย เลือก Edit Exclusion
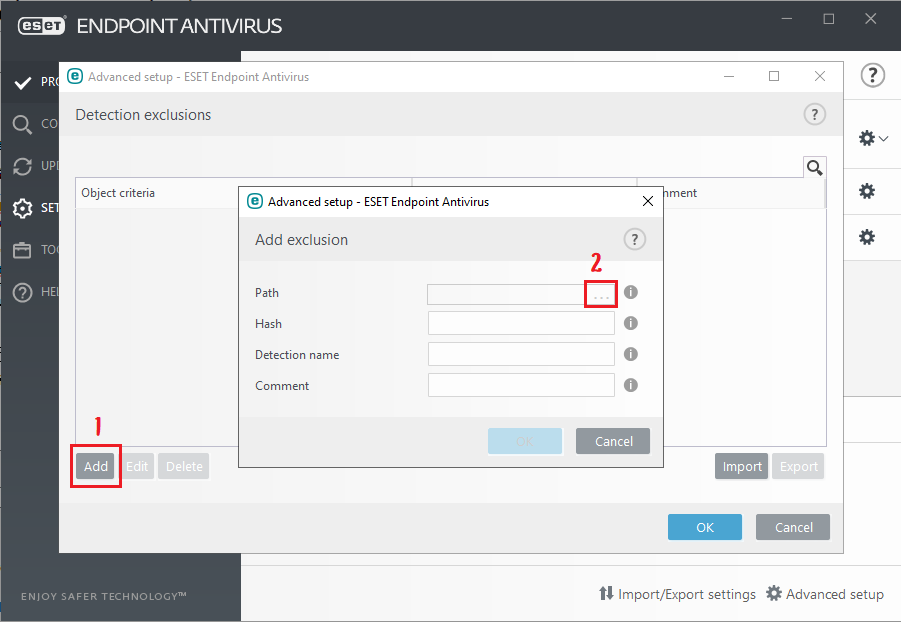
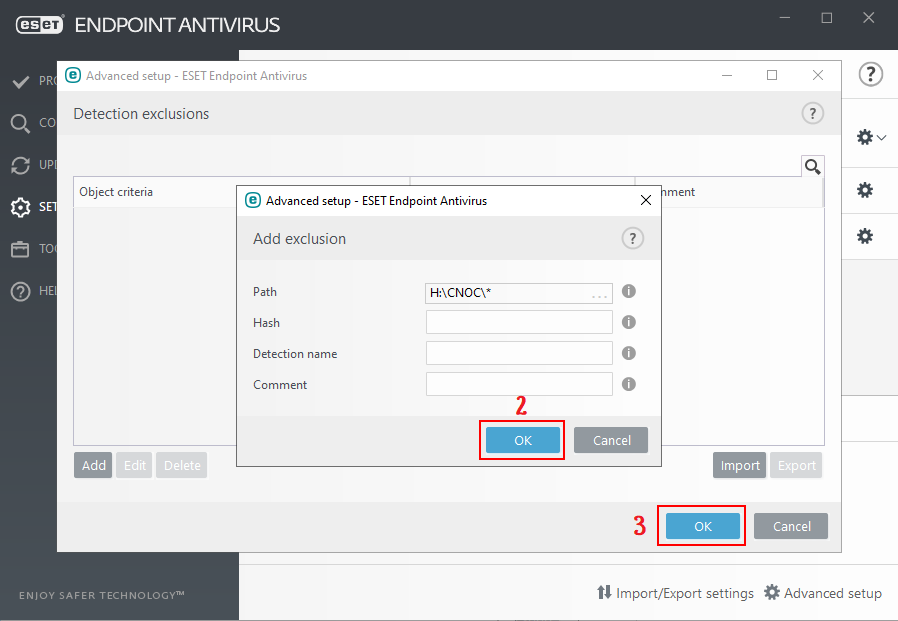
- กด Add จะพบหน้าต่าง Add Exclusion ที่ท้ายหัวข้อ Path คลิกที่สัญลักษณ์ ...
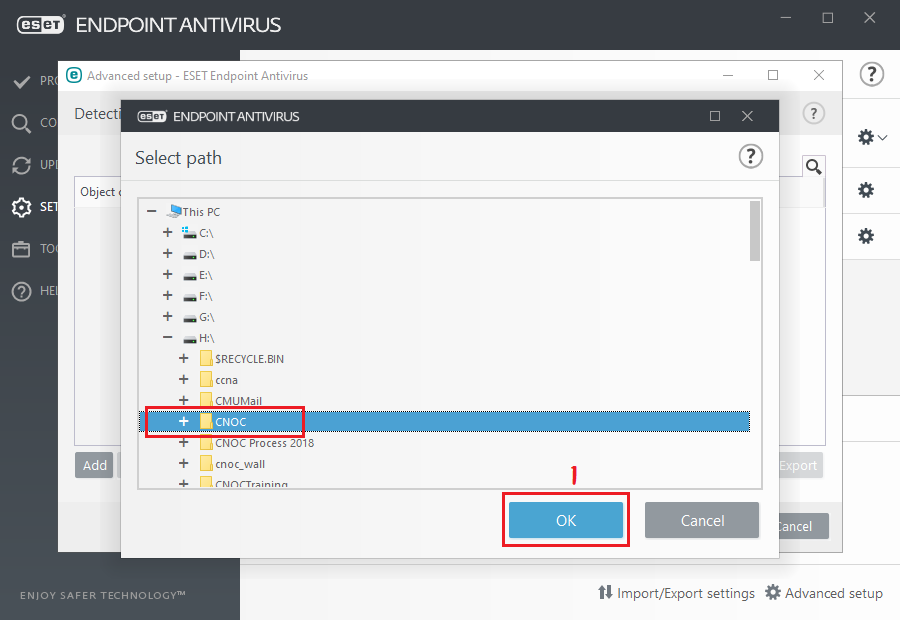
- เลิอก Drive และ Folder ที่ต้องการให้ยกเว้นการ scan จากนั้นกด OK ตามรูป
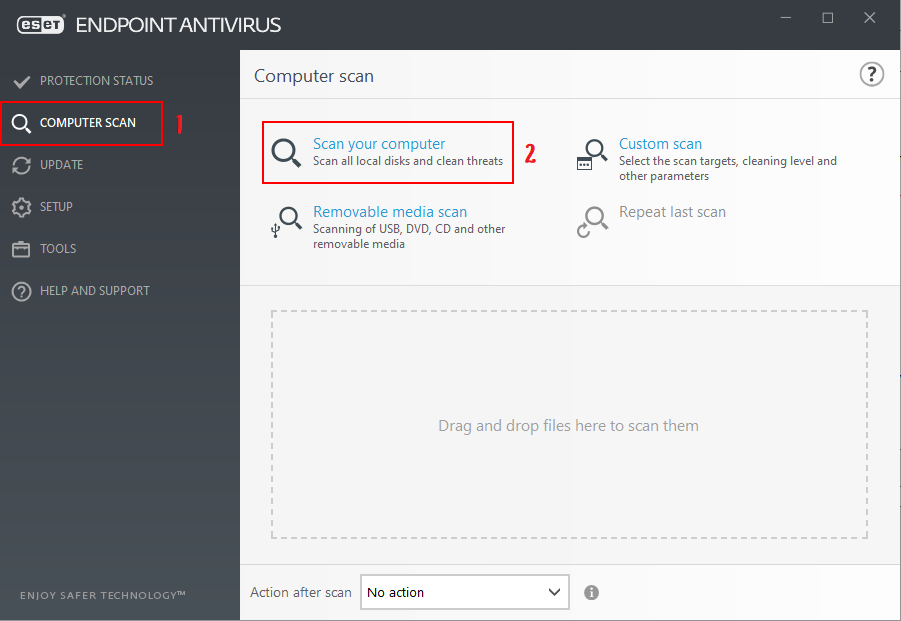
- เลือก Tab Computer scan และเลือกคำสั่ง Scan your computer
การติดตั้ง ESET Endpoint Antivirus สำหรับระบบปฏิบัติการ macOS
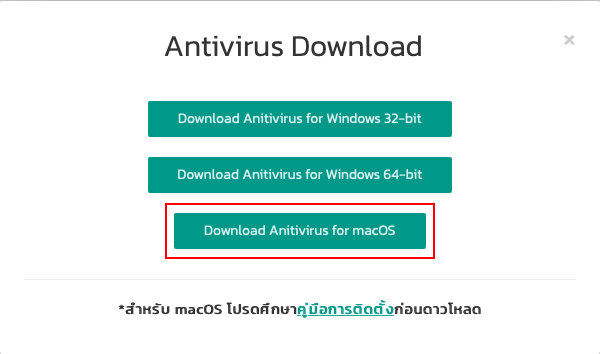
- ไปที่ https://antivirus.cmu.ac.th/ แล้ว Log in ด้วย CMU Account อ่านและทำความเข้าใจข้อตกลงการใช้งาน กดยอมรับข้อตกลง จากนั้น download file สำหรับ MacOS
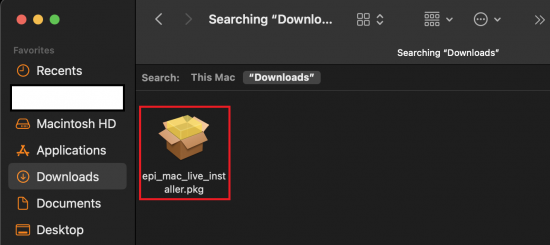
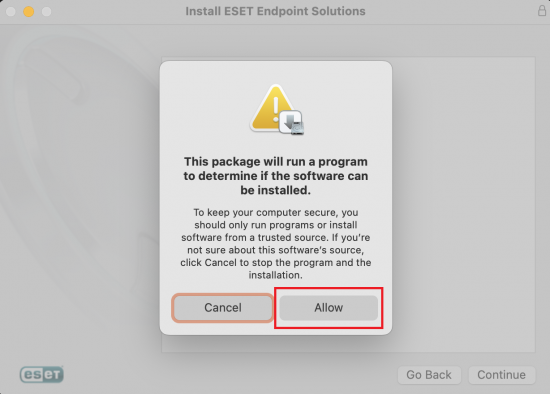
- ไปที่ Downloads จากนั้น Double Click ที่ file epi_mac_live_installer.pkg และกด Allow
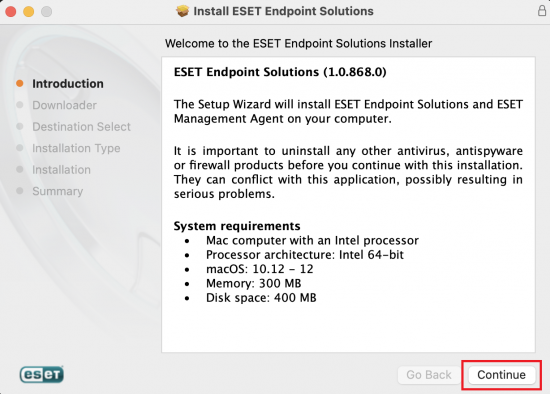
- ในหัวข้อ Introduction กด Continue
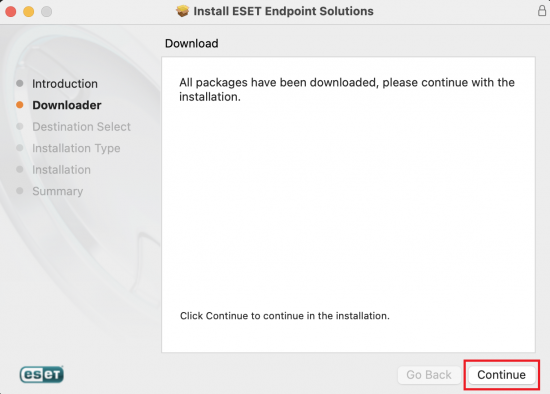
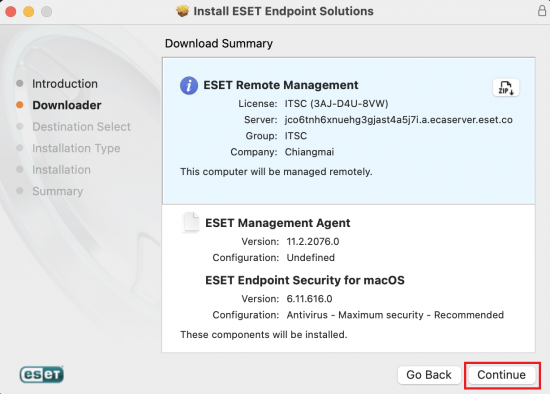
- ในหัวข้อ Downloader กด Continue อีก 2 ครั้ง
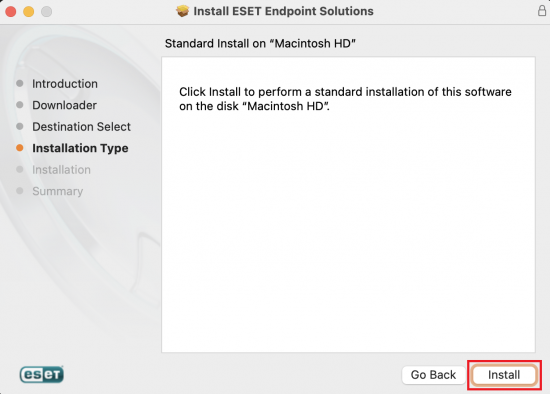
- ในหัวข้อ Installation Type กด Install
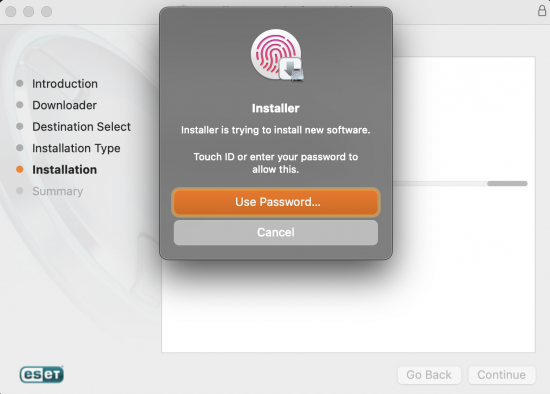
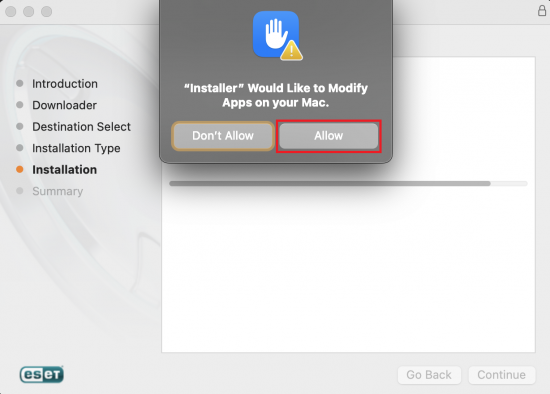
- ในหัวข้อ Installation ใส่รหัสผ่าน หรือลายนิ้วมื้อของเครื่อง และกด Allow
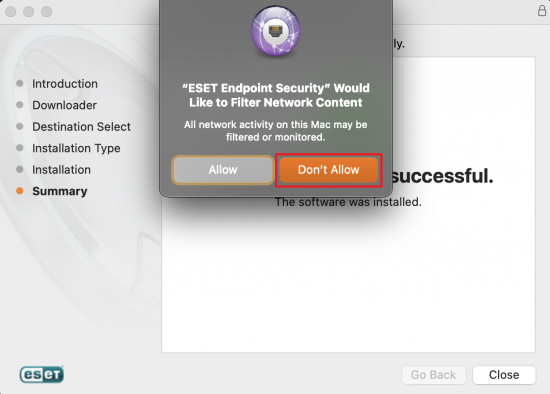
- กด Allow ในหัวข้อ Summary รอจนกระทั่งติดตั้งโปรแกรมเสร็จ กด Close
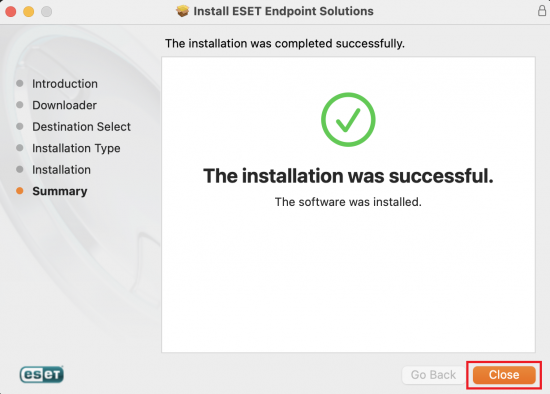
- กด Move to Trash เพื่อลบไฟล์ติดตั้งที่ Download มา
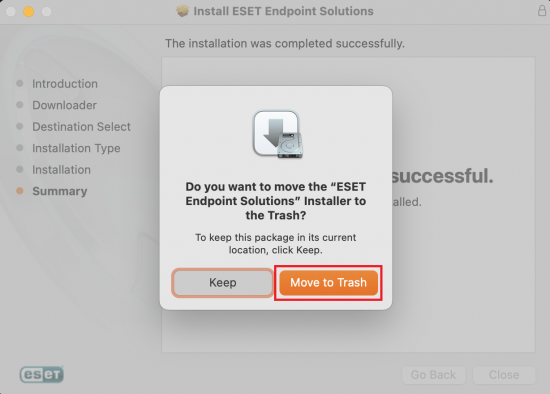
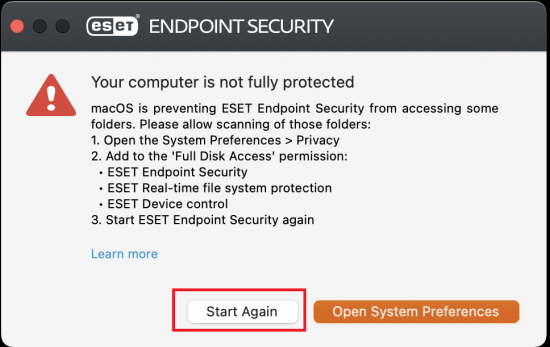
- หากพบแจ้งเตือน Your computer is not fully protected ดังรูป เลือก Open System Preferences
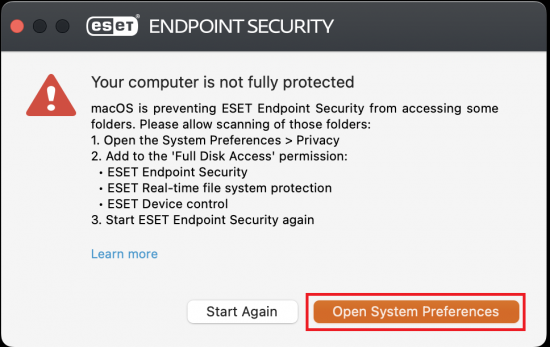
- หน้าต่างการตั้งค่าจะปรากฏขึ้นมา ให้ไปที่เมนู Privacy & Securityจากนั้นไปที่ Full Disk Access และเปิดใช้งาน ESET Endpoint Security และ ESET Management Agent
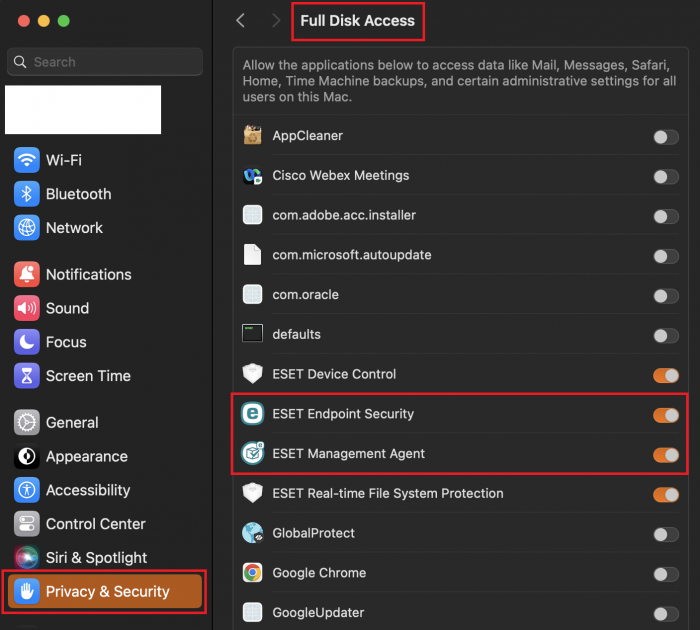
- จากนั้นกลับไปที่ แจ้งเตือน Your computer is not fully protected และกด Start Again
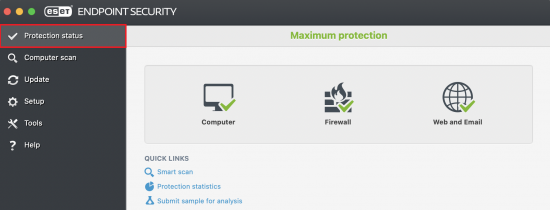
- ทำการ Restart เครื่อง 1 ครั้ง แล้วเปิดโปรแกรม ESET Endpoint Antivirus ตรวจสอบสถานะความพร้อมใช้งานของโปรแกรมที่ เมนู Protection Status ด้านซ้ายมือ
เปิดใช้คำสั่งสแกน Thumb drive หรือ External Hard disk อัตโนมัติ
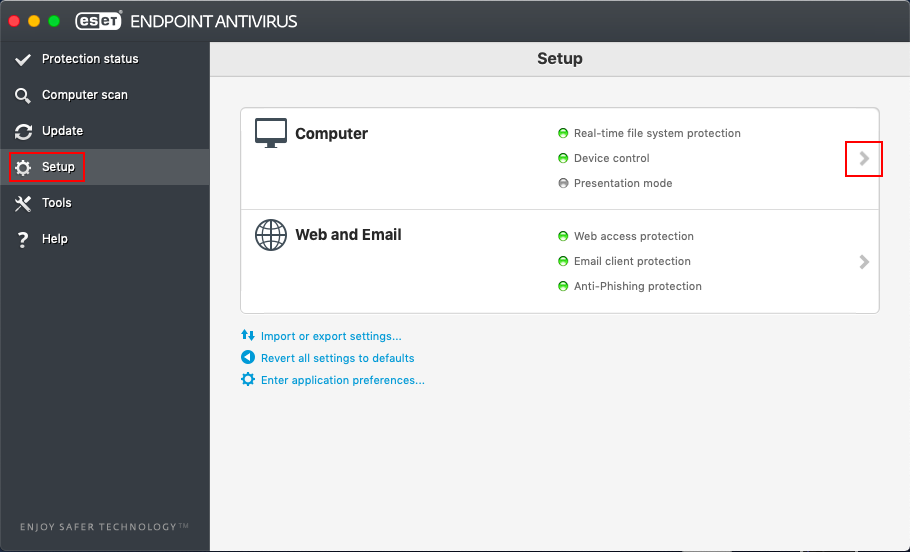
- เปิดโปรแกรม ESET Endpoint Antivirus ไปที่ Set up คลิกเครื่องหมาย > ในหัวข้อ Computer
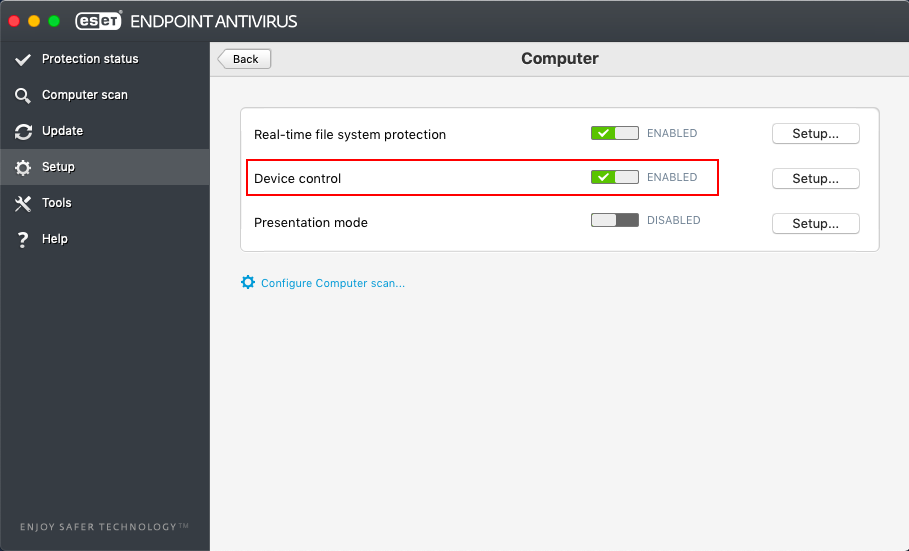
- เปิดใช้งาน Device control
วิธียกเว้นการ Scan หรือ action file ใน Folder ที่กำหนด
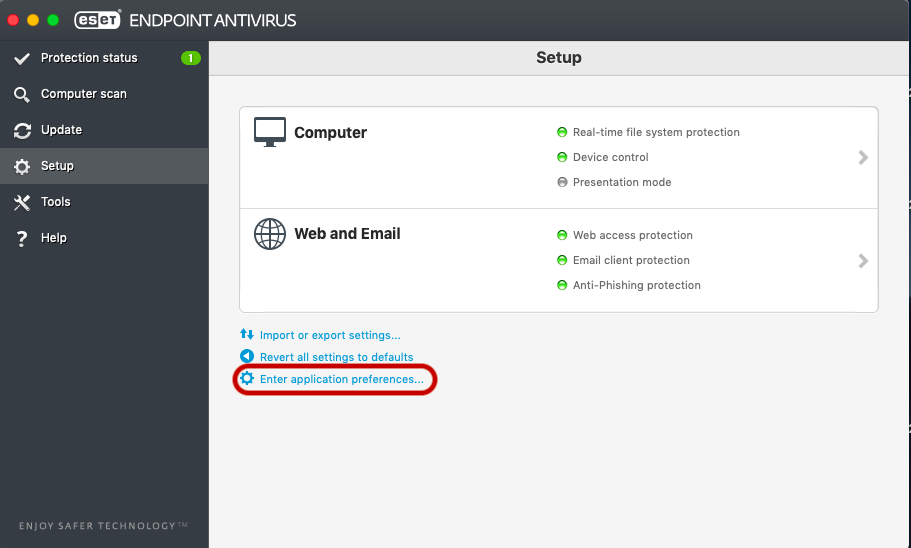
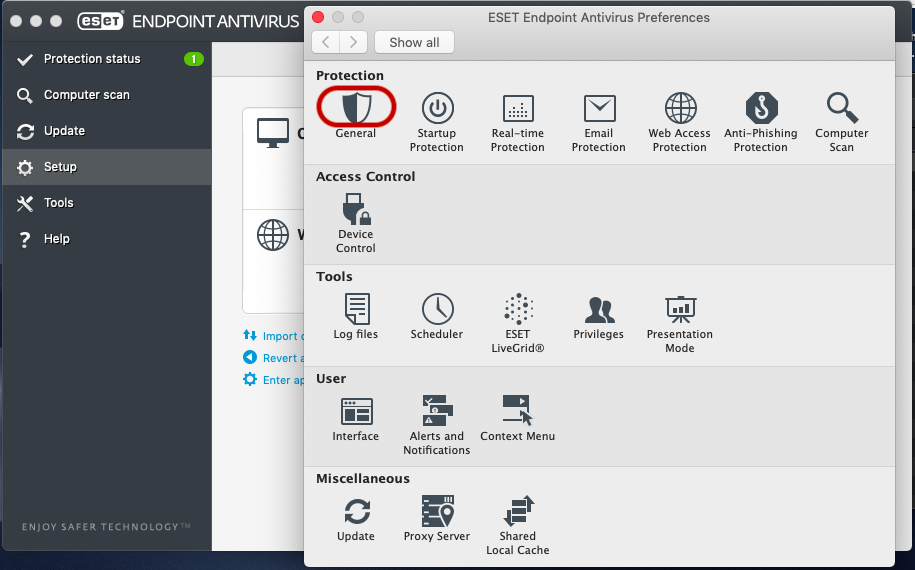
- เปิดโปรแกรม ESET Endpoint Antivirus ไปที่ Setup เลือกเมนู Enter application preference และ General
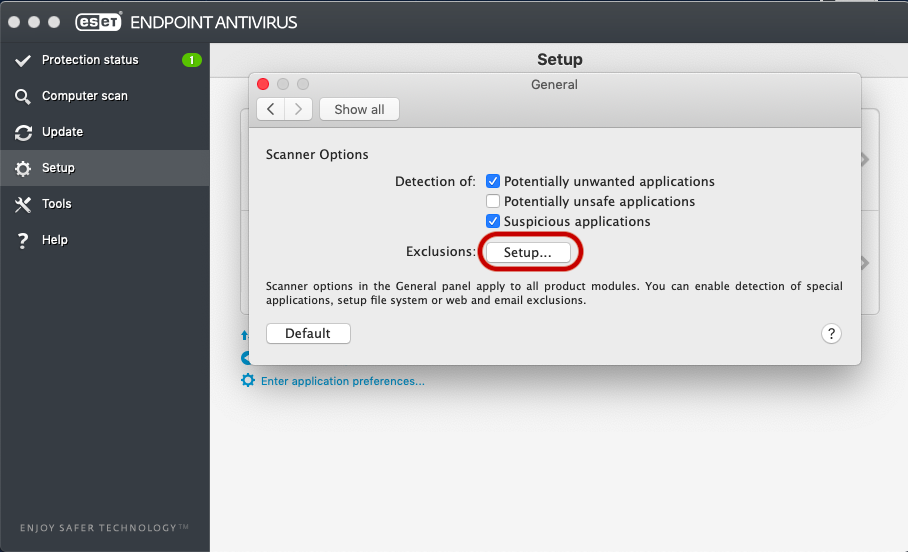
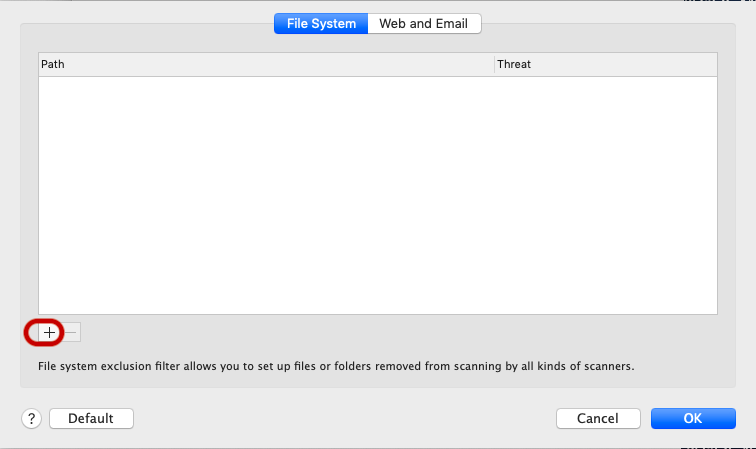
- เลือก Setup และกดเครื่องหมาย +(บวก) ดังรูป
- กดลูกศรที่ Macintosh HD เพื่อเข้าไปเลือก Folder ที่ต้องการยกเว้นการสแกน เลือกแล้วกด OK (ตามตัวอย่างเลือก path: /Users/itsc/Documents/Doc-CMU)
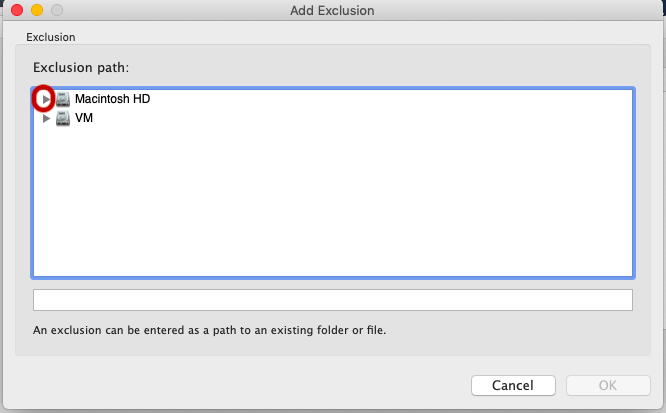
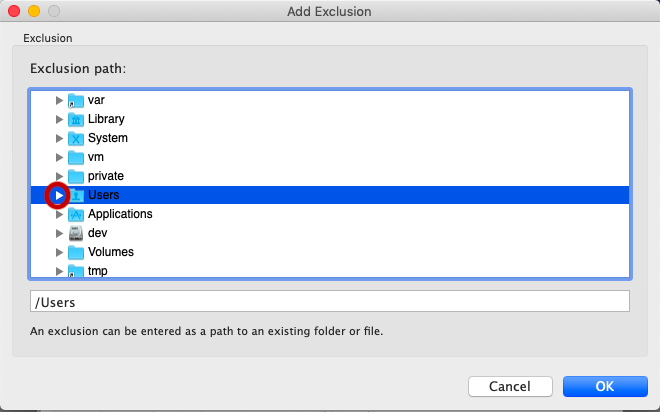
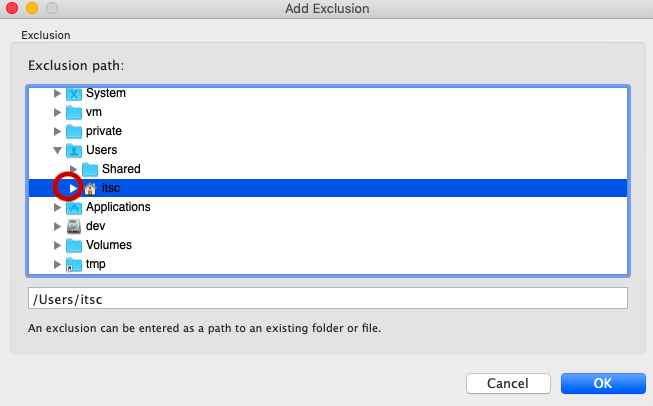
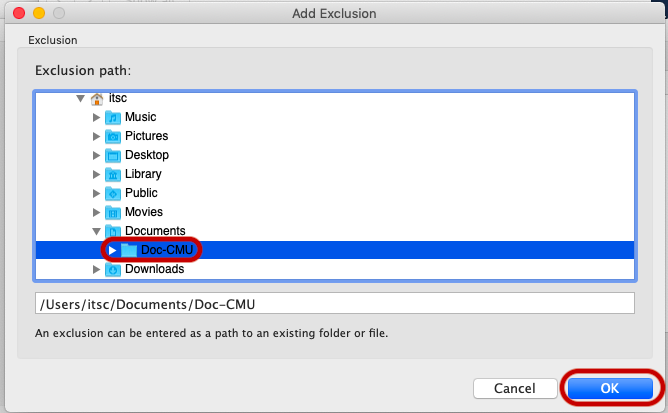
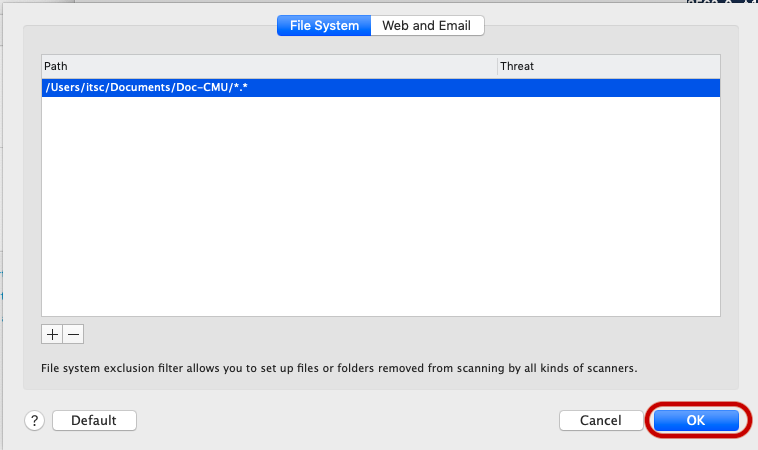
- ที่เมนู file System จะแสดง path ตรวจสอบอีกครั้งว่าถูกต้องหรือไม่จากนั้นกด OK เสร็จการคั้งค่าทั้งหมด
